
Apr 6, 2021

Try presenting in Teams meetings from PowerPoint
- Add our blog to your RSS feed reader" href="/rss/blog.xml" data-bi-name="RSS Subscription" data-bi-id="rss_feed" data-bi-bhvr="120" data-bi-socchn="RSSSubscription" title="Microsoft 365 Insider Blog RSS" target="blank" class="d-inline-block">
Hello Office Insiders, I’m Lishan Yu, a program manager on the PowerPoint team. You might have heard that we announced the PowerPoint Live in Teams feature at Microsoft Ignite last month. Today, I’m excited to show you how to check out this new experience, and start presenting in Teams meetings from PowerPoint.
Presenting in Teams meetings
Presenting in a meeting used to be as simple as clicking Slide Show in your PowerPoint deck. Nowadays, even though you may not be in the same room as your audience, we believe your flow to present should be as easy and intuitive – clicking the Present in Teams button in PowerPoint is the only step you need to take to present the deck in your Teams meeting!
How it works
Give the feature a try next time you need to present in a Teams meetings:
- Join a Teams meeting or an ad-hoc Teams call.
- Open your presentation in PowerPoint for Windows.
- Click the Present in Teams button in the top right corner.

Scenarios to try
Ready to take the PowerPoint Live feature for a spin? Try some of the scenarios below.
As a presenter :
- After clicking the Present in Teams button in PowerPoint, notice that you can see both the chat and your content at the same time in Teams (and don’t feel like you’re missing out on the discussion).
- Take advantage of features like grid review and slide notes to present more effectively.
As an audience member :
- If you joined late, move back through the deck and quickly catch up without having to ask the presenter to stop and recap what was already shared.
- Interact with and experience the richness of the content being presented such as better video quality, live web links, and more.
- Make any adjustments you need to more fully enjoy the presentation (i.e., use high-contrast mode).
Requirements
In order to try out the feature, you will need to:
- Have the latest Teams desktop app installed.
- Store the presentation on OneDrive for Business or SharePoint.
- Join a Teams meeting before clicking the Present in Teams button in PowerPoint for Windows.
- Be using an Office 365 E3/A3, Office 365 E5/A5, or Microsoft 365 for Government license.
Availability
This feature is rolling out over the next several days to Insiders running Beta Channel Version 2104 (Build 13926.20000) and later.
We’d love your feedback, so please let us know how you think. To get in touch, do either of the following:
- Inside the app, select the Help button in the top-right corner of the app.
- Respond to this post or tweet at @OfficeInsider .
Learn what other information you should include in your feedback to ensure it’s actionable and reaches the right people. We’re excited to hear from you!
Sign up for the Office Insider newsletter and get the latest information about Insider features in your inbox once a month!
Sorry, JavaScript must be enabled to use this app.
Vesa Nopanen – My Metaverse Day
Mr. Metaverse welcomes you to my Metaverse day to explore the Future Work.
The Ultimate How To Guide for Presenting Content in Microsoft Teams

Sharing / presenting content in Teams meeting is at the same time simple but is also has some options available that may not be known enough by everyone. This guide lets you get started and dive deeper what happens when you share your window, document or desktop in Microsoft Teams.
This article will be updated when there are new features or based on feedback.
Updated 22.3.2021 Presenter View section.
Community: I am happy to add Mac and iOS screenshots into the article as well if someone is willing to collaborate & provide them. 😎💪
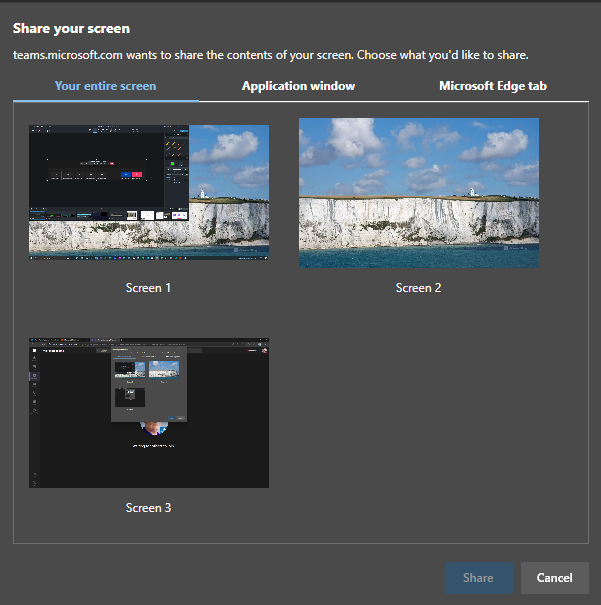
Teams Desktop: sharing a screen (Windows)
Opening the sharing with Microsoft Teams Desktop (in the New Meeting experience mode).
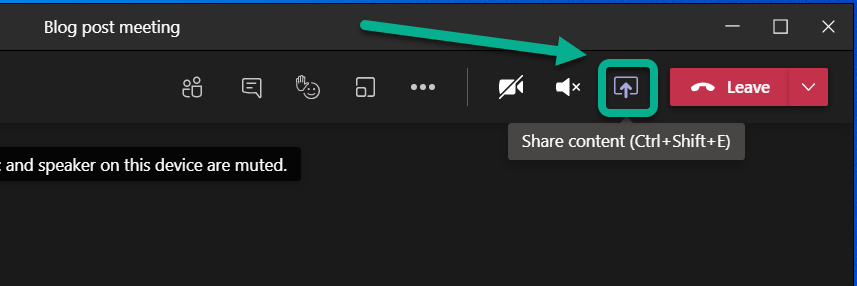
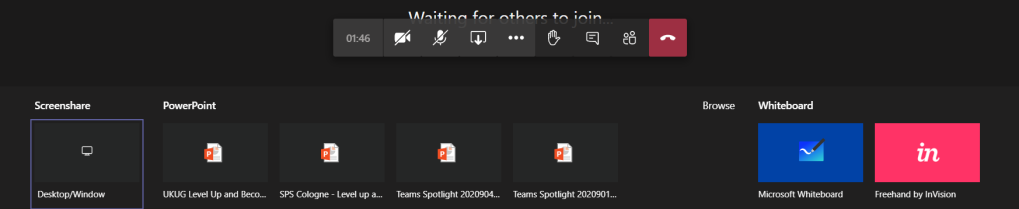
This opens the Share Tray. From it you can choose to start sharing
- Your Desktop (Screen share)
- Specific application (Window)
- Whiteboard application: either Microsoft Whiteboard (natively with Microsoft 365) or available 3rd party Whiteboards
- PowerPoint document
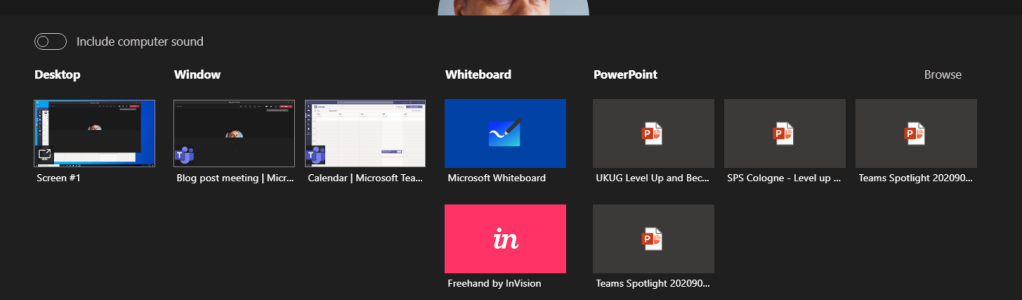
TIP: When you choose to share something using Teams Desktop you can choose to include your computer sounds to meeting. This is a must-have option if you are playing music or video to your participants. You can not toggle this on later – you need to choose this when you start sharing.
When you choose to include computer sound included with the sharing you need to have configured the speaker for computer and Teams meeting to be the same one.
If you have multiple monitors available for your Microsoft Teams you can choose any of those displays.
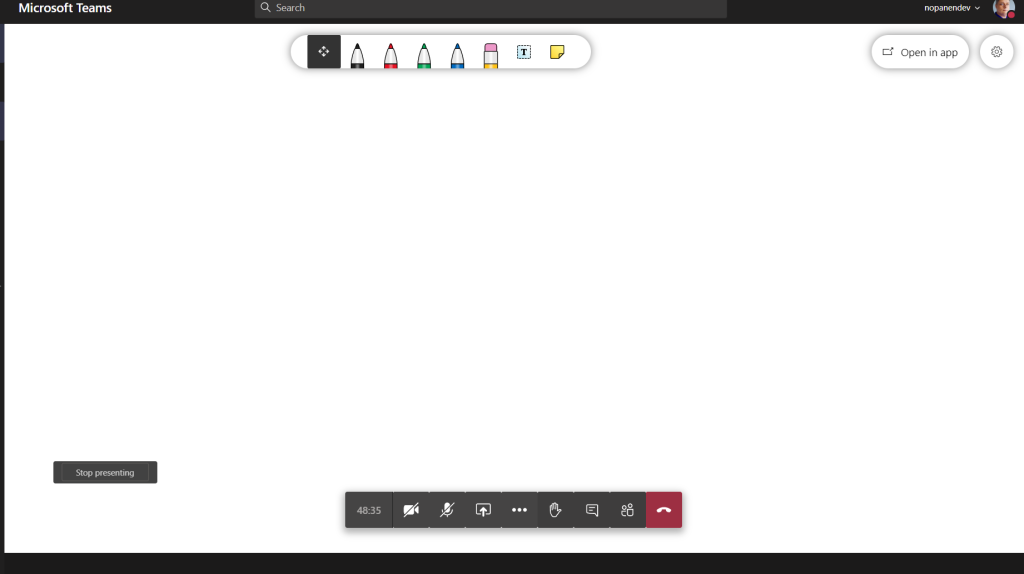
And you have the sharing open. Shared area is marked with red rectangle around it. You will find the more smaller Teams meeting control window in one of your desktops – and if you have the camera on it will show the video.
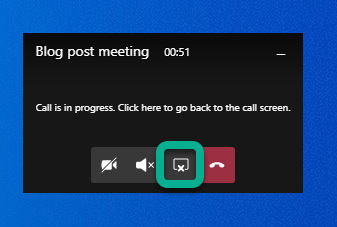
But more importantly you can use that small window to control camera, audio or sharing (ending it with one press). Or you can click on the small window (not on meeting toolbar) and it will expand back to the full size.

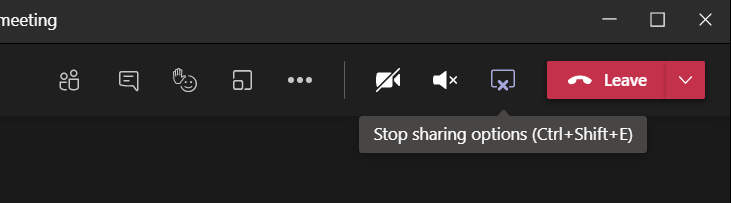
You can use that same icon to stop sharing in the expanded window.
Tip: If you have two screens available you should consider presenting your PowerPoint presentation so that you share the external screen and project your presentation there (PowerPoint – Slide Show – Monitor). Share that external screen to Teams meeting so you can be sure that whatever you show in that screen it is shown to attendees. Just check that your second screen is not a ultra-wide display or 8k (or preferably even 4k) because the content is going to be tough to read and view by attendees. FullHD screen works the best here.
Tip2: when you are presenting PowerPoint in external screen (and sharing that to Teams meeting) do they advantage of inking and pen if you are using a device with touch screen (like Surface)!
Tip3: if you have an embedded video in your PowerPoint and you use screen/display sharing to present it to the audience: Don’t forget include computer sound with your share!
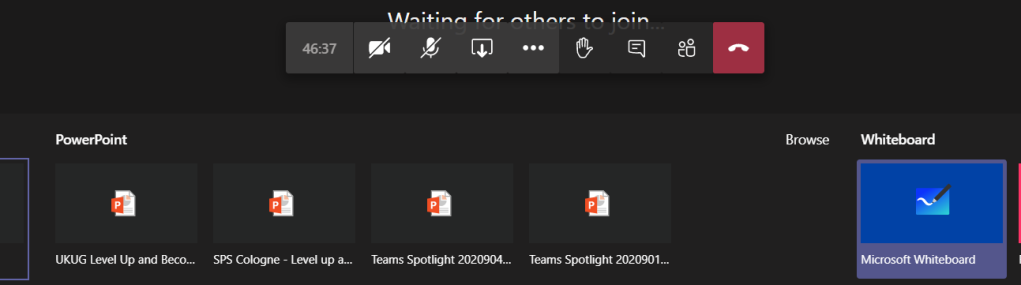
Teams Desktop: sharing a PowerPoint
You can choose from your recent PowerPoint documents in the list
- A PowerPoint document you opened or edited in Microsoft Teams (in a team you belong to) or in your OneDrive
- Browse for more
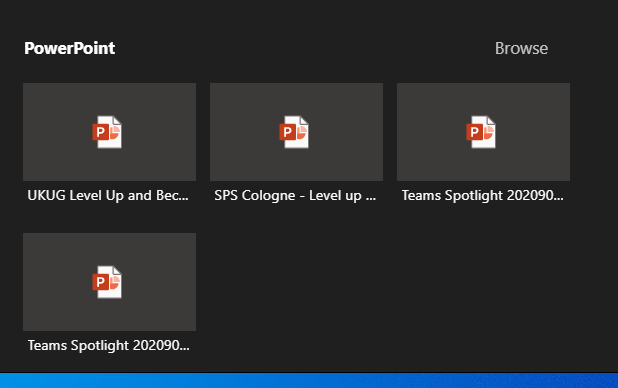
This list of sharing PowerPoints is causing often some big questions. PowerPoints will appear in the list once you edit or open the PowerPoint presentation in Teams or OneDrive (there may be some short delay). Generally it applies to the next meeting you join. Make sure you prepare for the meeting by opening the document in advance. Simply uploading a presentation to OneDrive or Teams does not bring it to the list – you need to open/edit it as well.
Browse-option lets you choose a PowerPoint from your OneDrive or from your computer.

What this one lacks is the ability to choose a file from a team you belong to.
TIP: Use OneDrive syncing to have an easy access to files in the most relevant teams you belong to .
Once you are sharing the PowerPoint you can see it in the presenter view mode! This feature is generally available ! This makes it easy to do presentations using Teams – without having to have a PowerPoint desktop app open at the same time. Seems to work only on Teams Desktop with new meeting experience mode at the moment.
The presented area (PowerPoint) is shown surrounded with a red rectangle.
Updated 22.3.2021. There are other controls in this as well for jumping between slides and accessibility controls.
I have a another article diving deeper to Presenter view in here !
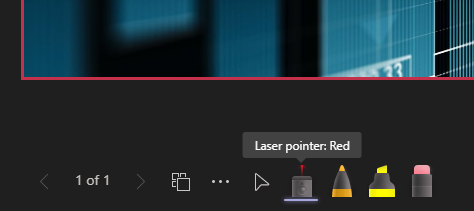
NEW: PowerPoint Live has now laser pointer and inking capabilities. Read about them here !
Once the presentation is shared you can move back and forth easily with arrows in the screen.

Note: there is the “eye” icon. If you press that one it locks the PowerPoint for the participants so that they see the same slide as you do: they can not browse the deck on their own. This is called private viewing disable (arrows for other participants will be disabled). Private viewing is enabled on default.

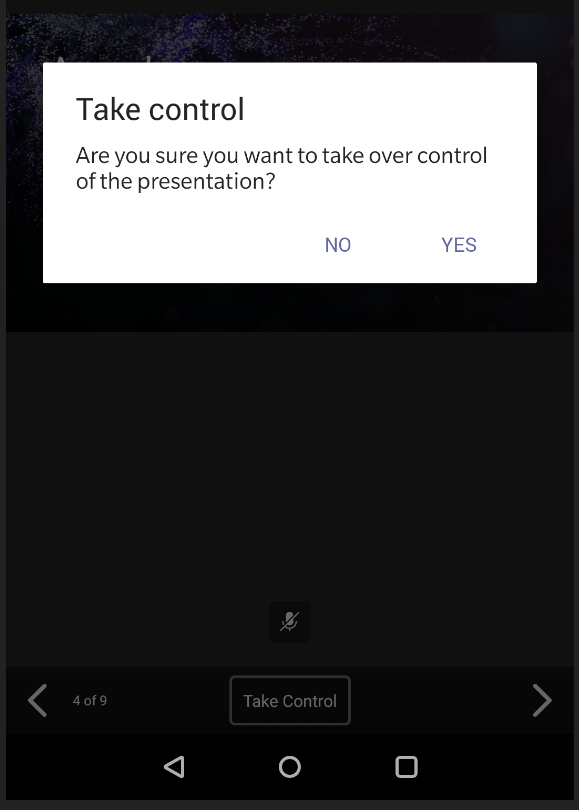
Note: if you are a presenter in the meeting where a PowerPoint is shared to you can take control of the shared PowerPoint to advance slides. This does not ask for any confirmation and the feature is really useful when you have multiple presenters who use the same slide deck. Just be careful that everyone else are not presenters – or they know not to touch it.

You will get a warning that someone has taken the control and can easily take it back.

Whoever is in control of the presentation has also the control to disable/enable private viewing mode. As can be seen in the picture above (with Take control) the eye is missing and arrows are greyed out: this means someone else than you have the control and they have disable the private viewing.
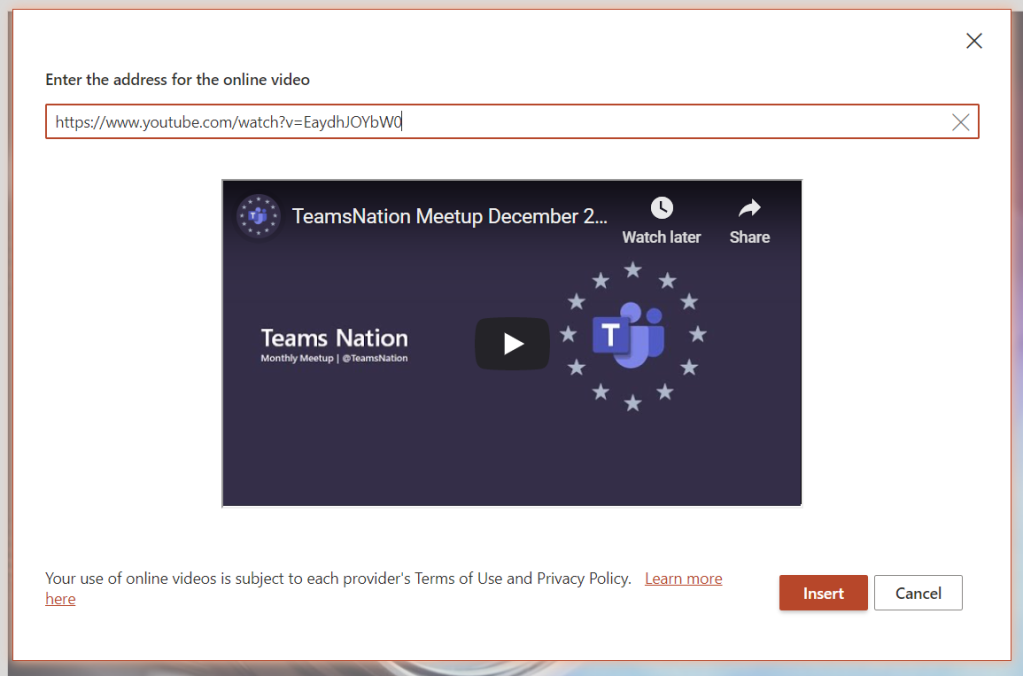
Note: When you share PowerPoint to a meeting this way participants can click links you have in your presentation. Thank you Joe for this reminder!

If you add a online video to your presentation your participants can activate that on their own as well. It is good also to note that if you hit “play” it doesn’t reflect to attendees (=they need to play the video themselves)
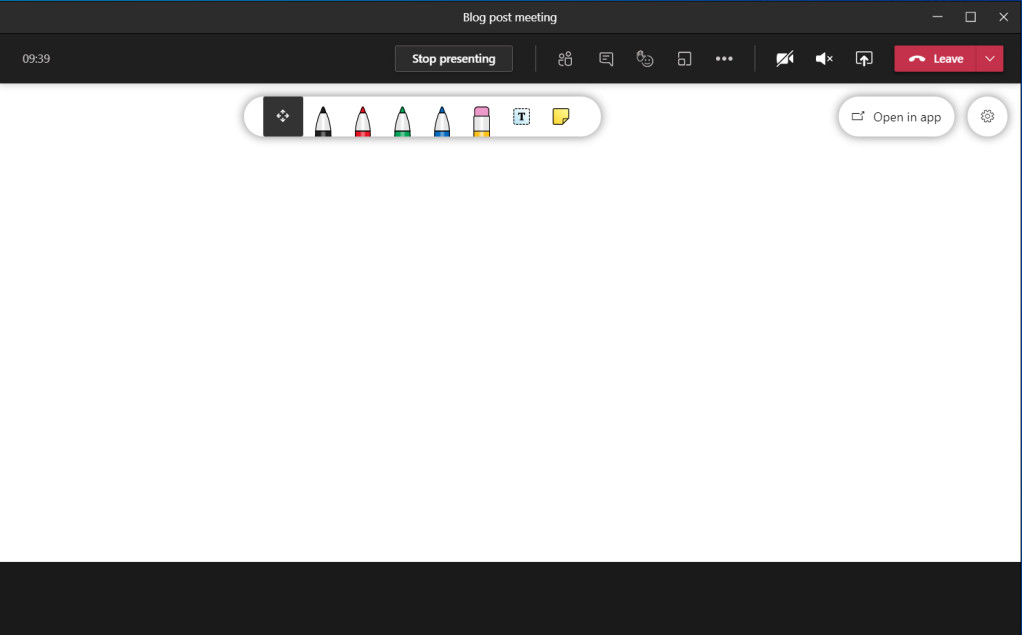
Teams Desktop: sharing a Whiteboard
When you choose Microsoft Whiteboard from the Share Tray you are taken directly to the Whiteboard view. Everyone who is in the same organization as you are (the situation in January 2021) can co-author the Whiteboard with you. Once you are done you can Stop presenting (middle top screen) or share something else.
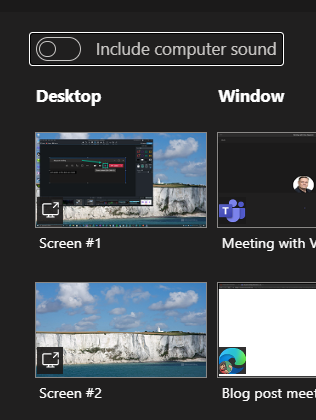
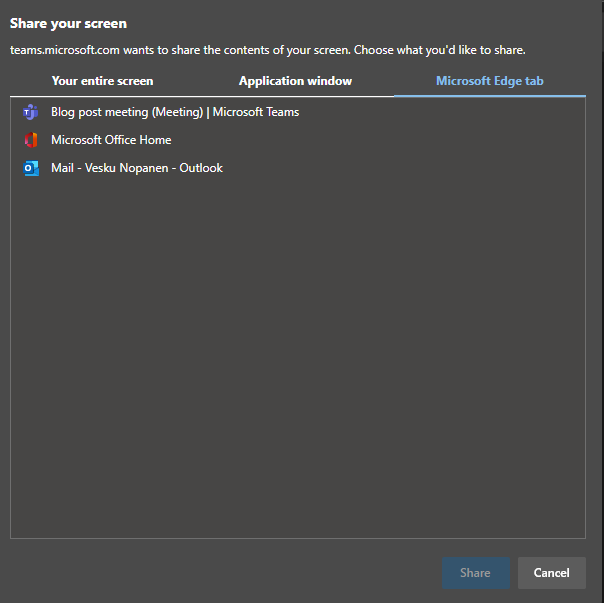
Teams web client: sharing a screen (Microsoft Edge)
Sharing looks a bit different when you are using Teams web client. Sharing is available in (new) Microsoft Edge and Google Chrome browsers. The toolbar is hovering on top of the meeting. From the toolbar you can open the share tray.

When you have the share tray open you can choose to share something of following
- Desktop (Screenshare)
- A specific PowerPoint document
- Whiteboard: either Microsoft Whiteboard or Freehand (3rd party).
- Entire screen
- Application window (a specific application only)
- With Microsoft Edge you have option to choose a selected, specific, tab
When(if) you have multiple monitors it is easiest to just share a one of them: it makes the sharing really simple and easy to manage: anything on that display is shared.
If you don’t have multiple monitors then you might want to just share a single application.
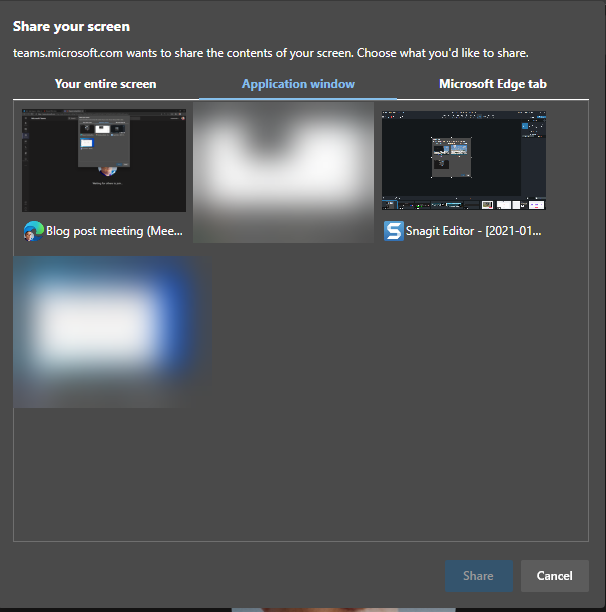
This is useful when you want to show something specific that runs in it’s own application but you can not share anything else on your screen.
Note: Teams is not in the list (not even on blurred ones) and nor is Spotify or ToDo. Not every application can be shared with this.
Note2: you can not share desktop audio to the meeting using Teams web client.
And the last option is to share a selected Edge tab – and if you have multiple Edge profiles open you can share from any of those by clicking the desired Edge active and choosing the tab.
In my example I chose to share one of my screens. You don’t get much feedback – you just click on the screen and hit Share. In one of your screens you will have this toolbar:

You can end sharing using either that toolbar or you can navigate to your web Teams meeting and choose Stop sharing from the toolbar there.

Teams web client: sharing a PowerPoint
This list of sharing PowerPoints is causing often some big questions. PowerPoint presentations will be in the list once you edit or open the PowerPoint presentation in Teams or OneDrive (there may be some short delay). Generally it applies to the next meeting you join. Make sure you prepare for the meeting by opening the document in advance. Simply uploading a presentation to OneDrive or Teams does not bring it to the list – you need to open/edit it as well.

Note: there is the “eye” icon. If you press that one it locks the PowerPoint for the participants so that they see the same slide as you do: they can not browse the deck on their own. This is called private viewing disable. Private viewing is enabled on default.

Whoever is in control of the presentation has also the control to disable/enable private viewing mode.
Teams web client: sharing a Whiteboard
Sharing a Whiteboard is initiated simply by choosing Microsoft Whiteboard (or Freehand or other available 3rd party application) from the share tray.
I have found out that sometimes when you start sharing Microsoft Whiteboard to the meeting using Teams web client it doesn’t do anything. The solution is to try again.
Once the Whiteboard opens you can work on it normally – or choose to open it in the Whiteboard app to have a broader set of tools available.
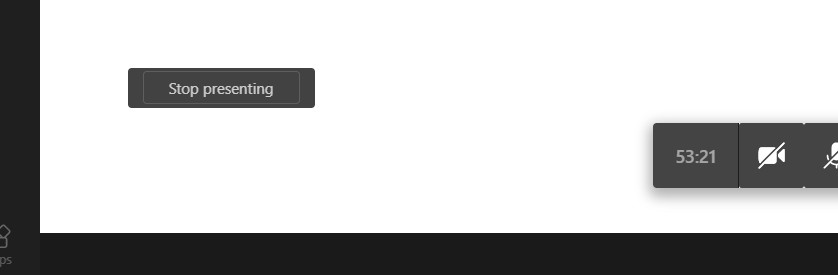
When you are done you can choose the “Stop presenting” that is hovering on the left bottom area (left of meeting toolbar).
Teams mobile: sharing a screen
Were you aware that you can also share content using your mobile device? I have examples and screenshots using a Android device but these also work with iOS – the user interface might be slightly different.
You initiate the sharing via … menu selection in the mobile to open the list of options
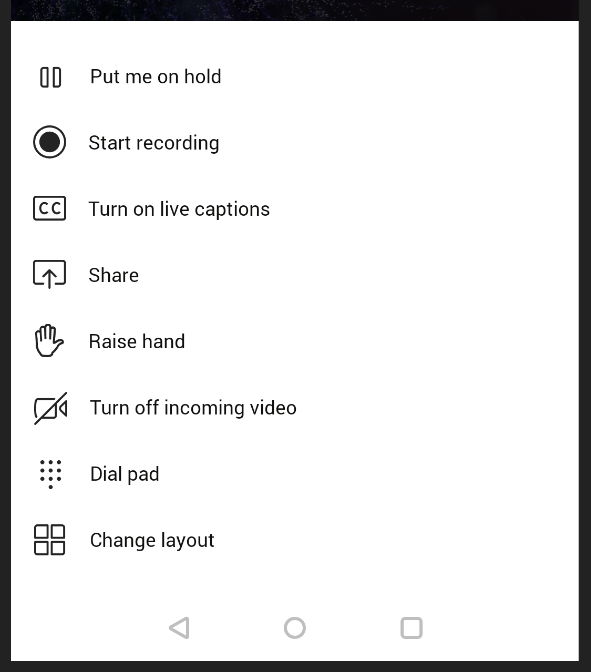
You choose Share and you get to choose what to share
Yes – you can share your mobile device screen to the meeting. This is really useful if you have a application you want to show or train to others.
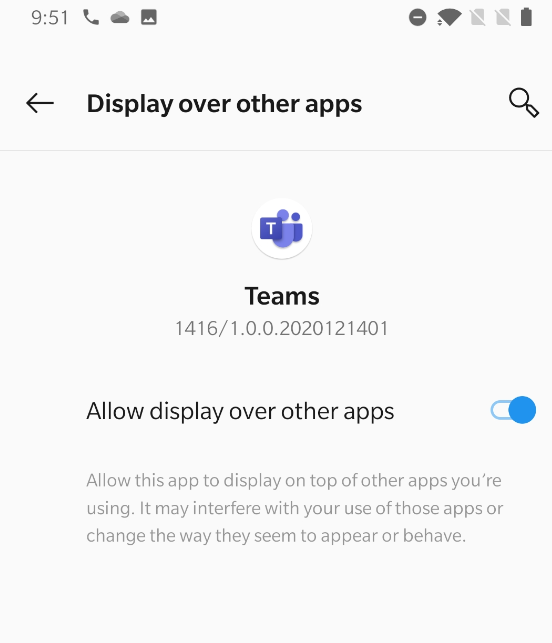
You may have to adjust settings to turn on allowing Teams to display over other apps.
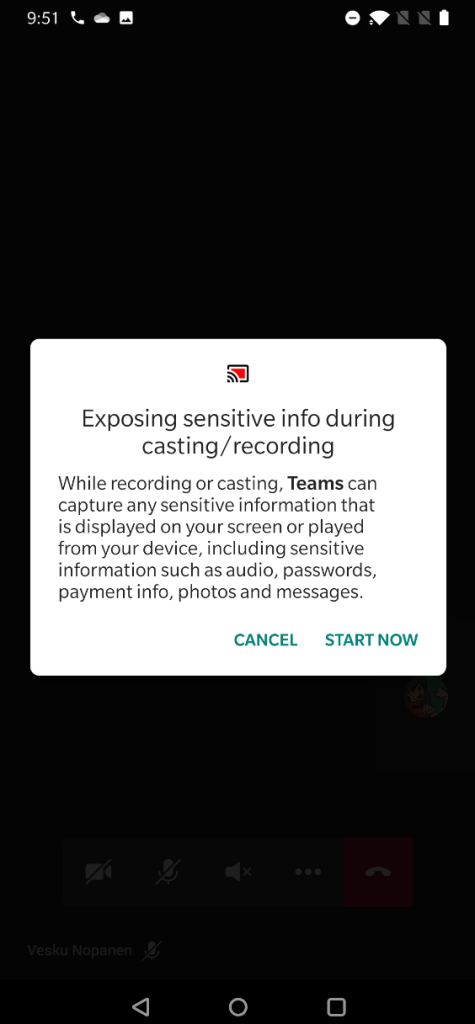
After that one you may have reshare the screen. And you get the next warning.
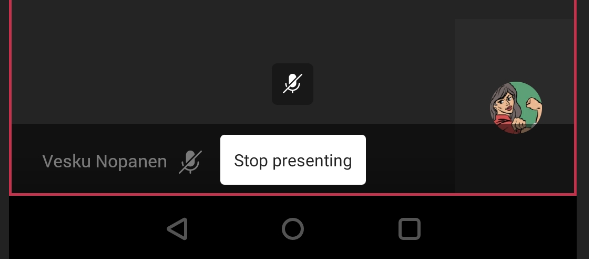
And your screen is now shared. You can see the red block that lets you know what are of your mobile device screen has been shared.

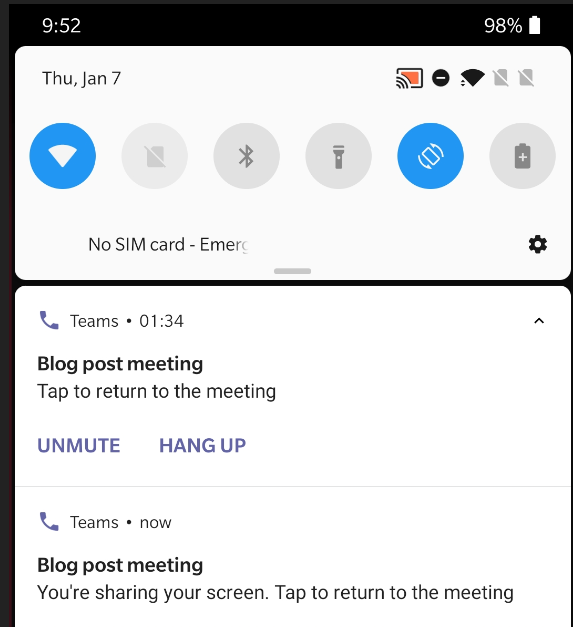
And if you pull down notifications area you have option to return to Teams meeting (if you have been using some other app) and there is also the notification that you are sharing your screen.
When you are done sharing you can return to Teams meeting and then choose to Stop presenting.
Teams mobile: sharing a PowerPoint
Sharing a PowerPoint works really well on Teams mobile! It is in fact even better than the version in other clients.
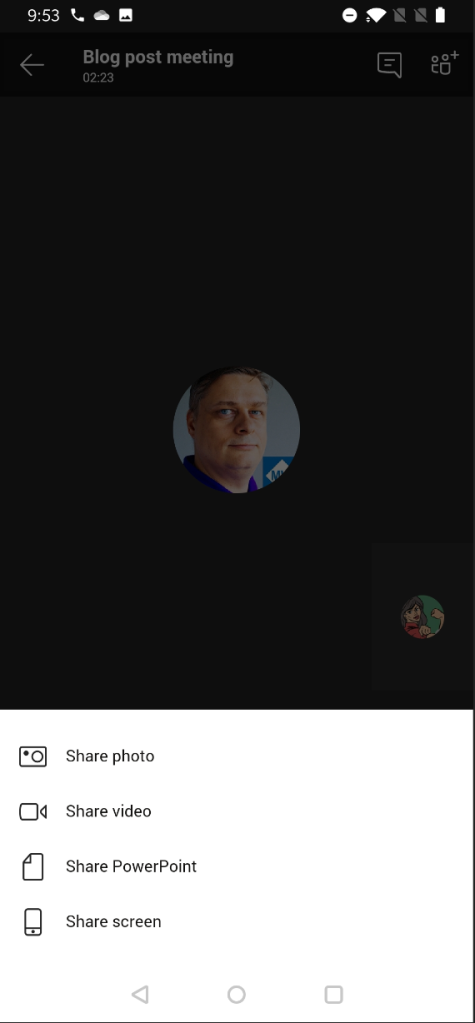
You start by imitating the sharing (as with screen share) and choosing the PowerPoint instead. You get a screen:
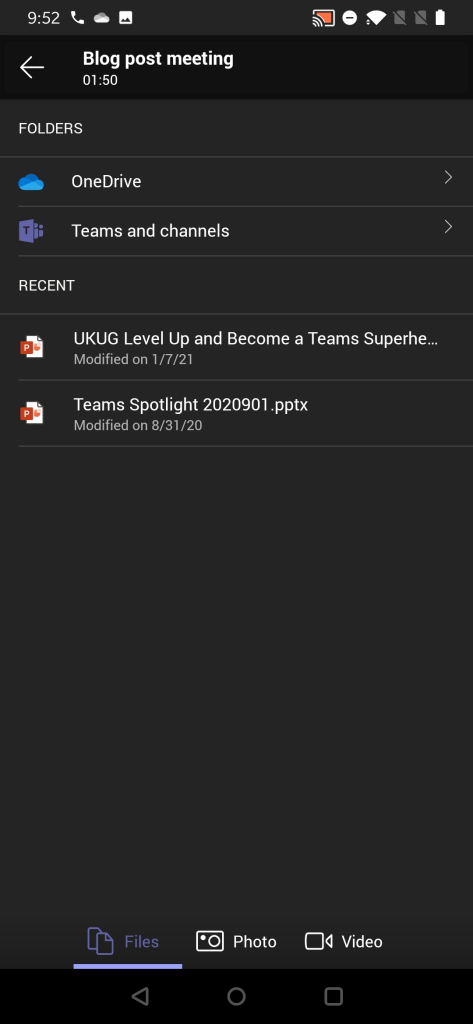
From this screen you can choose to browser thought
- A PowerPoint presentation from any Team and channel you belong to!
- Choose a PowerPoint presentation you opened or edited most recently (as you notice compared to other examples that this isn’t 1:1 in sync.. There are differences so that is why I am really happy that you can browse through Teams for sharing)
Once you have selected the PowerPoint to present it is very straight forward from that moment.
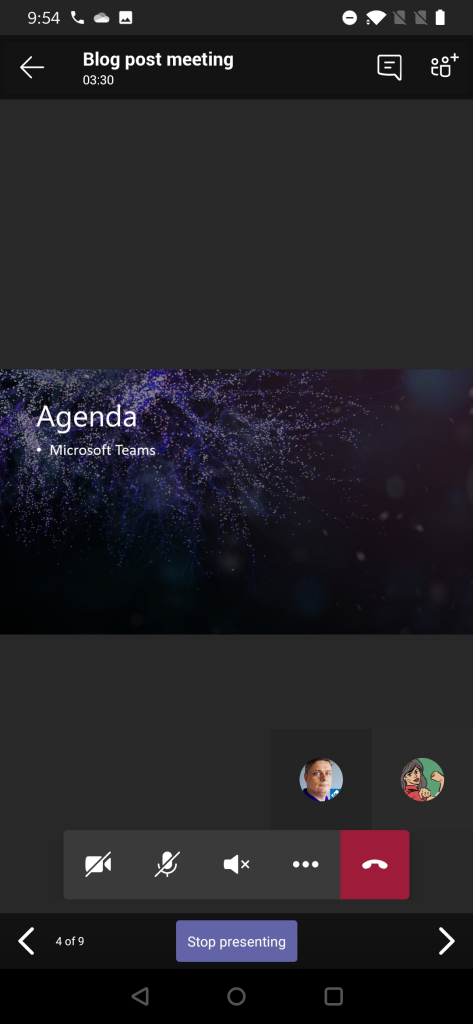
Using Teams mobile you can also take control of a PowerPoint someone else is presenting (if you are a presenter in the meeting). This means that you can participate in a multi-presenter meeting quite easily by using just your mobile device and Teams!

You will get a warning before you take the control – in case you pressed Take Control accidentally.
Teams mobile: sharing a photo or video
Follow the steps laid out earlier and instead of screen or PowerPoint you select this time a picture (from device’s picture gallery) or a video (using device’s video camera). Since sharing a picture is very straight forward I use the video instead as example.
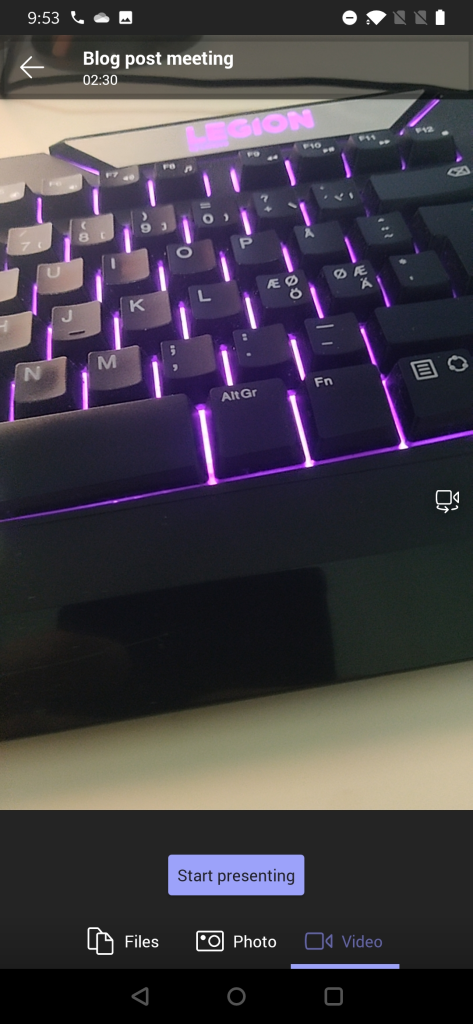
You get to see a preview of video first. You can switch to other camera (front/back usually) & position the device properly and once you are ready you just hit Start presenting .
And when you are done you can press on “Stop presenting” to end your video feed.
This video is different from showing your own video using Camera icon the meeting toolbar. Instead of being a attendee video this one is shown in the shared area for every participant in the meeting. This is useful when you have something in the same room/space that you want to share to others in the meeting. Possible use cases: a model on table, physical whiteboard, view from the window, interviewing someone, view in the outside, …
Best practices from my experience
The way I use to share content when in Microsoft Teams meetings is
- I share one of my screens (I have three screens so this is a natural choice for me). This way I know what is being shared all the time since I always share the same screen (the one in the middle, my camera is on top of that screen). Be careful what you drag to the shared screen. This is the way I share my PowerPoint presentations (projecting the presentation to the shared screen)
- If you have a touch-screen device (like Surface-laptop) you should use pen/inking to enhance the presentation experience. This also works when you are sharing the external screen & presenting from touch-screen device: make your presentation stand out!
- Prepare the content you share in advance. Open PowerPoints, apps, browsers etc so you don’t have to spend any time with them when you are live.
- Share your screen early rather than later. This will give you time to reshare.
- When doing a presentation with multiple persons using just the PowerPoint deck share it directly to Teams meeting so you can switch between speakers easily. With the new Presenter view -support this is now a good option.
- Make use of Teams features: Put everyone but real presenters else as attendee so they can’t start sharing their screen accidentally – and you can hard mute them as well. Use meeting options -setting before they join in.
- When people complain they don’t see the share: check that you are actually sharing your screen. If someone is seeing your share and some others not: those who can’t see your share need to leave and rejoin the meeting. Sometimes restarting your sharing can fix that issue too but usually the issue is in the participant end.
- I rarely use application / window -sharing.
- Sharing a video in Teams meeting (or in Live event) is usually ok but you can expect some quality drop – especially if you have a lower bandwidth. Have a backup link to the video available. People seem to struggle more with videos embedded inside a PowerPoint.
- Use Windows Focus Assist and Teams Do Not Disturb mode so you don’t get any unwanted popups on your shared screen. Microsoft Teams will also have a upcoming feature (currently usable in public preview) that let’s users to choose if Teams notifications do their own “toast” (pop-up banner) or do they go directly to Windows notification area (honoring the Focust Assist setting).
- Use Teams Desktop version + new meeting experience when possible. Check that you have the latest version.
More information or different view into this?
Check out Microsoft Support article about Sharing content in Microsoft Teams meetings .
I hope you have enjoyed this guide and it has provided to be useful. Please do drop a comment from below if you have any questions or you want to send me greetings!
Sharing is Caring! #CommunityRocks
Aiheeseen liittyy.

Published by Vesa Nopanen
Vesa "Vesku" Nopanen, Principal Consultant and Microsoft MVP (M365 and AI Platform) working on Future Work at Sulava. I work, blog and speak about Future Work : AI, Microsoft 365, Copilot, Microsoft Mesh, Metaverse, and other services & platforms in the cloud connecting digital and physical and people together. I have about 30 years of experience in IT business on multiple industries, domains, and roles. View all posts by Vesa Nopanen
5 thoughts on “ The Ultimate How To Guide for Presenting Content in Microsoft Teams ”
- Pingback: Dew Drop – January 18, 2021 (#3361) – Morning Dew by Alvin Ashcraft
- Pingback: [m365weekly] #19 – M365 Weekly Newsletter
- Pingback: PowerPoint Live / Presenter View in Microsoft Teams – Vesa Nopanen – My Teams & Microsoft 365 Day
- Pingback: PowerPoint Live / Presenter View in Microsoft Teams - Tech Daily Chronicle
- Pingback: Microsoft Tech News and Product Updates: 4/26/2021 – Mr. Wombat
Leave a comment Cancel reply
This site uses Akismet to reduce spam. Learn how your comment data is processed .

- Already have a WordPress.com account? Log in now.
- Subscribe Subscribed
- Copy shortlink
- Report this content
- View post in Reader
- Manage subscriptions
- Collapse this bar
How to share PowerPoint slides in Teams meetings
1] share slides in a teams meeting by sharing entire screen, 2] share slides in a teams meeting by sharing the powerpoint window, a] share the slide show window, b] share the powerpoint window in normal view, c] share the powerpoint window in reading view, 3] share slides in a teams meeting with powerpoint live, can i present powerpoint on teams and see notes, how do i share a powerpoint in teams and still see chat, sangeetaghera@twc.
Microsoft Teams Articles
Microsoft teams, extend teams with apps and integrations.
- Request License for Teams Dial-In Numbers
- Existing SharePoint Site Elements as a Tab
- Sync Teams Files to Your Device
All Microsoft Teams Articles
Share Slides in Teams meetings with PowerPoint Live
PowerPoint Live offers benefits over simple screen-sharing.
This article applies to: Microsoft Teams
PowerPoint Live in Microsoft Teams offers several benefits over screen-sharing your PowerPoint presentation window or editing window.
- Seamlessly switch between presenters. Unlike screen-sharing, where the presentation is shared from a single presenter, co-presenters can take control of the slide deck during their portion of the presentation.
- The built-in presenter view provides all the tools you need for a successful meeting. You can see the audience, control slides, and view notes all in one location.
- Enhanced accessibility. Audience members can use screen readers, live translation, and high contrast slides.
- Special audience focus tools. Use the laser pointer, pen, and highlighter to draw attention to key points.
- Option for attendees to go back or ahead. If enabled, audience members can move between slides to review something they missed while the presentation continues.
- Smoother transitions to video or audio. Play high-quality embedded video and audio without having to change to a browser, media player, or other outside app or window.
- Instant attendee access to links. Audience members can open links and videos in the presentation on their own devices. No more waiting for you to circulate the presentation after the meeting.
For more information, see Microsoft’s Share slides in a Teams meeting with PowerPoint Live and the Microsoft blog post Introducing PowerPoint Live in Microsoft Teams .
To share feedback about this page or request support, log in with your NetID
At Cornell we value your privacy. To view our university's privacy practices, including information use and third parties, visit University Privacy .
How to share PowerPoint slides in Teams meetings
The powerpoint live feature in teams ensures a professional presentation that has built-in accessibility features for you and your audience.
- Set up and join your Teams meeting as usual
Enable Include computer sound if your presentation has audio content that you want to share (including embedded videos, narrated sections or music)
- If your presentation is not listed then select Browse OneDrive or Browse my computer and locate the PowerPoint file you want to share
- Wait for the presentation to start on all attendees devices - it can feel like this is taking a long time, but it usually completes in 5 to 10 seconds
| Action | Method |
|---|---|
| Move to the next slide | Select Press Press Press |
| Move to the Previous slide | Select Press Press Press |
| Jump to a particular slide | Select the slide you want from the slide previews at the bottom Select or press , then select the slide you want to jump to from the slide sorter |
| View participant / hands-up list | Select at the top of Teams |
| Switch between presenter view and participant video feeds | Select any of the participant video panels to view video feeds Select the slide panel to switch back to presenter view |
| Force participants to view the same slide as you | Select at the top of Teams |
- Use the Presenter mode options at the top of your Teams screen to switch between Content only (just your slides) and Standout (your video is shown in the bottom-right corner of the slides)
- Select More actions just below your slides to show/hide your notes and slide preview, select high contrast mode, or translate the slides. These actions only affect your view, each attendee can select their own independent settings
- Options to change the font size of your notes are displayed to the bottom-right of the current slide
Prepare with a quick practice-run
A quick practice before the live session will give you confidence in using Teams to present. Here's how:
- Open Teams and select Calendar
- Select Meet Now > Start meeting > Join now
- Close the prompt to Invite people to join you
- Now select Share and follow the instructions above
Further information
Video tutorial.
A short video tutorial on How to use PowerPoint Live in Teams by Breakwater IT
Other presentation formats
PowerPoint Live is only available for files saved in the latest PowerPoint (PPTX) format, used in PowerPoint 2016 and newer. If your presentation is in another format then try saving it as a PowerPoint file, either in the application you used to create it or in PowerPoint.
Sharing PowerPoint from a Mac
To share a PowerPoint file in presentation / slideshow mode on a Mac you need to give Teams permission for Screen Recording (see Sharing content on a Mac , about half-way down). You only need to do this once, the setting remains in place for future presentations.
Related links
- Overview: Microsoft Teams
- Top tips on running webinars in Teams
- Microsoft Teams collection
Get support
If you cannot find the solution you need here then we have other ways to get IT support
Get IT support
Submit a suggestion , compliment or complaint
Nate Chamberlain, Microsoft MCT
Microsoft 365 training and content for modern digital workplaces
How to share your screen during a Microsoft Teams meeting
The process used when sharing your screen in Teams depends on whether you’re using the Teams desktop app or web app. I’ll cover both methods in this post, and provide a video demonstration for each.
Share your screen using the Microsoft Teams desktop app
Using the desktop app (installed on your machine), you can share your screen during a meeting in just a few clicks:
- Once inside the meeting, select the Share icon (rectangle with an arrow) in the upper right corner next to the Leave button.
- Screen (one of your monitors and everything you see on it, even if you change windows/apps)
- Window (one specific window or app – prevents accidentally sharing things like your email)
- If you’ll be sharing video audio or music, toggle the button to include computer sound
- When finished sharing, use the same Share button to stop sharing.
If you’ll be sharing a PowerPoint presentation, consider using PowerPoint Live as opposed to just screen sharing the full-screen presentation. This enables your attendees to benefit from individual features that won’t affect others including:
- Moving forwards and backwards through slides for a refresher or more time to consume the content
- Changing slides to high contrast for better visibility
- Translating slides to a language of choice
- Click on links directly on slides (such as social media, references, survey, or company hyperlinks)
Watch the desktop version video demonstration to see these steps performed, including PowerPoint Live:
Share your screen using the Microsoft Teams web app
The web app is entirely browser-based, meaning you don’t need to have anything installed on your device to use it. You can access it anytime from any device with web access by navigating to https://teams.microsoft.com in your browser of choice.
In the web app, you can share your screen during a meeting by following these steps:
- Once inside the meeting, select the Share icon (rectangle with an arrow) from the lower central area menu. If the menu has disappeared, simply move your cursor around the meeting space to make it reappear.
- Entire screen : A whole monitor/screen and everything that becomes visible on it.
- Window : A single app or window (prevents accidentally sharing things like your email)
- Microsoft Edge tab : A single browser tab (similar to the app/window option, this prevents accidentally switching to a sensitive app or tab)
- If you’ll be sharing video audio or music, check the box to Share system audio
- PowerPoint (PowerPoint Live): Select a recent presentation, or click Browse to find a presentation and utilize this feature.
- When finished sharing, use the same Share button to stop sharing or one of the Stop sharing dialogs you may see.
Watch the web version video demonstration to see these steps performed, including PowerPoint Live:
Spread the word:
Leave a reply cancel reply.
This site uses Akismet to reduce spam. Learn how your comment data is processed .
Discover more from Nate Chamberlain, Microsoft MCT
Subscribe now to keep reading and get access to the full archive.
Type your email…
Continue reading
Code of Conduct - Terms and Conditions - Privacy Policy
Home Blog PowerPoint Tutorials How to Share a PowerPoint Presentation on Microsoft Teams
How to Share a PowerPoint Presentation on Microsoft Teams

In recent years many remote meeting tools like Microsoft Teams and Zoom have become the norm for regular remote meetings. If you’re new to Microsoft Teams, the chances are you are still finding your way around various options. One of the most common questions a Microsoft Teams newbie might ask is how to share PowerPoint on Teams.
What is Microsoft Teams?
Microsoft Teams is a messaging app by Microsoft for online collaboration and remote meetings that comes integrated with Microsoft 365. It provides a real-time workspace where end users can collaborate via chat, Teams Channels, Live calls, etc. Microsoft Teams also integrates with other Microsoft products like PowerPoint and OneDrive, enabling instant file sharing via the cloud.
Why use Microsoft Teams to Present Your PowerPoint Presentations?
Many organizations use Microsoft Teams for online collaboration and remote meetings. Organizations with integrated Microsoft products like its Windows operating system, Microsoft Office, and Azure Active Directory prefer Teams as the primary internal and external communication app. Organizations use Microsoft Teams to provide secure accounts to employees, with two-factor authentication and data encryption. These accounts are integrated into the Active Directory, providing scalability and control for IT administrators to offer people within an organization an online collaboration platform that can be securely used within the limits of the organization’s data protection policies.
While there are many alternatives to Microsoft teams, such as Zoom and Google Meet, the integration of teams with other Microsoft products, such as Azure, Microsoft Office apps, and OneDrive, makes it attractive within a secure enterprise environment.
How to Present PowerPoint in Teams?
How to present your PowerPoint slides on Microsoft Teams, let us tell you there are at least two methods for sharing presentations. This includes sharing a PowerPoint file directly and presenting your slide deck before one or more meeting participants, or perhaps PowerPoint templates or Google Slides templates to help a colleague design a slide deck.
How to Attach and Share Your PowerPoint Slides on Teams
To share a PowerPoint file on teams, go to an ongoing conversation or meeting window and click Attach files . This will provide you with the option to either fetch a file via OneDrive or from your device. This option can be used for sharing PowerPoint files and other types of files, such as documents, spreadsheets, videos, compressed files, etc.

When sharing a file, you can add a message optionally before hitting Send .

The recipient and the sender can download the file, open it in a browser, or copy the file link for further sharing.

How to Present Your PowerPoint Slides on Teams
Method #1: use the share button in powerpoint.
You can also directly present your slide deck via Microsoft Teams by sharing your screen to start a Live presentation during a remote meeting instantly. Suppose your organization uses Microsoft Teams regularly. In that case, the chances are you will be using it for presentations during remote meetings; therefore, it’s essential to know how to use the screen-sharing option to present online.

Method #2: Share Screen to Present a PowerPoint Presentation
Another way to present a PowerPoint presentation on Teams is by sharing the screen with your audience. If you share your screen, this will show the audience whatever is visible on the entire screen on your device.

Pros of sharing your screen with the audience to present a presentation:
- It is easier to activate
- You can easily switch to other windows besides the PowerPoint presentation and also share them with the audience
Cons of sharing your entire screen on Teams for presenting:
- If you have confidential data in other windows, you may want to avoid switching the windows and keep only the Slideshow window in front.
- You may accidentally switch to other windows, and your audience can lose focus of the presentation.
Method #3: Share PowerPoint Window to Present Your Slides
If you intend to hide parts of your screen, you can simply share the relevant PowerPoint window so that your audience can only view the presentation. During a Live call, click the Share button and select your screen or window to share.

5 Features to Make the Most from Your Microsoft PowerPoint Presentation Sharing in Teams
Microsoft Teams offers a wide array of features that make it a robust remote meeting and online collaboration app since it leverages the full force of Microsoft 365 and other Microsoft products.
1. Translate Slides into a Different Language
This is a private feature that individuals can use to translate slides in their language instantly. As a presenter, you can ask your audience to use this feature if they deem it convenient to help bridge a gap that might exist due to a language barrier.
Slides can be viewed in a different language via More actions > Translate Slides . From the drop-down list, you can pick a preferred language.

2. Use Live Captions
Microsoft Teams supports Live Captions / Closed Captions (CC) to help persons with disabilities, including those suffering from hearing impairment. Closed Captions can also be helpful for people to translate or view text in a preferred language.
Turn on Live Captions: To enable Live Captions on Teams, go to More options > Turn on live captions . Translate Spoken Language: To translate Live Captions, go to Captions settings > Change spoken language .

Turn Off Live Captions: You can turn off Live captions anytime via More actions > Turn off live captions .

3. View Slides in High Contrast
Viewing slides in high contrast on Teams can have several benefits. For example, it helps you focus on the content and is also helpful for people with visual impairment. To configure your slides to appear in high contrast, follow the steps below:
1. Launch your PowerPoint presentation.
2. Click on the Present tab at the top of the window.3. Go to More action > View slides in high contrast .

4. Annotate your Slides in Real Time
Like any standard remote meeting app, Microsoft Teams also provides a number of handy annotation options to help you make the most out of your PowerPoint presentations. You can click on Start annotation when sharing your full screen during presentations to start annotating slides.
Powered by Microsoft Whiteboard, this powerful feature enables one or more meeting participants or the presenter to annotate presentations. It can also be a helpful feature when you’re looking to collaborate online during a Live presentation.
5. Pop Out the Window
You can separate the presentation window from the Teams window to make it easier to work with the two. This feature can be handy when working with multiple monitors or separating the two windows from uncluttering your screen. You can use this option by clicking on the Pop-out option from the toolbar during a screen-sharing session.

How to Stop Presenting on Teams
When presenting your slide deck, you can also present your PowerPoint presentation using any view, be it as a SlideShow or in Normal view. Once you’re done presenting, click Stop Presenting to conclude your session. Furthermore, you can also choose to enable or disable your camera and computer sound when presenting your slides.

To turn off screen sharing during a remote meeting, you can click Stop Sharing .

Present in Teams Button in PowerPoint is Missing. How to Fix it?
Some users might have used the Present in Teams option to share a PowerPoint presentation during a meeting. Suppose you are wondering why the Present in Teams button in PowerPoint Presentations is missing. In that case, this option isn’t available for anyone using the free version of Teams, as only users with a paid subscription, such as a Business Standard or Business Premium Plan. Furthermore, you must share your PowerPoint presentation with OneDrive to use this option. To use the Present in Teams option, upload your PowerPoint presentation to OneDrive. You can do this via File > Save As > OneDrive .

Once done, the Present in Teams button will become available to instantly launch your presentation for sharing during a Teams call.

5 Tips to Make your Presentation a Success on Microsoft Teams
Presenting PowerPoint in Teams can require being mindful of a number of things. This includes accounting for brevity to ensure your presentation does not take more than its designated time, using slides that are suitable for remote meetings. Below is a list of 5 tips to make your presentation successful using Microsoft Teams.
1. Check Your Audio and Video Settings
One of the most annoying problems faced during remote meetings is technical failures such as no or low audio quality. This becomes even more annoying when the meeting organizer or a presenter during their session faces the issue, wasting precious time. This is why you must check your audio and video settings beforehand to ensure everything works correctly. If you need to play a video during your session, make a test call with a colleague and get feedback if the sound and video quality are up to the mark.
2. Make Sure Your Slides are Clear and Concise
Presentations delivered via Microsoft Teams will often take place during scheduled remote meetings. This means that you will have to account for the designated time given for your session, which is why you must ensure that your slides are clear and concise.
3. Use Animations and Transitions Sparingly
Since remote meetings will be attended by participants using different types of computers and mobile devices, some animations and transitions might not be suitable. This is because they can cause Teams to slow down, or the slides might not display appropriately via screen sharing. For example, 3D animations , GIF animations , and objects with elaborate PowerPoint animated sequences might cause issues when displayed via Teams.
4. Keep Your Slides on Topic
One of the banes of remote meetings is how a discussion can go off-topic very quickly. This is why it’s best to ensure that your slides remain focused on the topic and additional discussions are discouraged during the presentation session.
5. Use Team Members’ Names Sparingly to Call Out Specific Points
Calling out team members for their opinion or advice during a remote meeting can quickly lead to a very lengthy and off-topic discussion. This is why it’s best to call out team members’ sparingly. If you have been using Teams or other remote meeting apps long enough, you would have learned by now that for some topics, it’s best to ask participants to schedule a separate meeting so that the ongoing discussion remains on track.
Other Issues to Troubleshoot while presenting a PowerPoint presentation on Microsoft Teams
Someone has already set up Teams for your organization’s error
If you’re using a premium subscription for Microsoft Teams managed by your organization’s IT team, you might get an error when logging in to Teams. In such a case, you might get the following error:
“Someone has already set up Teams for your organization.”
If you see the error message mentioned above, this means that your account isn’t ready yet, and you need to contact your organization’s IT team to ask when your account might be ready for use.
We’re sorry–we’ve run into an issue error.
Another prevalent issue is when the following error message appears:
“We’re sorry–we’ve run into an issue.”
This is a generic message, and usually, it can be resolved by clicking the Restart button that appears below the error. In case the issue isn’t resolved after restarting the Teams app, ensure your Internet connection is working. More often than not, the issue is associated with the Internet connection. If the issue persists, you can clear your cache , reinstall Teams or contact your IT support team. The error can also occur if there is an outage affecting Microsoft products or if there is a configuration issue for Microsoft 365 accounts associated with your organization.
Final Words
Using Microsoft Teams to share a presentation file is easy enough. However, when presenting a PowerPoint presentation in Teams, you must decide how to present your slide deck. If you need to switch back and forth between your slides and another document, spreadsheet, or browser window, it might be best to share your entire screen. However, if you wish to focus only on the slide deck, sharing your Window can help you avoid sharing the rest of your screen with the audience.
Like this article? Please share
Meeting, Microsoft Teams, Share Filed under PowerPoint Tutorials
Related Articles

Filed under Business • July 28th, 2022
What is an All Hands Meeting?
The proper meeting format can boost your company’s transparency and help employees align with its core values. In this article, we will introduce the All Hands Meeting model and why it’s a resource you should consider from now on.

Filed under Business • February 17th, 2022
A guidebook to set Meeting Objectives by taking Effective Meeting Notes
Make an impact in your meetings by applying the science of note-taking. Capture all the valuable information you require by taking effective meeting notes.

Filed under Business • May 20th, 2021
Quick Guide to Project Kick Off Meetings
Every time a team must begin a project an essential set of meetings must happen to ensure the success of the project. In this blog post we discuss the Project Kick Off Meeting and why it´s so important at the beginning of any new project.
Leave a Reply
How-To Geek
How to share your screen in microsoft teams.

Your changes have been saved
Email is sent
Email has already been sent
Please verify your email address.
You’ve reached your account maximum for followed topics.
Quick Links
Table of contents, how to screen share in microsoft teams on desktop, how to screen share in microsoft teams on mobile.
Microsoft Teams makes it easy to share your desktop or mobile device's screen in your online meetings. You can even choose between sharing your device's entire screen or just a specific app window. Here's how.
Related: What Is Microsoft Teams, and Is It Right for My Business?
- Share Your Screen in Microsoft Teams on Desktop
- Share Your Screen in Microsoft Teams on Mobile
On a Windows, Mac, Linux, or Chromebook computer, you can use Teams web version or the app to share your screen in a meeting.
To start, first, launch Microsoft Teams on your computer and join a meeting.
In the meeting, at the top of the Teams interface, click the "Share Content" option (an up-arrow icon).

You will see a "Share Content" section to the right of the Teams interface. To share your computer's entire screen, then in this section, click "Screen." To share a specific app's window, click the "Window" option instead.

If you select the "Screen" option, Teams will start presenting your desktop's screen in the meeting. You will see a red border around your screen indicating the screen is being shared.
On Linux, you will not see the red border around your screen when it's shared. You also can't share a specific app's window on Linux.

If you choose the "Window" option, select the app window that you'd like to share.

When you've finished your meeting and you want to stop screen sharing, then at the top of the Teams interface, click "Stop Presenting."

And that's all there is to screen-sharing in Teams on desktop. Very useful!
Like Teams, you can also share your screen in Zoom and Google Meet meetings .
Related: How to Share Your Screen in a Zoom Meeting
On an iPhone, iPad, or Android phone, you can use the official Teams app to share your phone's screen in your online meetings, similar to sharing mobile screens in Skype .
To do so, first, launch the Microsoft Teams app on your phone. In the app, join the meeting where you'd like to present your phone's screen.
In the meeting, from the bottom bar of the Teams app, select the three dots.

From the three-dots menu, select "Share."

Choose the "Share Screen" option. To include the audio in your screen share, toggle on the "Audio" option.

If you're on Android, you will see a "Display Over Other Apps" page. Here, find "Teams" and tap it. Then enable the "Allow Display Over Other Apps" option.

If you're on an iPhone or iPad, tap the "Start Broadcast" option.

Tap the back button to get back to the Teams screen. There, in the prompt that opens, select "Start Now."

A red border will appear around your phone's screen, which indicates your screen is currently being shared. To stop sharing your screen, tap "Stop Presenting."

And that's how you make explaining various concepts and ideas easier by sharing your screen with Microsoft Teams!
Did you know you can use a whiteboard in a Teams meeting ?
Related: How to Use a Whiteboard in a Microsoft Teams Meeting
- Microsoft Office
- Microsoft Teams
- How to Login
- Use Teams on the web
- Join a meeting in Teams
- Join without a Teams account
- Join on a second device
- Join as a view-only attendee
- Join a breakout room
- Join from Google
- Schedule a meeting in Teams
- Schedule from Outlook
- Schedule from Google
- Instant meeting
- Add a dial-in number
- See all your meetings
- Invite people
- Meeting roles
- Add co-organizers
- Hide attendee names
- Tips for large Teams meeting
- Lock a meeting
- End a meeting
- Manage your calendar
- Meeting controls
- Prepare in a green room
- Present content
- Share slides
- Share sound
- Apply video filters
- Mute and unmute
- Spotlight a video
- Multitasking
- Raise your hand
- Live reactions
- Take meeting notes
- Customize your view
- Laser pointer
- Cast from a desktop
- Use a green screen
- Join as an avatar
- Customize your avatar
- Use emotes, gestures, and more
- Get started with immersive spaces
- Use in-meeting controls
- Spatial audio
- Overview of Microsoft Teams Premium
- Intelligent productivity
- Advanced meeting protection
- Engaging event experiences
- Change your background
- Meeting themes
- Audio settings
- Manage attendee audio and video
- Reduce background noise
- Voice isolation in Teams
- Mute notifications
- Use breakout rooms
- Live transcription
- Language interpretation
- Live captions
- End-to-end encryption
- Presenter modes
- Call and meeting quality
- Meeting attendance reports
- Using the lobby
- Meeting options
- Record a meeting
- Meeting recap
- Play and share a meeting recording
- Delete a recording
- Edit or delete a transcript
- Customize access to recordings or transcripts
- Switch to town halls
- Get started
- Schedule a live event
- Invite attendees
- organizer checklist
- For tier 1 events
- Produce a live event
- Produce a live event with Teams Encoder
- Best practices
- Moderate a Q&A
- Allow anonymous presenters
- Attendee engagement report
- Recording and reports
- Attend a live event in Teams
- Participate in a Q&A
- Use live captions
- Schedule a webinar
- Customize a webinar
- Publicize a webinar
- Manage webinar registration
- Manage what attendees see
- Change webinar details
- Manage webinar emails
- Cancel a webinar
- Manage webinar recordings
- Webinar attendance report
- Get started with town hall
- Attend a town hall
- Schedule a town hall
- Customize a town hall
- Host a town hall
- Use RTMP-In
- Town hall insights
- Manage town hall recordings
- Cancel a town hall
- Can't join a meeting
- Camera isn't working
- Microphone isn't working
- My speaker isn’t working
- Breakout rooms issues
- Immersive spaces issues
- Meetings keep dropping

Engage your audience with presenter modes in Microsoft Teams
Meeting participants tend to be more focused and have a better experience when they see a presenter along with a presentation. An interactive presenter also helps guide an audience along with visual cues while reducing information overload. By using a presenter mode such as Standout , Side-by-side , or Reporter in a Teams meeting instead of sharing screen or window content only, you become a more engaging and integral part of your presentation. The following examples show how each presenter mode appears to an audience:

Use a presenter mode

Under Presenter mode , choose the mode that you want. Also, be sure that your camera is turned on.

To start your presentation, choose to share your S creen or Window on your PC or device.
Note: Using interactive presenter modes with PowerPoint Live will soon be available.

Note: Presenter mode customization is available as part of the public preview program and might undergo further changes before being released publicly. To get access to this and other upcoming features, switch to Teams public preview .
Presenter modes also allow presenters to customize how their content will be oriented on screen and adjust the size of the video to better fit the presentation.
Customize video display
1. Use the Position buttons in the preview window to direct where videos will appear in relation to the content.

2. Enlarge or reduce video size using the Size slider. Slide the circle to the left to reduce the size of a video, or to the right to enlarge the size of a video.

More things to know
Interactive presenter modes are only available for the desktop version of Teams.
Meeting attendees using the mobile or online versions of Teams will see a shared window or screen and presenter video separately.
When you use an interactive presenter mode, a small, moveable picture-in-picture window pops up to show you what your audience sees. If you close this window and need it again, restart the presenter mode.
Related links
Meetings in Teams Schedule a meeting in Teams Share content in a meeting Introducing PowerPoint Live in Teams

Need more help?
Want more options.
Explore subscription benefits, browse training courses, learn how to secure your device, and more.

Microsoft 365 subscription benefits

Microsoft 365 training

Microsoft security

Accessibility center
Communities help you ask and answer questions, give feedback, and hear from experts with rich knowledge.

Ask the Microsoft Community

Microsoft Tech Community

Windows Insiders
Microsoft 365 Insiders
Was this information helpful?
Thank you for your feedback.
IMAGES
VIDEO
COMMENTS
Share slides in Microsoft Teams meetings with PowerPoint ...
To present content in a meeting: Select Share in your meeting controls. Choose to present your entire screen, a window, a PowerPoint file, or a Whiteboard. Select Stop sharing in your meeting controls when you're done. Note: In Teams for web, you can share your screen using Google Chrome or the latest version of Microsoft Edge.
If you're leading a presentation and need to share your PowerPoint slides during a Microsoft Teams meeting, here's how: • Once your meeting is active, select...
The seven options are: Share your entire screen/desktop. Share the Slide Show window. Share the editing window with a clean look. Run the Slide Show in a window and share that window. Use the PowerPoint sharing option in Teams. Use Presenter View to show the audience your slides while you see Presenter View. Present with your video beside your ...
Present your slides. If you're already in a Teams meeting, select Share and then under the PowerPoint Live section, choose the PowerPoint file you're wanting to present. If you don't see the file in the list, select Browse OneDrive or Browse my computer. If your presentation is already open in PowerPoint for Windows or Mac, go to the file ...
Discover more ways to share content in Microsoft Teams. Jen Bradley from the #MicrosoftTeams team talks about some of her favorite ways to share content in a...
If you need to present in an online meeting, you can show your PowerPoint slides right from a Microsoft Teams meeting.If you're a presenter:1. Select Share c...
Give the feature a try next time you need to present in a Teams meetings: Join a Teams meeting or an ad-hoc Teams call. Open your presentation in PowerPoint for Windows. Click the Present in Teams button in the top right corner. Scenarios to try. Ready to take the PowerPoint Live feature for a spin? Try some of the scenarios below. As a presenter:
Introducing PowerPoint Live in Microsoft Teams
Teams web client: sharing a screen (Microsoft Edge) Sharing looks a bit different when you are using Teams web client. Sharing is available in (new) Microsoft Edge and Google Chrome browsers. The toolbar is hovering on top of the meeting. From the toolbar you can open the share tray.
Go to PowerPoint and select the Slide Show tab in the top ribbon. Click on the Set Up Slide Show button. Select Browsed by an individual (window) under Show type and click on OK. Click on the play ...
This article applies to: Microsoft Teams. PowerPoint Live in Microsoft Teams offers several benefits over screen-sharing your PowerPoint presentation window or editing window. Seamlessly switch between presenters. Unlike screen-sharing, where the presentation is shared from a single presenter, co-presenters can take control of the slide deck ...
Method. Set up and join your Teams meeting as usual. In Teams, select Share > PowerPoint Live and choose your presentation from the list. Enable Include computer sound if your presentation has audio content that you want to share (including embedded videos, narrated sections or music) If your presentation is not listed then select Browse ...
Learn how to share PowerPoint Slides in Microsoft Teams the correct way. There are different ways to present your PowerPoint slides in a Teams meeting. In th...
Using the desktop app (installed on your machine), you can share your screen during a meeting in just a few clicks: Once inside the meeting, select the Share icon (rectangle with an arrow) in the upper right corner next to the Leave button. When finished sharing, use the same Share button to stop sharing.
Present your slides. If you're already in a Teams meeting, select Share and then under the PowerPoint Live section, choose the PowerPoint file you're wanting to present. If you don't see the file in the list, select Browse OneDrive or Browse my computer. If your presentation is already open in PowerPoint for Windows or Mac, go to the file ...
QUICK LINKS: 00:28 — Video playback challenges when sharing your desktop. 01:24 — The solution using web streaming. 01:58 — Using PowerPoint Live to share and synchronize video playback. 02:22 — Demo: adding online videos using PowerPoint on the web. 03:34 — Demo: Microsoft Teams meeting experience for the presenter and other participants. 04:29 — Demo: Using PowerPoint desktop to ...
Method #1: Use the Share Button in PowerPoint. You can also directly present your slide deck via Microsoft Teams by sharing your screen to start a Live presentation during a remote meeting instantly. Suppose your organization uses Microsoft Teams regularly.
In Microsoft Teams, you can show your desktop, a specific app, a whiteboard, or a presentation in a meeting. In your meeting controls, select Share . Turn on the Include sound toggle to share your computer audio. Screen lets you show everything on your screen. Window lets you share an open window on your screen, like a browser page.
📚 Order my book, Teach Yourself Visually: Microsoft Teams: http://jum.to/TYVTeamsPowerPoint is likely one of the most popular apps shared during a Microsoft...
From the three-dots menu, select "Share." Choose the "Share Screen" option. To include the audio in your screen share, toggle on the "Audio" option. If you're on Android, you will see a "Display Over Other Apps" page. Here, find "Teams" and tap it. Then enable the "Allow Display Over Other Apps" option. If you're on an iPhone or iPad, tap the ...
To stop sharing the window, use the stop sharing button in the Teams control bar. Teams allows you to see participant videos while sharing content. When you are sharing content in a Teams meeting, open the full Teams app on your screen using the instructions above to see the participant videos and get feedback during your presentation.
Engage your audience with presenter modes in Microsoft ...