with input and suggestions from many on the and at
to skip past FAQ questions list and other info and go directly to the start of this topic.
on Google.
The Home Tab in Word 2007 - Word 2021(365) ). Although the program Word for the Mac has a similar Home tab, this page describes the Windows version. In particular, the Mac program does not have Dialog Launcher button which give access to more controls. Tab - the basic workspace in a document:
I suspect that many Word users seldom stray from the Home Tab. They are missing many opportunities to make Word work for them, but that is not the topic of this page. On this page I intend to examine the control groups on the Home Tab and what each of the controls does. This leads into the Font and Paragraph dialogs and the Clipboard functions of Word.
-- -- -- -- --
.
Word 2019/365 has added a sixth group at the far right: Voice. It holds a Dictate button.
I do not pretend to know what every control does, especially the ones on the dialog boxes. I will tell you what I know. If I am speculating or guessing, I will try to make that clear. As I learn more, this page will be changed. This is a "work in progress."
Group
The clipboard group is on the far left of the Home Tab. It is often used in conjunction with the , which is on the far right of that tab.
(with options) : I have been told that when Microsoft studied Word users, they discovered that the most used Command was "Paste" so when they redesigned the user interface, they decided to give this command prominence as the first button people would see. (The keyboard shortcut in most Windows programs including all versions of Word is .) The Paste button is actually a drop-down menu of paste choices which is similar to the paste options you see after you paste if you use the the shortcut.
Button Drop-Down - Ctrl Key Result
Button is the mouse equivalent of .
The Copy Button also puts selected text or graphics into the Clipboard. It remains where it is, though. The keyboard equivalent for this is Ctrl+C .
The Format Painter (Brush) ( Ctrl+Shift+C to copy formatting, Ctrl+Shift+V to paste formatting)
rather than the Format Painter. In the long run it will make your life much simpler.
These all work with the Office Clipboard as well as the System Clipboard. You can see what is in the Office Clipboard by clicking on the dialog launcher in the bottom right corner of the Clipboard group. (Again, the Mac program does not use Dialog Launchers.)
.
The top of the Office Clipboard Task Pane will tell you the number of items in the clipboard out of the possible 24. If, with the Clipboard Task Pane showing, you click on one of the items, it will be pasted into your document at the current insertion point even if it was not the last item placed in the clipboard.
Note, the (Windows) System Clipboard holds the last item cut or copied. It only holds one item.
The font group has to do with how characters look. It is distinguished from the paragraph group where the formatting handles the entire paragraph. I am going to divide these controls into three parts: Controls that give you direct formatting or erase that formatting, A Control that changes the Case of text but is not formatting, and Controls that change how the text looks but are not considered formatting. Let's look at the last two types, first, because there are only two of them. Change Case : - Note that Small Caps is not one of the options. Highlighting : - Highlighting is not considered formatting in Word Highlighting cannot be part of a Style definition (unlike shading) and is not reversed by the Clear Formatting button. Next is the Oops button: Clear Formatting, which will strip the effects of the other buttons in the font group from selected text. Clear All Formatting This says it clears all formatting. This is not accurate. It clears all direct formatting, the same as using Ctrl+Spacebar and Ctrl+Q. . It then changes the paragraph style to the Normal style. The Clear Formatting button will clear any of the formatting applied by the remaining buttons in the Font Group or direct paragraph formatting as well as any style formatting. The following are all considered Direct Formatting by Word and can be cleared by the Clear Formatting button (or by Ctrl+Spacebar ). Font Dropdown and Font Size Dropdown These have been a part of Word since at least Word 97. You can click on them to give a list to select from or you can type in them. In the size window you can type a size that is not on the dropdown list. In the Font window you can start typing the name of a font and it will fill in the first font name that fits as you type. Increase Font Size - Grow Font Decrease Font Size - Shrink Font These two buttons will increase/decrease the size of selected text. The increments are according to the font sizes shown in the dropdown for fonts except that for smaller sizes it will go in increments of one that can be lower than any shown. The minimum is 1. Bold (Ctrl+B) Italic (Ctrl+I) These two buttons apply Bold or Italic formatting to text. When the insertion point is inside text that has been formatted as bold or Italic, these buttons will be shaded. Bold and Italic are toggle formatting. I.e., if you apply bold to text that is already bold, it is turned off. Both can be applied to the same text, so that you can have text formatted Bold and Italic . I tend to use the Strong and Emphasis character styles instead of the direct formatting in case of a theme change. There is no built-in style for that. Applying the style is not a toggle. Underline (with options) (Ctrl+U) Clicking on the Underline button will underscore your text. Clicking the little triangle on the right will give you options for the type of underline you want. Once you select an option, that option is active during your Word session (including in different documents). The Underline Color brings up a palette. More Underlines... brings up the Font dialog box which has access to even more underline types. You can only apply one type of underlining to a character. This is character formatting so you could apply different types to different characters in the same word. If text is already underlined and you click on the Underline button, the underlining will be removed. Strikethrough The Strikethrough button gives you a single line through selected text. A double line is possible through the Font Formatting dialog box ( below ). If this button is clicked on text that already has double-line strikethrough, it changes it to single-line. If it is clicked on text that already has single-line strikethrough, that is removed. The Strikethrough button will be shaded if selected text has a single underline applied. Subscript Superscript These decrease the font size proportionally and lower or raise the baseline. These buttons are toggles and will be shaded when text is selected to which they apply. Text Effects Text Effects lets you apply WordArt type appearance to text in the body of your document. Unlike WordArt, Text Effects can be applied using Styles . The Text Effects button is available beginning with Word 2010. The screenshot above is from Word 2013; the last three choices in the menu are not available in Word 2010. This works as a gallery, changing the appearance of text as you mouse-over a type. Also, as you mouse-over, if you pause, you will see background information on the effect. The Text Effects button only works as a drop-down. Unlike the Underline , Highlighting , and Color buttons which also allow choices, it will not apply an effect upon being clicked. You need to pick something. Text Effects work best on larger-size text. On body-size text they will make the text unreadable. For access to all of the options, you need to use the Dialog Launcher . I do not pretend to understand all of the choices in this. Here is an Office-Watch page on them. Font Color If you simply click on the font color button, it will give you the color shown. That color will be the last one applied to text in your Word session. If you click on the drop-down, it gives you selections and menu choices. I try to use Theme colors when they work. That is because if a theme is changed, the color is more likely to fit in. More Colors gives you access to the full palette Gradient allows setting multiple colors fading - this is much more effective with larger text. Font Dialog Launcher (Ctrl+D) As with many of the Groups on the Ribbon, the Font Group has a dialog launcher button in the bottom right corner. An alternative for reaching this dialog box is the keyboard shortcut Ctrl+D . This opens a dialog box that gives control over multiple options and gives more options than do the buttons on the Ribbon. Two not available on the Ribbon buttons are Double strikethrough, and S MALL C APS. In addition, the Underline style gives access to many different kinds of underscores. The Preview box at the bottom previews what you are setting. Under that are buttons that let you set these settings as the default for new documents (based on this template), for text effects , and OK/Cancel. Even more options are available on the Advanced tab of the font dialog box: These have to do with character rather than line spacing. Exploration of these options is beyond the scope of this page. Clipboard -- Font -- Paragraph -- Styles -- Editing -- Voice (2019)
The Paragraph Group
Bullets and Numbering is the top-right section of the paragraph group. For simple documents that will not need much editing, these will work fine. Bullets The first button is for bullets. Clicking on the bullet button will give you a bullet, the type of bullet will be the last type used by you. Following paragraphs will have the same bullet type. When you press the Enter key to create a new paragraph in an empty line, Word will discontinue use of bullets. When you click on the button, Word changes the indents to add a "hanging indent" that indents both the bullet and the associated text. Clicking on the down-pointing triangle will give you choices. You can also choose to define your own bullet icon. For documents that are going to be heavily edited or with multiple kinds of bullets, I recommend use of bullets linked to Styles. See How to control bullets in Ribbon Versions of Word by Shauna Kelly .
The second bullet is for simple numbered lists. Clicking on the button will give you a single-level numbered list of the type last used. Shown below is such a number inserted with the ruler showing. Included with the numbering is a first-line indent and a hanging indent. Your numbered list will be set in from the margin and following lines in the paragraph will be set in more. As with bullets, you can apply this to existing paragraphs. As with bullets, the down-facing triangle will give you more choices. The screenshot above shows the gallery of choices. As with the bullets gallery, the list number gallery lets you preview your choice for selected text. In this show, the current choice is with the full stop following the number; the previewed choice is with a right parenthesis. As with bullets, you can define a new format. In addition, you can reset or restart your numbering. Again, with simple documents that will not be edited much, this button works fine. For anything more complex, you will want to go to Numbering linked to Styles. See How to create numbered headings or outline numbering in Ribbon Versions of Word by Shauna Kelly . This method gives much finer control and is much less prone to development of "spaghetti numbering."
Controls - East-Asian Languages
If any East-Asian language is enabled, the Paragraph Group on the Home tab will include two additional controls to change the text direction. When used with a non-East-Asian language, they do not really change the direction but do change the ruler and other things. This is explored more in my page on Alignment and Justification .
The little arrow in the bottom right corner of the Paragraph group launches the Paragraph Formatting dialog. Again, such formatting is best done using Styles rather than directly.
The Styles Group
The Styles Group in Word 2007-2010 is shown above. The Styles Group for 2013 and later no longer has the Change Styles dropdown. That has been moved to the design tab in those versions. From Word 2016 on it has become smaller horizontally but still has the expansion dropdown menu. With Word 2021 and Windows 11, a different look was introduced, called the "New Experience." It changed the Styles Group, removing the unformatted names of the styles and instead showing them formatted. This decreases the number of styles that can be displayed. It is possible to add style controls to the Quick Access Toolbar. Here is a link to my free Add-In that does this: Styles QAT Add-In . Clipboard -- Font -- Paragraph -- Styles -- Editing -- Voice (2019)
The Editing Group
The Editing Group actually appears on the far right end of the Home Tab.
The Editing Group has three choices, two of which are drop-down. Find Find ( Ctrl+F ) opens the navigation pane with the insertion point in a search box Advanced Find ( Ctrl+H , Alt+D ) opens the Find dialog box (See Replace below) Go To... ( Ctrl+G ) opens a dialog that lets you go to a point in your document Replace ( Ctrl+H ) opens the Replace dialog box shown below. Actually, it opens a smaller dialog box with everything above "Search Options" on it. In the smaller version the button on the left reads "More >>" instead of "<< Less." Note the Find and Go To tabs at the top. These are the dialog boxes for the Advanced Find and Go To commands. The Replace dialog can be used instead of the Advanced Find box if you want, just ignore the Replace and Replace All buttons. Under both the Find what and Replace with boxes are areas for format. These are controlled by the Format and No Formatting buttons when the cursor is in the box for the text. There are multiple web pages devoted to this dialog box. Here is a place to start: MVP General Word Help Page
The Voice Group - Dictate Office 2019-2021/365 Only
Note that the Online version of Word also has a Transcribe function. As far as I know, this is the only function available in the Online version that is not in the Desktop applications.
Variations on the Home Tab
This page has been exploring the controls in Word 2010 and 2013. The Home tab has remained mostly the same in all versions of Word. Here are some screenshots.
-Word 2007 - wider -Word 2007 - narrower The three tabs above are all screenshots of the ribbon on the same computer. Word repackages the ribbon tabs to fit the available space. Here, I've simply decreased the size of the screenshots of the wider versions. In the wider version, it gives more space to the Styles Gallery. In the narrower version some buttons shrink or lose captions. The combination of screen size and resolution determines what you will see, so your ribbons may not look exactly like any of the ones shown here. Another example showing different screen layouts is in the Word 2010 version of the Drawing Tools contextual tab below. Your ribbon may or may not have a Developer Tab , that is up to you. The Word 2007 and 2010 tabs shown are from a laptop running Windows Vista. The Word 2013 tabs are from a desktop tower running Windows 7 on a larger screen.
Word 2010 - Narrower (Note the collapse of the QuickStyles Gallery and Editing Group. The Quick Styles gallery is now available through the dialog launcher button next to the word "Styles.". Other groups are compressed. This is less than half as wide as the one immediately above it.)
Word 2016/365
Original Word 2016 Word 2016/365 in 2018 - Note Voice/Dictate Group on Right Word 2019/2021/365 in 2023 Word 2021/365 New Experience applied in 2023 - major change is look of Quick Styles Gallery and addition of Editor
Copyright 2000-2024 Charles Kyle Kenyon
FAQ provided as an adjunct / hobby as a part of my web site as a .
( - - - - - - - - - - - - - - - - - - - ( )
How To Use Home Tab Options In MS Word
In this lesson, you will learn How To Use Home Tab Options In MS Word . This lesson will discuss the groups and commands available in home tab in creating word document.
What is Home tab in MS Word?
The Home Tab in MS Word is where you can find basic information about how text looks when it’s printed or shown online. It lets you use both direct formatting and formatting based on styles. Styles take up a lot of space in Word because they are such an important part of using it well.
Table of contents
How many groups are in the home tab of ms word , home tab in ms word features.
The Microsoft Word Home tab provides many features to users, including the following.
Shortcut Keys of MS Word Home Tab
Home tab in MS Word Use this keyboard shortcut: Alt+H to see the keyboard shortcuts for items. When the button is pressed, the keys to press for each item in the Home tab are shown, as shown in the picture below .
What are the Parts of Home tab in MS Word?
Clipboard of ms word home tab.
Clicking on the dialog launcher in the bottom right corner of this group brings up the Clipboard task pane quickly.
Command Button of MS Word Home Tab Clipboard
Font group of ms word home tab.
The Font Group of the MS Word Home Tab contains all of the character formatting commands. By clicking the dialog box launcher in the bottom right corner of this group, you can quickly display the “Font” dialog box.
Command of MS Word Home Tab Font
Paragraph group of home tab.
You can quickly open the “Paragraph” dialog box by clicking on the dialog box launcher in the bottom right corner of this group.
List of Commands in the Paragraph Group of the Home Tab
begin in the upper left corner. The appearance of bullet lists can be customized by clicking the drop-down arrow. Indent a list item and create a sub bulleted item by pressing “Tab” on the keyboard.
Numbered lists are like bullet lists, but they list events in order. The drop-down arrow allows list customization. Tab creates a sub number and indents a list item.
The right increase/decrease indent icons move chosen text five spaces right or left or to the next tab. Right indentation creates sub-bullets or sub-numbers. Left indentation doesn’t.
The Sort icon arranges text after an increase/decrease indent. It’s for Word tables.
Show/Hide Paragraph group’s top right. Formatting icon reveals document formatting options. This helps users suspect erroneous document formatting. Missing formatting.
Bottom row: Paragraph Alignment. The options align the selected text to the left, center, right, and justified, which evenly distributes content between the margins. Left-aligned Word documents are the default.
Paragraph alignment icons are next to Line & Paragraph Spacing. Line and paragraph spacing are set here. Spacing increases paragraph readability. Users can customize “Line Spacing Options”
Text, tables, and paragraphs can be shaded to change their background color. It’s for flyers and Word documents.
The Page Borders icon creates borders around text and paragraphs. There are endless borders. Borders divide paragraphs.
Styles Group
A style group in the home tab is a collection of formatting attributes that you can apply to text, tables, and lists in your document to alter their appearance quickly. When you apply a style, you apply a variety of formats in a single, straightforward operation.
You can quickly toggle the display of the Styles Task Pane by clicking on the dialog box launcher in the bottom right corner of this group.
Editing Group of MS Word Home Tab
The voice group has a dictation command that lets you speak into your computer and have it turn it into text. Both the desktop version of Word 2019 and the online version (Office 365) have the dictation feature.
Reuse Files
Reuse Files – Displays the Search task pane.
MS Word Home Tab Short Cut Keys
Bold
CTRL + B OR
Center Para
CTRL + E
Copy Format
CTRL + SHIFT + C
Distribute Para
CTRL + SHIFT + J
Edit Copy
CTRL + CTRL + C OR
Edit Cut
CTRL + X OR
Edit Find
CTRL + F
Edit Go To
CTRL + G OR
Edit Paste
EDIT PAST SPECIAL
ALT + CTRL + V
EDIT REPLACE
CTRL + H
Edit Select All
CTRL + A
Font Size Select
CTRL + SHIFT + P
We hope this tutorial helps you as you plan to create a document in MS Word.
Leave a Comment Cancel reply
22 Basic Microsoft Word practice exercises for beginners
Microsoft Word Exercises for Practice: – This article is very important for a basic computer course, for college and school students learning Microsoft Word online and offline. In this, you will get the best ideas on how to learn and practice Microsoft Word. And you can explore the capabilities of Microsoft Word as a business software in this post.
The best way to learn anything is by doing exercises and creating samples of existing materials from experts. It’s ok that you know about Bold, Italic, Page Layout, Insert Menu, View options, etc. but it’s great if you can use such options in creating anything in Microsoft Word.
I mean tools are the same, but the field, seed, and process are changed. So, Can you do that with the same tools? I know farmers do it daily.
So, let’s explore how to learn Microsoft Word. Microsoft Word Exercises ideas that I think every student around the world should practice.
Microsoft Word practice exercises for beginners:
1. create and design admission/enquiry forms etc..
To create this kind of form, you need to use shapes, text boxes, colors, formatting options, tables, and horizontal lines in MS Word. This is a very good exercise to practice because it will give you an idea of how to use such options practically on various official documents that we use in our daily official life.
These days many people do not create forms and charts usually they download them. That makes the forms boring. And often you see similar kinds of formats in forms. But as a student or teacher or small business owner if you learn to create such forms not only do you expand your thinking and creativity but you can also utilize this ability in business and job.
See a sample in the image below.
2. Create bills/leaflets/brochures. See the sample below.
Everyone has various designs of bills such as your refrigerator shopping bill, computer bill, electricity bills, and various other kinds of bills. So you can practice in Microsoft Word to create that type of bill format. It’s good for practice in which you will learn the Insert menu option, text adjustment between the table, page size, and text boxes.
3. Design E-book cover pages / Magazine front/ books front/back page using the cover page option in Insert Menu.
This practice is an advance. But try to find the books and magazine cover pages. And try to make it similar in MS Word. Imagine if you’re the designer, how you will design the same content or front page. You will learn while practicing this about the Cover Page option in MS Word or you can design without using that option. The benefit of learning this is about understanding the various practical uses of Microsoft Word in our daily lives.
4. Create Business Cards using Shapes, text, and colors.
People use Adobe Photoshop, Corel Draw, and websites to create business cards nowadays automatically and manually. You can also use that. But it’s about mastering MS Word options and skills. When you create and design anything in Microsoft Word. Your basic computer skills become strong. That helps you in the future when you start working on a Computer or MS Office or MS Word. Also, basic computer skills are very important before doing any degree course in IT. So, Design the business cards similarly you see in the below sample picture.
You Might Also Like
How to learn Microsoft Office Online at Home
5 Best CRM Software to build intact customer relationships
Streamline Your Business with Essential All-in-One Management Software
This is an advanced exercise, but if you do it and create cards then the options you’ve learned during your computer courses in MS Word remain forever in your brain.
Related: Importance of MS Word in Education
5. Use smart art and create organizational charts and showcase relations:
Smart Art is one of the favorite options in Microsoft Word. Smart art is used to draw diagrams that are used to showcase the content visually that will be easy to understand and manage. As you see below the smart art image Hierarchy Diagram is used to create an organizational chart or structure of the Telecom company.
This is the best method to understand and teach certain things to students, teachers, parents, and companies. You will see such organizational charts in the company’s office and government head offices.
Radial Cluster:
I have created this radial cluster diagram and organizational chart using Smart Art in Microsoft Word to showcase the difference between Managed WordPress Hosting and Shared Hosting” in one of the latest published posts. You can practice and create a similar chart to showcase the relation or useability differences.
Structural Chart:
I hope that you can see (if not zoom in the browser using (Ctrl+ + ) both WordPress hosting and shared hosting smart images that are created in Microsoft Word.
When you practice MS Word Option to create the above diagram or any other, you get many problems. Those problems were not there while you were learning MS Word. These are the problems such as font size adjustment, lines adjustment, etc. colors, shape adjustment, etc. when you use tools or Word applications to communicate your point of view.
So, when you solve these problems by yourself or with the help of your computer course instructor it will be great for your computer knowledge and MS Office skills. Because when you solve the problem you learn very important working lessons in MS Word. This is why you’re learning.
Related: Steps to create a simple business plan using templates in Word App
6. Make book content page or index page
This is another idea in which you need to create an index or content page of the book. In this process, you will learn about the first-line indent, hanging indent, and the perfect use of the ruler bar in Microsoft Word.
And also about a page number, and a hyperlink (if it is an eBook). You can discuss this article with your computer teachers, to allow us or provide us with similar things to practice on.
7. Try to create a similar Header and footer that you’re seeing in the Book
This is the most important option and thousands of students find it difficult to use the header and footer. It’s easier to learn header and footer one time but if you’re not practicing it in various ways or the things such as books header and footer, it’s tough for you to explain it to others.
That’s why I am suggesting you try using the different styles of header and footer. And you will get such an example from the books.
8. Insert the Image into the shape
This is a little easy. But you must know easier things more than difficult things. Because in interviews especially related to IT, people ask easier questions than difficult ones.
So, practicing even on small things is also beneficial. You don’t know when it will be helpful for you in the future.
So, insert an image into the shape. Take and draw a shape from the Illustration menu, place it on a page a little higher in size, and then double-click on the shape. Go to the shape fill option and click on the picture. As an example, you can see the following image.
Related: – Top 10 powerful uses of Microsoft Word.
9. Practice hyperlinking and creating links between Word document texts to D: /, Play songs from Microsoft Word text, and create links between internal and external files.
This is the most important option in Microsoft Word. Most of the processes on the internet contain links. The hyperlink is the starting point in which you learn how things are connected.
It’s also a great option for Web Designers or web designing teachers to teach “How website links work” by using the hyperlink as an example.
As you can see in the image below, I am displaying the connection between the play song text to the location of the song.
Now you need to select the text in which have written the play song and then insert a hyperlink (Ctrl+K) and in the hyperlink address, put the path of the song. After that press, the Ctrl button and click on the blue link, so now any song that you selected will start playing.
10. Design a Happy Birthday Message by using Word Art and print it.
I think it’s the easiest thing for you. You can use the Word Art option for this. You can create the best wishes message in MS Word. After that, you can print. And give it to the person. It’s about creating small things at home. This is also a good way to make kids interested in learning the computer.
Also good for students and kids to create fun things and print or give them as a gift to parents. So, they will enjoy your creativity.
11. Create a chart and show the product price comparison between years:
The chart option is very important in Microsoft Word and Excel. However, the use of the chart option and any other option in MS Word depends on the demand for a certain content type.
For example, you’re writing a book or making notes about something in which you have to write and explain the price comparison between 3-4 years. Then you can use the chart for visualizations to analyze the data.
In visual format or the chart, it’s easier for people to understand, what you mean. Also, it gets more views or focus than the content.
So, try to create the chart you’re seeing in the above image.
12. Get the newspaper and see the text-based advertisement and Design
Design and create text or image-based advertisements that you saw in the newspaper. Designing such an advertisement will be a very beneficial role for Microsoft Word students or people learning Advanced Microsoft Word skills. Advertisement designs contain high-quality images, text, and layouts. And these designs are created by experts. When students practice expert material and create similar or better than that.
I think that movement is great for learners and teachers. So, try to create as many as you like. It will make you master MS Word. And I think doing exercises after completing the class topic is the best way to learn MS Word.
13. Take a double-column book or newspaper and design or create a similar paragraph style in the Word document .
Not all often type or create content in a double column. I know computer teachers can teach you such options. But they will not be able to explain the deepest or professional uses of such options for certain reasons.
So, I will suggest that you use the column option and find the newspaper similarly as you see below and create or type the text as you’re seeing in the newspaper. And if you’re having a problem, ask your teachers. So, when your teachers teach you how to do that thing or this thing, it will be great for your knowledge.
14. Create a letterhead or identity card of any company or institution that you have and insert the Watermark with that company name in the document.
You can create an identity card, visiting card or birthday card in MS Word. As you’re seeing below this is an example of cards and letterheads. But you can find such things. And practice your MS Word knowledge in creating an identity card, and letterhead.
This will give you an idea of how to adjust the text in different shapes and areas. Also, this is a good exercise in which you learn after printing, what size you need to adjust on the page. And when you do that, you learn very precious things in MS Word.
In this video tutorial, you will get basic ideas to create a letterhead. You will get ideas to insert letterhead content in the header and footer, you will also learn how you can use watermarks in letterhead, and how to print and adjust content on the page. The video tutorial is in Hindi, but even if you’re not familiar with the Hindi language, you can still learn and watch it for practice ideas:
Step by Step Guide to create printable letterhead in Microsoft Word and Google Docs
15. Decorate a Word document with a page border, and content border, add patterns, and write beautiful text in it.
This is the easiest page layout option, in which you can learn about page borders in MS Word, text borders, color or shading on the page, and pattern.
These options are very beautiful when you’re creating eBooks, making notes, and doing anything that requires the following type of style. See the image below and try to create something similar to this one.
16. Insert Images and Practice on Format Menu and Image Options.
You can use image options and style to decorate, retouch, and adjustment of colors and brightness in MS Word. As you can see, I have created various styles and image effects. These are easy to create.
But to learn more advanced effects later in other professional software, you need to learn and practice such things during your basic computer course.
17. Insert a template or download the new template in Microsoft Word from the Internet and edit those templates with your content.
There are 100+ templates almost for anything in the Microsoft Word Template option. The top benefit of using the template is that if you don’t know how to create or design a certain thing then you can just download the template and replace the existing text with your text. And it’s done.
This is the most important option that you should learn because it’s tough when you don’t know how to design or create anything, so try to practice on 10+ templates and see what it will look like.
Related: Uses and features of Microsoft Word.
18. Practice Typography
Write 10 lines or 10 sentences and then change the font, style, color, and size of each sentence. make each one different from than previous and next..
Fonts are the face of the text. The following image displays various fonts and styles. Just create similarly. During the practice, you will learn which font will be better for the specific text. Just write 10 lines and differentiate each one.
19. Create a Tenant management form in Hindi or your native language.
We use computers or technology mainly for two reasons the one is Innovation and the second is problem-solving. There are various ways of solving problems using computers. Some problems are solved immediately or some take time. For example, you can create an accounts management software to manage business incoming, outgoings, cash flow, balance, and taxes.
Similarly, there are software and mobile apps to manage tenants. I have created this form for my office space owner. He wanted a simple solution that they could follow and manage easily. They are not that much familiar with apps and other digital methods. I told them about digital options. But they want something that can be taken care of easily and also send tenants’ details for police verification when needed.
So we created the following form and this is also an example of immediate problem-solving using a computer and Microsoft Word. Now after printing one copy of this, they can photocopy it as per the number of tenants they want to manage.
So as beginners, you can try to create a similar form by using the Table feature in Microsoft Word. For the best practice 1st create and decide on columns on rough physical paper and the details that you want. You can create a better form than this and I expect that from you.
And for Hindi or your native language, even if you do not have Hindi font or French or Spanish font on your computer or in Microsoft Word. You can use Google Translate for this, convert the word into Hindi or Spanish, and then copy and paste it into the form table column.
20. Practice to design a brochure for an event
When you try creating this brochure design in Microsoft Word, you’ll learn basic and advanced techniques. This includes using image effects, grouping shapes, adding colorful bullets, and creating textures. These skills are valuable, especially if you plan to work with Word or as a virtual assistant. But even as a Word beginner, practicing these exercises is essential for building your Word skills.
Here you can watch a free video tutorial to learn brochure design : Brochure Design Practice in Microsoft Word | Word Exercise for Beginners | Hindi Tutorial
21. Learn and Practice creating business card designs in Microsoft Word
Today, there are plenty of software options available for creating business cards, such as online tools, Adobe InDesign, Corel Draw, Photoshop, Canva, and more. However, making a printable business card may seem straightforward but does involve some technicalities and creative flair.
As a student, it’s beneficial to tackle challenging and intricate design tasks in Microsoft Word, like this business card project. This practice will help you strive for excellence and mastery of Word skills. Consider it your 21st exercise towards becoming a Word expert.
Here you can watch a complete and detailed video tutorial on this: How to Create Modern Business Card Design in MS Word | Step-by-Step Detailed Tutorial
22. Practice to create a professional-looking certificate design
Practicing certificate design and Microsoft Word is essential because it empowers you with valuable digital skills that are increasingly relevant in today’s technology-driven world. By honing your proficiency in Microsoft Word, you not only gain the ability to create professional certificates but also enhance your competence in document formatting, layout design, and image manipulation. These skills have broad applications across various personal and professional tasks, making you more adaptable and capable in a digital environment.
Furthermore, practicing certificate design offers you a practical avenue for skill development while producing tangible outcomes. It allows you to create certificates for courses, achievements, or even for your own business, helping you develop an eye for aesthetics, attention to detail, and the ability to produce polished documents. Overall, this practice not only enhances your digital competence but also provides you with a versatile skill set that can significantly benefit your personal and professional growth.
By creating and practicing below certificate design below, you will be able to explore various design options to create a professional-looking certificate. This is just a sample but along with this design, you can take it’s design to the next level.
If you want to learn how you can do it please follow this step tutorial: How to create a professional-looking certificate design in Word | Step-by-Step Tutorial in Hindi
I think if you practice Microsoft Word by working on these exercises then it will be enough to make you above average among all the students around the world doing basic computer courses or learning Microsoft Word.
Because after learning Microsoft Word, you have to work with professionals or in companies. And almost all official works are related directly and indirectly to the above exercises.
So, this is the best method to learn Microsoft Word by doing exercises. And this is about practical knowledge.
I hope these Microsoft Word Exercises ideas will be helpful for you. To learn more visit: Top 10 Basic and Advanced Microsoft Word skills
How useful was this post?
Click on a star to rate it!
Average rating / 5. Vote count:
No votes so far! Be the first to rate this post.
We are sorry that this post was not useful for you!
Let us improve this post!
Tell us how we can improve this post?
8 thoughts on “22 Basic Microsoft Word practice exercises for beginners”
good practical please send more practical in winword. Thanks
These are good Practical exercises. Please send list of practicals of MS Word in Vocational IT NSQF level-1 subject code-402 class IX
please send a book which covers exercises like this
Great content! Thanks for putting this out there!
This is very nice
I have recently joined a Private Computer classes at the age of 53. Can you guide me through WORD, EXCEL, POWERPOINT & INTERNET
Is it possible for you send step by step Assignments for all the above 4 courses, so that I can evaluate whether I am learning properly or not ?
Hi, That’s a very good concern as a student “whether I am learning properly or not” I think 80% students ignore this. I will contact you by email. Age is not a problem. I expect you have strong reason or specific task or goals to learn all these three + internet in this age. Yes, I can evaluate through giving you assignment and testing it.
our class used this as example for our activity it hard.
Leave a Comment Cancel reply
Save my name, email, and website in this browser for the next time I comment.
How a YouTube Channel will help you to get a Digital Marketing Job
HOME TAB in Microsoft Word
The Home tab in Microsoft Word within the Microsoft 365 suite is a central hub for commonly used formatting and editing tools. It houses various commands and functions that are essential for basic document creation and manipulation. Here's an overview of the key sections and tools typically found within the Home tab:
This section includes functions related to copying, cutting, and pasting text or objects within the document. It also features the Clipboard pane, which allows users to access recently copied items.
This tool enables users to copy the formatting of a selected text and apply it elsewhere in the document.
Here, users can modify the font type, size, color, and style of the selected text. It includes options for bold, italic, underline, and other text effects.
This section provides tools for adjusting paragraph alignment (left, center, right, and justified), line spacing, indentation, and bullet or numbering styles.
Users can quickly apply predefined styles to text within the document, making it easy to create consistent formatting throughout.
Tools such as Find, Replace, and Select can be found here, aiding in locating specific text, replacing content, and selecting portions of the document.
This option allows users to remove formatting or content from the selected text while retaining the text itself.
Allows users to search for specific words or phrases within the document.
Enables users to find specific words or phrases and replace them with different text.
This tab might provide features related to voice input or dictation, allowing users to control Word using voice commands or dictate text directly into the document.
The Editor feature typically integrates grammar checking, style suggestions, and clarity improvements into the existing interface. If separated into a tab, it might contain tools for checking spelling, grammar, and providing writing suggestions or refinements.
This tab could encompass various additional tools or functionalities that extend Word's capabilities through third-party add-ins or custom features. It might include tools for document management, project management, formatting enhancements, or integration with external services.
Visual Studio VSTO Add-ins Web Add-ins Web Development Web Services Windows Forms WPF Forms XML
Express Backend Fluent UI Functions HTML Pages Microsoft Graph Node JS Runtime Numbers Objects Email Us ...
Office Add-ins Office Events Office Manifest Office Scripts Outlook API PowerPoint API React Library Ribbon Commands Find Add-ins ...
Strings Syntax Task Panes TypeScript Variables Visual Studio Code Word API Yeoman Generator
Undo - (Added in 365). (Ctrl + Z). Button with Drop-Down. Allows you to undo changes, even after you have saved the document, as long as you are within the undo limits. By default Office saves the last 100 undoable actions. If you can't undo an action, the Undo command changes to Can't Undo. Redo - (Added in 365). (Ctrl + Y). Button with Drop-Down. Allows you to redo several actions at the same time using the drop-down. The Redo button only appears after you've undone an action.
You can quickly display the Clipboard task pane by clicking on the dialog launcher in the bottom right corner of this group.
Paste - Button with Drop-Down. The drop-down contains the commands: Paste, Paste Special and Paste as Hyperlink. Cut - (Ctrl + X). Cuts the current selection to the clipboard. Copy - (Ctrl + C). Copies the current selection to the clipboard. Format Painter - (Ctrl + Shift + C). Copies the formatting from one place in a document and lets you apply it somewhere else. This works across multiple documents.
This group provides access to all the Character Formatting commands. You can quickly display the "Font" dialog box, Font Tab, by clicking on the dialog box launcher in the bottom right corner of this group.
Font - (Ctrl + Shift + F). Provides a list of all the available fonts (based on your current printer selection). Font Size - (Ctrl + Shift + P). Lets you adjust the character size (based on your current printer selection). Increase Font Size - (Ctr + Shift + >). Increases the font size of the current selection to the next larger size in the Font Size box. Decrease Font Size - (Ctrl + Shift + <). Decreases the font size of the current selection to the next smaller size in the Font Size box. Change Case - Drop-Down. Changes the selected text to either uppercase, lowercase or another type of capitalisation. The drop-down contains the commands: Sentence Case, Lowercase, Uppercase, Capitalize Each Word and Toggle Case. Clear All Formatting - (Ctrl + Spacebar). Clears all the formatting from the current selection. Bold - (Ctrl + B). Toggles bold on the current selection. Italic - (Ctrl + I). Toggles italics on the current selection. Underline - (Ctrl + U). Button with Drop-Down. The button toggles bold on the current selection. The drop-down contains the commands: Underline, Double Underline, Thick Underline, Dotted Underline, Dashed Underline. Strikethrough - Draws a line through the middle of the selected text. Subscript - (Ctrl + =). Converts the selection to small letters below the text baseline. Superscript - (Ctrl + Shift + +). Converts the selection to small letters above the text baseline. Text Effects and Typography - Drop-Down. Apply text effects such as Outline, Shadow, Reflection, Glow, Number Styles, Ligatures and Stylistic Sets. Text Highlight Color - Button with Drop-Down. Shades the background behind the current selection.The drop-down contains the commands: No Color and Stop Highlighting. For more details please refer to the Characters > Text Highlight page. Font Color - Button with Drop-Down. The button changes the colour of the font of the current selection. The drop-down contains the commands: Automatic, Theme Colors, Standard Colors and More Colors.
This group provides access to all the Paragraph Formatting commands. You can quickly display the "Paragraph" dialog box, Indents and Spacing Tab, by clicking on the dialog box launcher in the bottom right corner of this group.
Bullets - Button with Drop-Down. The button toggles single level bullets from the selected paragraphs. The drop-down contains the commands: Recently Used Bullets, Bullet Library, Document Bullets, Change List Level and Define New Bullet. The Change List Level extension displays levels 1 to 9. The Define New Bullet displays the "Define New Bullet" dialog box. Numbering - Button with Drop-Down. The button toggles single level numbering from the selected paragraphs. The drop-down contains the commands: Recently Used Numbering, Change List Level, Define New Number Format and Set Numbering Value. Multilevel List - Drop-Down. The drop-down contains the commands: Current List. List Library, Change List Level, Define New Multilevel List and Define New List Style. A multilevel list shows the list of items at different levels, rather than just at one level. This was previously accessible from the Outline Numbered tab on the Bullets & Numbering dialog box and has replaced Outline numbering. Please refer to the Bullets > Multilevel List for more details. Decrease Indent - Decreases the indent by 1 or removes the indent completely. Increase Indent - Increases the indent by 1. Sort - Displays the "Sort Text" or "Sort" dialog boxes allowing you to sort paragraphs of text or text within tables. If your current selection is not in a table then the "Sort Text" dialog box is displayed. If the current selection is in a Table then the "Sort" dialog box is displayed. This command was previously on the Table drop-down in 2003 but now appears both on the Home Tab and Table Tools - Layout contextual tab. Show/Hide Paragraph Marks - (Ctrl + *). Toggles the display of paragraph marks and other hidden formatting. Align Left - (Ctrl + L). Aligns text to the left. Center - (Ctrl + E). Aligns text to the center. Align Right - (Ctrl + R). Aligns text to the right. Justify - (Ctrl + J). Aligns text to both left and right margins adding extra space between words where necessary. Line Spacing - Drop-Down. The drop-down contains the commands: 1.0, 1.15, 1.5, 2.0, 2.5, 3.0, Line Spacing Options, Add Space Before Paragraph and Add Space After Paragraph. The Line Spacing Options command displays the "Paragraphs" dialog box (Indents and Spacing tab). The default line spacing is 1.15. Shading - Button with Drop-Down. The button applies the selected shading to the current selection. The drop-down contains the commands: Theme Colors, Standard Colors, No Color and More Colors. Border - Button with Drop-Down. The button applies the selected border to the current selection. The drop-down contains the commands: Bottom Border, Top Border, Left Border, Right Border, No Border, All Borders, Outside Borders, Inside Borders, Inside Horizontal Border, Inside Vertical Border, Diagonal Down Border, Diagonal Up Border, Horizontal Line, Draw Table, View Gridlines and Borders and Shading.
You can quickly toggle the display of the Styles Task Pane by clicking on the dialog box launcher in the bottom right corner of this group.
Quick Styles - Displays a gallery of available styles (with auto preview). Is the Heading 1 style different in 2007 and 2010 to 2003. Yes the Normal template and styles are very different.
Find - Button with Drop-Down. The button displays the "Find and Replace" dialog box and displays the Find tab. The drop-down contains the commands: Find and GoTo. The GoTo tab can also be displayed by clicking on the Page: 1 of 2 indicator on the status bar in the bottom left corner. Replace - This displays the "Find and Replace" dialog box and displays the Replace tab. Select - Drop-Down. The drop-down contains the commands: Select All, Select Objects and Select Text with similar Formatting. The Select Text will select text with similar formatting.
Dictate - Lets you use speech-to-text to author content.
Editor - Displays the Editor task pane.
Reuse Files - Displays the Search task pane.
Hindi Videos
English Videos
Download Files
MS Word for Beginners
MS Word | Home Tab Explained with 15 Examples
How To Use Mail Merge In MS Word
How to Send Email from MS Word
Hide Or Unhide The Ribbon In MS Word
Learn MS Word Basic Skills For Beginners Part 1
MS Word :Home Tab Explained 15 + examples
How To Use Mail How To Use Mail Merge In MS Word M
Create Headers IN MS Word
Create A Cover Page In MS Word
Create A Hyperlink In MS Word
MS Word: Highlight Text
MS Word: Left Align Text
Learn MS Word: Use Center Align to Format Text
MS Word: Right Align Text
MS Word : Format Text Better with Justify Alignmen
MS Word: Manage Line Spacing
MS Word: Apply Background Color To Text
Insert Comment In MS Word English
Learn MS Word - Splitting and Joining Text in Word
MS Word Undo and Redo Chapter 4
MS Word Find and Replace Chapter 5
MS Word Spell Check Chapter 7
MS Word Check Word Count Chapter 8
MS Word Printing A Document Chapter 9
MS Word Formatting Text Chapter 10
How To Format A Word Document Chapter 12
MS Word Page Formatting Chapter 13
Learn MS Word Using Sectins Chapter 14
Learn MS Word Add a Cover page Chapter 15
Learn MS Word Create Header Chapter 16
Learn MS Word Editing Headers Chapter 17
Learn MS Word - How To Use Styles Chapter 19
Learn MS Word Create Own Formatting Style Chapter
Learn MS Word Use Themes Chapter 22
Learn How To Modify Themes in MS Word Chapter 23
Learn How To Create Borders in MS Word Chapter 24
Learn How To Edit Border in MS Word
Learn How To Create Page Borders in MS Word
Learn How To Create Text and Paragraph Borders In
Learn How To Create Tables In MS Word
Design Tables In MS Word
Create Line Numbers In MS Word
Create Table Of Content In MS Word
Save As Option in MS Word
View 2 MS Word Documents Side by Side
Insert Image in MS Word
Insert Footnote & Endnote in MS Word
Insert ClipArt IN MS Word
Mix Image and Text In MS Word
Insert special Characters in MS Word
Inset Text Box In MS Word
Use Comments In MS Word
Zoom Feature in MS Word
Use Quick Access Toolbar MS Word
All 68 MS Word Shortcut Keys
All Videos List
Related Videos
Suggested video 1
Suggested video 2
Suggested video 3
Suggested video 4
Suggested video 5
Suggested video 6
Copyright 2021 My E-Lesson - All Rights Reserved.
Skip to main content
Skip to secondary menu
Skip to primary sidebar
Skip to footer
Erin Wright Writing
Writing-Related Software Tutorials
How to Use Microsoft Word (10 Core Skills for Beginners)
By Erin Wright
Do you want to learn how to use Microsoft Word quickly? This tutorial teaches ten core skills for beginners.
Table of Contents
How to Start a New Document
How to change the font, size, and color, how to change the alignment, line spacing, and indentations, how to add headings, how to change the margins, how to add images, how to add page numbers, how to add headers and footers, how to run the editor (spelling and grammar check), how to save and print your file.
Please note that this is a quick start guide. I have in-depth tutorials for most of these topics for those who would like to learn more.
Watch all the steps shown here in real time!
Explore more than 250 writing-related software tutorials on my YouTube channel .
The images below are from Word for Microsoft 365. These steps are similar in Word 2021, Word 2019, and Word 2016.
We will cover these ten core skills in Word for Mac in a separate tutorial.
Open Word on your computer.
When Word opens, you will be in the Home screen of the Backstage view.
Select Blank document to start a new document. (Alternatively, select Open if you want to open an existing Word document.)
When the new document opens, you will be in the Home tab in the ribbon , and your cursor will automatically be placed towards the top, left-hand corner of the page, ready to type.
You can change the font, size, and color before or after you type text. However, if you want to change existing text, first left-click, hold, and drag with your mouse to select the text.
Select the Home tab in the ribbon if you are not already there (see figure 2).
Select the menu arrow to open and choose from the (A) Font , (B) Font Size , or (C) Font Color menus in the Font group.
If you selected existing text, that text will change immediately. If you haven’t selected existing text, all new text will feature the choices you just made.
Further Reading: How to Change the Font, Font Size, and Font Color in Microsoft Word
Like the font choices shown above, you can change the alignment, line spacing, and indentations before or after you type text. However, if you want to change existing text, first left-click, hold, and drag with your mouse to select the text.
Select the Home tab, if you are not already there (see figure 2).
Select the Align Left , Center , Align Right , or Justify button to position the text on the page.
Select the Line and Paragraph Spacing menu arrow and then choose a spacing option from the drop-down menu.
Select the Decrease Indent or Increase Indent buttons to adjust the indent as necessary.
Further Reading: How to Adjust Line Spacing in Microsoft Word and Three Ways to Indent Paragraphs in Microsoft Word
You can turn existing text into a heading or choose a heading level before typing the heading text.
Select the Home tab if you are not already there (see figure 2).
Select a heading level from the Styles group.
If the heading level you want isn’t visible, select the More button.
Select a heading level from the menu that appears over the Styles group.
Further Reading: How to Create and Customize Headings in Microsoft Word
You can change the page margins for your entire Word document at once.
Select the Layout tab in the ribbon.
Select the Margins button and then select an option from the drop-down menu.
Further Reading: How to Adjust the Page Margins in Microsoft Word
Place your cursor where you want to insert the image.
Select the Insert tab in the ribbon, select the Pictures button, and then select the location of the image:
This Device lets you choose an image stored on your computer or network server.
Stock Images lets you choose stock images, icons, cutout people, stickers, and illustrations. The full stock image library is only available to users signed into Word for Microsoft 365.
Online Pictures lets you search for images through Bing, Microsoft’s search engine.
For this tutorial, we will insert an image stored on the device.
(For “This Device” option only) Locate and select the image in the Insert Picture dialog box and then select the Insert button.
Your image should now appear in your Word document.
(Optional) Select one of the resizing handles and then drag the image to a new size.
(Optional) Select the Layout Options button and then choose how the image is positioned with the surrounding text:
A. In Line with Text
E. Top and Bottom
F. Behind Text
G. In Front of Text
The effect of each option will depend on the size of your image and the density of your text. So, you may need to experiment with several options to find the one most suited to your content.
Further Reading: How to Insert and Modify Images in Microsoft Word
Select the Insert tab in the ribbon (see figure 13).
Select the Page Number button and then select a location from the drop-down menu, followed by a design from the submenu.
Select the Close button to close the Header and Footer tab. (This tab only appears when the Header and Footers areas are active.)
Further Reading: How to Add Page Numbers in Microsoft Word
Select the Header or Footer button and then select a design from the drop-down menu.
Type your text into the placeholders.
Select the Close button to close the Header and Footer tab (see figure 18).
Further Reading: How to Insert Headers and Footers in Microsoft Word
In Word for Microsoft 365, the spelling and grammar check is called the Editor. Your spelling and grammar options will depend on which version of Word you are using. Therefore, your interface may look different than the images shown below.
Select the Review tab in the ribbon and then select the Editor button. (Older versions of Word will have a Check Document button, instead.)
Select the corrections or refinements category you want to review in the Editor pane.
If Word finds a possible error, select a recommendation or select Ignore Once or Ignore All .
Word will automatically move to the next issue within the category.
Select a new category or select the closing X to close the Editor.
What Is the Difference between the Editor Button and the Spelling and Grammar Button?
You may notice a Spelling and Grammar button next to the Editor button in the Review tab. This button provides a quick way to check only spelling or spelling and grammar without checking the additional refinements reviewed by the Editor.
Further Reading: How to Use the Editor in Word for Microsoft 365
I recommend saving your file before printing just in case there is a disruption during the printing process.
Select the File tab in the ribbon.
Select the Save tab in the Backstage view.
Select the location where you want to save the File.
Type a name in the File Name text box and then select the Save button.
Once you have saved your document to a specific location, you can then select the Save icon if you make changes to the document later.
To print, reselect the File tab (see figure 26) and then select the Print tab in the Backstage view.
Ensure the correct printer is selected and turned on, enter the number of copies into the text box, and then select the Print button.
From there, follow any additional dialog boxes provided by your printer.
Updated November 26, 2023
Microsoft Word Tutorials
Adobe Acrobat Tutorials
PowerPoint Tutorials
Writing Tips
Editing Tips
Writing-Related Resources
In this practice project for Word, students create a document with a title and table. The table has two columns that have different font alignment and incluces various fonts.
In this practice project for Word, students create a document using a different size and color font for the title than the rest of the paragraph.
In this practice project for Word, students create a document with two different types of bullets showing points and subpoints.
In this practice project for Word, students create a letter. Included in the letter is a heading on the right, indented paragraphs, and the closing and signiture near the middle of the document.
In this practice project for Word, students create a document that contains several paragraphs of text and also includes an outline with key points and subpoints.
In this practice project for Word, students create a document with the heading on the right, a boldfaced, centered title, and indented paragraphs. The document is double-spaced.
In this practice project for Word, students create a document with the heading on the right, a boldfaced title that is centered, and several paragraphs that are indented.
In this practice project for Word, students create a document using the preset headings to create a title bar. The document has different alignment and font, blanks, and a short outline.
In this practice project for Word, students create a document that shows some different effects that can be used with the same font.
In this practice project for Word, students create a document that includes a centered title followed by a numbered list.
In this practice project for Word, students create a document that has a centered title, a heading in the upper right corner, and indented paragraphs.
In this practice project for Word, students create a document with a table showing a school schedule. The blocks in the table are different sizes and will take individual work within the blocks to create the correct layout. The document includes a title and has the date in the top right corner.
In this practice project for Word, students create a document with a header and two colomns. The columns include boldfaced and italic font and different alignment.
In this practice project for Word, students create a document with two identical columns in landscape orientation. Included in each are indented lines and different alignment and font.
In this practice project for Word, students create a document like a student handout. This includes an outline with several levels, blanks for students to write on, and different font.
In this practice project for Word, students create a document with a header and two outlines. Students are asked to use the automatic numbering and outlining features in Word. They must use different font, some with all captials, and some that is boldfaced.
In this practice project for Word, students create a scoresheet using a table. Students must use different sizes, colors and styles of font, including different alignment.
In this practice project for Word, students create an outline using the automatic outline in Word, including many levels of subpoints.
In this practice project for Word, students create a document with a centered title in all capitals, the first letter of each word slightly larger than the rest. Throughout the document the font is different sizes, sometimes boldfaced or in color. Students must number the main points and indent for subpoints.
In this practice project for Word, students create a document similar to a test or quiz. They must include points and subpoints, blanks, boldfaced text, tabs, and spacing.
Subject Explorer
School Subjects
Math & Science
Business & Technology
Electives & Health
Board & Administration
Teaching & Learning
Audio/Video Lectures
Books & Documents
Classifieds
Jobs & Resources
Discussions
Language & Literature
Practice Projects for Microsoft Word
Word 9 Table Practice Document
Word 8 Formatting Text Practice Document
Word 7 Bullets Practice Document
Word 6 Letter Practice Document
Word 5 Text And Outline Practice Document
Word 4 Modified Text Practice Document
Word 3 basic text practice document.
Word 22 Preset Headings Practice Document
Word 21 Formatting Options Practice Document
Word 20 Numbered List Practice Document
Word 2 Heading 2 Practice Document
Word 19 Advanced Table Practice Document
Word 18 Columns Practice Document
Word 17 Columns Practice Document
Word 16 Lesson Notes Handout Practice Document
Word 15 Lesson Notes Practice Document
Word 14 Table Practice Document
Word 13 Outline Practice Document
Word 12 Formatting Practice Document
Word 11 Formatting Practice Document
Resource Type:
Pass it on:
Leave a Reply
Get started with computers
Learn Microsoft Office
Apply for a job
Improve my work skills
Design nice-looking docs
Getting Started
Smartphones & Tablets
Typing Tutorial
Online Learning
Basic Internet Skills
Online Safety
Social Media
Zoom Basics
Google Docs
Google Sheets
Career Planning
Resume Writing
Cover Letters
Job Search and Networking
Business Communication
Entrepreneurship 101
Careers without College
Job Hunt for Today
3D Printing
Freelancing 101
Personal Finance
Sharing Economy
Decision-Making
Graphic Design
Photography
Image Editing
Learning WordPress
Language Learning
Critical Thinking
For Educators
Translations
Staff Picks
English expand_more expand_less
Word - Creating and Opening Documents
Word -, creating and opening documents, word creating and opening documents.
Word: Creating and Opening Documents
Lesson 3: creating and opening documents.
/en/word/understanding-onedrive/content/
Introduction
Word files are called documents . Whenever you start a new project in Word, you'll need to create a new document , which can either be blank or from a template. You'll also need to know how to open an existing document .
Watch the video below to learn more about creating and opening documents in Word.
To create a new blank document:
When beginning a new project in Word, you'll often want to start with a new blank document.
A new blank document will appear.
To create a new document from a template:
A template is a predesigned document you can use to create a new document quickly. Templates often include custom formatting and designs , so they can save you a lot of time and effort when starting a new project.
Click the File tab to access Backstage view , then select New .
A new document will appear with the selected template .
You can also browse templates by category after performing a search.
To open an existing document:
In addition to creating new documents, you'll often need to open a document that was previously saved. To learn more about saving documents, visit our lesson on Saving and Sharing Documents .
The selected document will appear.
Most features in Microsoft Office, including Word, are geared toward saving and sharing documents online . This is done with OneDrive , which is an online storage space for your documents and files. If you want to use OneDrive, make sure you’re signed in to Word with your Microsoft account. Review our lesson on Understanding OneDrive to learn more.
To pin a document:
If you frequently work with the same document , you can pin it to Backstage view for quick access.
Navigate to Backstage view , click Open , then select Recent .
Compatibility Mode
Sometimes you may need to work with documents that were created in earlier versions of Microsoft Word, like Word 2010 or Word 2007. When you open these types of documents, they will appear in Compatibility Mode .
Compatibility Mode disables certain features, so you'll only be able to access commands found in the program that was used to create the document. For example, if you open a document created in Word 2007 you can only use tabs and commands found in Word 2007.
In the image below, you can see how Compatibility Mode can affect which commands are available. Because the document on the left is in Compatibility Mode, it only shows commands that were available in Word 2007.
Word 2007 Commands
To exit Compatibility Mode, you'll need to convert the document to the current version type. However, if you're collaborating with others who only have access to an earlier version of Word, it's best to leave the document in Compatibility Mode so the format will not change.
You can review this support page from Microsoft to learn more about which features are disabled in Compatibility Mode.
To convert a document:
If you want access to the newer features, you can convert the document to the current file format.
The document will be converted to the newest file type.
Converting a file may cause some changes to the original layout of the document.
Open our practice document .
Notice that the document opens in Compatibility Mode . Convert it to the current file format. If a dialog box appears asking if you would like to close and reopen the file in order to see the new features, choose Yes .
In Backstage view, pin a file or folder.
/en/word/saving-and-sharing-documents/content/
Unsupported browser
This site was designed for modern browsers and tested with Internet Explorer version 10 and later.
It may not look or work correctly on your browser.
Communication
How to Create, Open, and Save New Microsoft Word Document Files
Thanks to Microsoft Word, almost anyone can turn out professional-looking office documents.
Even if you’ve never used MS Word before, you’ll find that it only takes a few minutes to become familiar and comfortable with its interface and basic features.
Note : We used the Invoice template from Elements to create this letter. Find more great Word templates from Envato Elements.
In this tutorial, I'll show you how to write a business letter in MS Word. In the process, you'll learn the answers to the following:
How to create a Word document?
How do you save a file on Microsoft Word?
How to open a new file in MS Word?
How do you use a Word template?
How do you copy a Word document?
By the end of the tutorial, you'll be able to create your own document using Microsoft Word.
Launch Microsoft Word
Start by launching Microsoft Word. To use Microsoft Word online, you must have an Office 365 account (paid).
Sign in to your account, then click on Word .
How to Launch Microsoft Word on a Mac
If you’re on a Mac, you've got several options for launching Microsoft Word.
Option 1. Launch in Finder
Go to Applications , then double-click on Microsoft Word.
Note: In this tutorial, I’m using a Mac so that's the interface you see. If you’re on Windows, the steps will be similar, albeit with different names for different applications and interfaces. For example, Finder on a Mac is either Windows Explorer or File Explorer on Windows, depending on which version you're using.
Option 2. Launch in Spotlight.
Launch Spotlight by clicking on the search icon in the upper right-hand corner of the screen on your Mac.
A Spotlight search bar pops open. Type “Word.” Double-click on the Microsoft Word app that appears in the Spotlight results.
When you launch Microsoft Word for the first time, it automatically opens a new blank Word document. From here, you can proceed to make your business letter.
Otherwise, when prompted, select New > Blank Document > Create .
And that's how to create a new document in MS Word.
Make a Business Letter From a Template
If you want your document to have a fancier layout, the fastest way is to start with a business letter template for Word made by a professional designer.
Word comes with its own built-in templates. You may wish to use one of these. But, keep in mind that many other Word users may use these templates. That means you may get a document that looks like someone else’s. What you want to do is to make a good impression and stand out. The best way to do that is with a template.
You could make a template yourself. But, unless you’re already familiar with the advanced features of Microsoft Word, creating a complicated layout would take you a lot of time.
In this section, I’m going to show you how to make a business letter from a template in Word. I’m using the Invoice template for Word from Envato Elements. It includes a template for a cover letter, which would work well with the business letter we're making.
Step 1. Download the Template
Save the template to your hard drive. Duplicate it, so you’ll always have the original files on hand. These will come in handy in case you want to revert back to the original version of the template.
Most premium templates include a help file. Read it for specific instructions and tips from the template's designer.
Step 2. Open the Template in Word
Launch Microsoft Word, then select Open . Follow the rest of the prompts to open the duplicate template file you created earlier.
Since I only need the letter template for Word, I’m going to delete the page with the invoice. Go to the invoice page, then click Edit > Select All .
Press the Delete key on your keyboard. Now, only the letter template page remains in the document.
Step 3. Customize the Letterhead Template for Word
Replace the placeholder text with your own. Double-click into the text boxes to type your own text. You may have to click-and-drag a corner of the text box to make it bigger and accommodate your text.
Delete any other text boxes and graphic elements you don’t want to use. Use the formatting tools to apply styles to your text and add a bullet list, as you learned to do in the previous section. Finally, insert your logo.
Since we’re not using the large signature, there’s a large space on the lower half of the letter. To balance the page, I moved the entire body of the letter lower on the page.
This is the business letter all done:
Next, I'm going to show you how to make a business letter without a template.
Make a Business Letter From Scratch
If you don't need a professional appearance for your business letter or if it's a personal letter, you can still make a business letter. With a new blank Word document open, type your business letter.
You've just created a business letter as a new Word document! As you'll notice, it's very plain.
However, you may wish to modify the document’s default settings in Word.
1. Change the Margins
Go to Format > Document .
Change the margins as you wish. Click OK .
2. Change the Font and Font Size
Highlight the text whose font you wish to change, then click the drop-down arrow for the font section of the Microsoft Word ribbon. Scroll down the list of fonts until you find the one you want to use. Click on it to apply the font to the selected text.
To change the font size, select the text you wish to edit. Click the drop-down arrow for the font size section of the ribbon (it’s beside the font selector). Click on the font size you want to apply.
3. Format the Text
It’s easy to apply formatting styles to your business letter. Highlight the text you want to format. Then, click on any of the formatting buttons on the Microsoft Word ribbon.
The text formatting section of the ribbon, shown above, lets you apply a variety of styles and effects on your text, including changing the color of the font. Hover over a button to learn what it’s for.
4. Add Bullets
It only takes one click to add a bulleted list in Microsoft Word. Take note that each item on the list must be typed on a separate line.
To create a bullet list, select the items for the list. Click on the Bullets button.
This applies a basic dot-bullet on your list, with default settings for indents.
If you want a different bullet character, after selecting the list text, click on the drop-down arrow beside the Bullets button. Choose a bullet style from the selection that appears.
Or, click Define New Bullet , then select a different bullet character.
Here, you can also change the bullet position and text position. When you’re done, click OK .
5. Insert Your Logo
Our business letter is looking good! The only thing missing is our logo.
To add a logo in the header of the letter, double-click on the top-most part of the document. This opens the header. Click the Picture from File button.
Find the logo file in your computer, then click Insert .
To exit the header, click the Header & Footer tab in the ribbon. Then select Close Header and Footer .
The logo appears greyed out when the Header section is closed. Don’t worry, it'll display properly when you print the letter.
After moving the entire letter body down to add space below the logo, our business letter now looks like this:
You’ve just learned how to make a business letter from scratch using Microsoft Word.
How Do You Save a File in Microsoft Word?
Always save your work as you go! Otherwise, you run the risk of losing your work, should your computer shut off or crash unexpectedly. This section is for you if you're asking: "how do you save a file on Microsoft Word?"
The quickest way is to click the Save button on the top of Microsoft Word.
Or, go to File > Save .
Alternatively, go to File > Save As to make a copy of the file.
If you’re saving the file for the first time, or if you selected Save As , you’ll be prompted to give the file a name and indicate where to save the file. When you’re done doing so, click Save .
You can also set up a default location where Word will save your files. To set this up, go to Word > Preferences .
Click File Locations .
Select AutoRecover files , then click Modify…
Choose a location on your computer for where you want your Word documents to be saved. Click Open .
The new location appears under File Locations . If it’s correct, close this dialogue box by clicking on the X in the upper-left corner.
From this point forward, the files you save will be placed in the location you specified.
There's yet another way to save your Word files. Microsoft Word Autosave saves your work automatically every few seconds. To use Microsoft Word Autosave , you must:
have an Office 365 account
be logged into it when you use Word
save your file in your OneDrive
To enable Microsoft Word Autosave , toggle the Autosave button on the top left corner of the screen.
How to Open a File in Word
You can open a saved MS Word file on a Mac in one of three ways:
Option 1. Use Spotlight
If you remember the file name, you can use Spotlight to find and open the file. Click on the Spotlight button in the upper-right hand corner of your screen. Type the file name in the Spotlight search box.
When the file appears in Spotlight , double-click on the file name. The file opens in MS Word.
Option 2. Use Finder
Launch Finder. Either use the Search bar to find the file or navigate to the file by going to its specific location.
Double-click on the file name to open the file.
Option 3. Use Microsoft Word
Here's how to open a saved document in MS Word.
Launch Microsoft Word, then click on Recent to see a list of files you’ve worked on recently. Double-click on the file you wish to open.
Or, click on Open . Locate the file you want to open in your computer or cloud storage and select it. Click Open at the bottom of the dialog box.
Discover Great Word Graphic-Print Templates for 2019
As you can see, you can create an impressive document in Microsoft Word—even if you’re not a graphic designer, don’t want to hire one, or don’t want to spend hours designing a creative layout.
The answer is to start with a premium Word template. Envato Elements is a terrific source of graphic print templates for Microsoft Word . If you make many Word documents, you’ll love the unlimited downloads you get from Elements, all for one small subscription.
Aside from templates, you also get unlimited downloads of stock photos, graphics, logos, and fonts. It’s truly an amazing deal.
Here’s a sampling of the print templates for Word that you can find at Elements:
For those who only need the one-off document, GraphicRiver is another source of outstanding templates for Word. Here, you can find premium Word templates on a pay-per-use basis. That’s an economical option for those who don’t make a lot of print materials in Word.
Create Your Business Letter In Microsoft Word
In this tutorial, you learned how to create a Word document in the form of a business letter. You now know how to save a file on Microsoft Word, as well as how to open new and saved files. You've even picked up basic text formatting skills.
You’ve seen how to make a new document (such as a business letter) in Word from scratch. Or, you can create a new document with an advanced design by using a template for Word.
If you’re a power communicator who needs to churn out several documents, then look to Envato Elements for outstanding templates for MS Word . But, if your needs are few, then GraphicRiver may be the more logical place for you to find Word templates .
Lesson 1 Home Menu Complete Tutorial in Microsoft Word || Beginner to Advance Level
Microsoft Word Home Menu worksheet
Microsoft Word
"Welcome to the World of Microsoft Word: A Guide to the Home Menu
Microsoft Word (Home Menu )Tutorial (हिंदी)
How to learn Microsoft word/ Microsoft Word Class 01 Home menu
VIDEO
MS Word Home Menu
MS WORD || HOME & INSERT OPTION
Ms-Word Home Tab Full Lecture|Ms-Word
MS-WORD (HOME TAB) ll
MS word home option explain #youtube #viral #computer
Microsoft Word 2016 Home TAB part 1
COMMENTS
The Home Tab in Microsoft Word
In the Mac programs, these are reached through the menus. The Home Tab - the basic workspace in a document: Purpose. The Home Tab is about the basics of how text looks when it is printed or displayed online. It gives access to both direct and Style-based formatting. Because of the importance of Styles to using Word effectively, it devotes a ...
11: Exploring the Home and View Tab of Microsoft Word
The Home Tab contains the most commonly used document controls; actions in the Home Tab can change the font and size of the text, paragraph, and line spacing, copy and paste, change the organizational structure of the document. The Home Tab is grouped into four distinct areas: Clipboard, Font, Paragraph, and Styles.
The Microsoft Word Home Tab and Ribbon In Depth
Learn the Microsoft Word Home Tab and Ribbon tools and options inside and out in this crucial video. This video is one in a series of videos that will explor...
How To Use Home Tab Options In MS Word
Here are the available commands buttons in MS Word Home Tab Clipboard. Paste - Button with Drop-Down. The drop-down contains the commands: Paste, Paste Special and Paste as Hyperlink. Cut - (Ctrl + X). Cuts the current selection to the clipboard. Copy - (Ctrl + C). Copies the current selection to the clipboard.
Microsoft Word Basics Exploring the Home Tab
Welcome to our comprehensive guide on the Microsoft Word Home tab! In this video, we'll take you through all the essential features and tools available on th...
22 Basic Microsoft Word practice exercises for beginners
Microsoft Word practice exercises for beginners: 1. Create and Design Admission/Enquiry Forms etc. To create this kind of form, you need to use shapes, text boxes, colors, formatting options, tables, and horizontal lines in MS Word.
Home Tab in Microsoft Word
Title: Mastering Microsoft Word: A Comprehensive Guide for Beginners | Lecture 1Description:Welcome to the first installment of our Microsoft Word tutorial s...
HOME TAB in Microsoft Word
HOME TAB. The Home tab in Microsoft Word within the Microsoft 365 suite is a central hub for commonly used formatting and editing tools. It houses various commands and functions that are essential for basic document creation and manipulation. Here's an overview of the key sections and tools typically found within the Home tab: Clipboard.
PDF Microsoft Word 2016 Step-by-Step Guide
Click into the [Document title] field (be sure you click on the words "Document" or "title" and not an empty space). The field becomes selected and you can type "Manual of Operations". Note that this field is formatted to display all letters in capitals. Type "Circulation Desk" into the [Document subtitle] field.
Learn Microsoft Office Word 2007
Learn Microsoft Office Word 2007 - Home Tab | IT Online Training. Learn Microsoft Office Word 2007. The MS Word Home Tab Tutorial provides detailed explanation on all the commands that are used most often in Word 2007 to edit text and create styles.
Microsoft Word Support
This group provides access to all the Character Formatting commands. You can quickly display the "Font" dialog box, Font Tab, by clicking on the dialog box launcher in the bottom right corner of this group. Font - (Ctrl + Shift + F). Provides a list of all the available fonts (based on your current printer selection).
PDF Microsoft Word Step by Step (Microsoft 365 and Office 2021)
a document or as a PDF. To open a PDF file in Word, do either of the following: In File Explorer, right-click or long-press (tap and hold) the PDF file, select Open with, and then select Word. If you don't see Word in the list of apps, select Choose another app, select Word, and then select. Just once.
MS Word
MS Word Undo and Redo Chapter 4 ; MS Word Find and Replace Chapter 5 ; MS Word Spell Check Chapter 7 ; MS Word Check Word Count Chapter 8 ; MS Word Printing A Document Chapter 9 ; MS Word Formatting Text Chapter 10
PDF Microsoft Word
The Ribbon is organized into a set of task‐oriented tabs, and each tab on the Ribbon contains groups of commands. The Home Tab contains the most frequently used commands in Word. To get to another tab on the Ribbon click that particular tab. If you do not see a command(s) that you're looking for click the arrow beside each group name that ...
Word: Getting Started with Word
The Word interface. When you open Word for the first time, the Start Screen will appear. From here, you'll be able to create a new document, choose a template, and access your recently edited documents. From the Start Screen, locate and select Blank document to access the Word interface. Click the buttons in the interactive below to learn more ...
Ms Word Practical Assignment Pdf
Microsoft W ord is a word processor developed by Microsoft. It was first. released in 1983 under the name Multi-T ool W ord for Xenix systems. MS. W ord is a popular word-processing program used primarily for creating. documents such as letters, brochures, learning activities, tests, quizzes and. students' homework assignments.
Microsoft Word Home menu tutorial / Part 2
The Home menu in Microsoft Word is the primary location for basic formatting and editing tools. It includes a variety of functions to modify the appearance a...
How to Use Microsoft Word (10 Core Skills for Beginners)
Pro Tip: To select the entire document, press Ctrl + A on your keyboard. Figure 3. Selected text. Select the Home tab in the ribbon if you are not already there (see figure 2). Select the menu arrow to open and choose from the (A) Font, (B) Font Size, or (C) Font Color menus in the Font group. Figure 4.
Practice Projects for Microsoft Word
Word 15 Lesson Notes Practice Document. ★★☆☆. Kendall Myers November 15, 2017. In this practice project for Word, students create a document with a header and two outlines. Students are asked to use the automatic numbering and outlining features in Word. They must use different ….
Word: Creating and Opening Documents
A new blank document will appear. To create a new document from a template: A template is a predesigned document you can use to create a new document quickly. Templates often include custom formatting and designs, so they can save you a lot of time and effort when starting a new project.. Click the File tab to access Backstage view, then select New.; Several templates will appear below the ...
How to Create, Open, and Save New Microsoft Word Document Files
The quickest way is to click the Save button on the top of Microsoft Word. Here's how to save a Microsoft Word file. Start by clicking the Save icon. Or, go to File > Save. Select the Save option from to drop-down menu to save your file. Alternatively, go to File > Save As to make a copy of the file.
Words of thanks from Exalador and SmashNL after his funding ...
Posted by u/Joeri_van_Ees - 7 votes and no comments
Home
THE PRIDE OF THE NORTH! Our school district is a welcoming, high-performing, and thriving district with approximately 2130 amazing, unique, and special students who attend one of our three elementary schools, middle school, high school, or regional non-traditional high school. Centered on the boundary of the fertile, productive agricultural ...


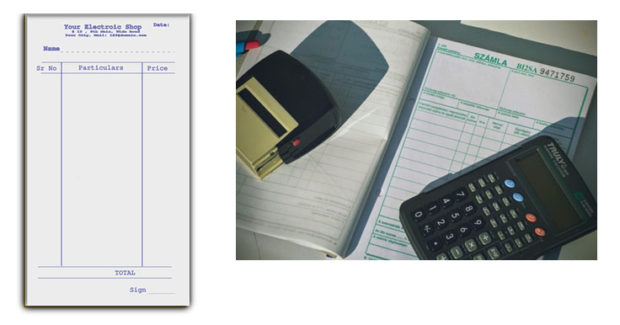


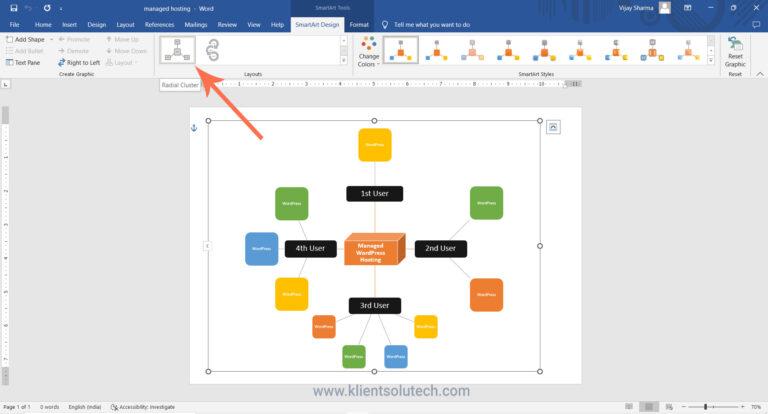


IMAGES
VIDEO
COMMENTS
In the Mac programs, these are reached through the menus. The Home Tab - the basic workspace in a document: Purpose. The Home Tab is about the basics of how text looks when it is printed or displayed online. It gives access to both direct and Style-based formatting. Because of the importance of Styles to using Word effectively, it devotes a ...
The Home Tab contains the most commonly used document controls; actions in the Home Tab can change the font and size of the text, paragraph, and line spacing, copy and paste, change the organizational structure of the document. The Home Tab is grouped into four distinct areas: Clipboard, Font, Paragraph, and Styles.
Learn the Microsoft Word Home Tab and Ribbon tools and options inside and out in this crucial video. This video is one in a series of videos that will explor...
Here are the available commands buttons in MS Word Home Tab Clipboard. Paste - Button with Drop-Down. The drop-down contains the commands: Paste, Paste Special and Paste as Hyperlink. Cut - (Ctrl + X). Cuts the current selection to the clipboard. Copy - (Ctrl + C). Copies the current selection to the clipboard.
Welcome to our comprehensive guide on the Microsoft Word Home tab! In this video, we'll take you through all the essential features and tools available on th...
Microsoft Word practice exercises for beginners: 1. Create and Design Admission/Enquiry Forms etc. To create this kind of form, you need to use shapes, text boxes, colors, formatting options, tables, and horizontal lines in MS Word.
Title: Mastering Microsoft Word: A Comprehensive Guide for Beginners | Lecture 1Description:Welcome to the first installment of our Microsoft Word tutorial s...
HOME TAB. The Home tab in Microsoft Word within the Microsoft 365 suite is a central hub for commonly used formatting and editing tools. It houses various commands and functions that are essential for basic document creation and manipulation. Here's an overview of the key sections and tools typically found within the Home tab: Clipboard.
Click into the [Document title] field (be sure you click on the words "Document" or "title" and not an empty space). The field becomes selected and you can type "Manual of Operations". Note that this field is formatted to display all letters in capitals. Type "Circulation Desk" into the [Document subtitle] field.
Learn Microsoft Office Word 2007 - Home Tab | IT Online Training. Learn Microsoft Office Word 2007. The MS Word Home Tab Tutorial provides detailed explanation on all the commands that are used most often in Word 2007 to edit text and create styles.
This group provides access to all the Character Formatting commands. You can quickly display the "Font" dialog box, Font Tab, by clicking on the dialog box launcher in the bottom right corner of this group. Font - (Ctrl + Shift + F). Provides a list of all the available fonts (based on your current printer selection).
a document or as a PDF. To open a PDF file in Word, do either of the following: In File Explorer, right-click or long-press (tap and hold) the PDF file, select Open with, and then select Word. If you don't see Word in the list of apps, select Choose another app, select Word, and then select. Just once.
MS Word Undo and Redo Chapter 4 ; MS Word Find and Replace Chapter 5 ; MS Word Spell Check Chapter 7 ; MS Word Check Word Count Chapter 8 ; MS Word Printing A Document Chapter 9 ; MS Word Formatting Text Chapter 10
The Ribbon is organized into a set of task‐oriented tabs, and each tab on the Ribbon contains groups of commands. The Home Tab contains the most frequently used commands in Word. To get to another tab on the Ribbon click that particular tab. If you do not see a command(s) that you're looking for click the arrow beside each group name that ...
The Word interface. When you open Word for the first time, the Start Screen will appear. From here, you'll be able to create a new document, choose a template, and access your recently edited documents. From the Start Screen, locate and select Blank document to access the Word interface. Click the buttons in the interactive below to learn more ...
Microsoft W ord is a word processor developed by Microsoft. It was first. released in 1983 under the name Multi-T ool W ord for Xenix systems. MS. W ord is a popular word-processing program used primarily for creating. documents such as letters, brochures, learning activities, tests, quizzes and. students' homework assignments.
The Home menu in Microsoft Word is the primary location for basic formatting and editing tools. It includes a variety of functions to modify the appearance a...
Pro Tip: To select the entire document, press Ctrl + A on your keyboard. Figure 3. Selected text. Select the Home tab in the ribbon if you are not already there (see figure 2). Select the menu arrow to open and choose from the (A) Font, (B) Font Size, or (C) Font Color menus in the Font group. Figure 4.
Word 15 Lesson Notes Practice Document. ★★☆☆. Kendall Myers November 15, 2017. In this practice project for Word, students create a document with a header and two outlines. Students are asked to use the automatic numbering and outlining features in Word. They must use different ….
A new blank document will appear. To create a new document from a template: A template is a predesigned document you can use to create a new document quickly. Templates often include custom formatting and designs, so they can save you a lot of time and effort when starting a new project.. Click the File tab to access Backstage view, then select New.; Several templates will appear below the ...
The quickest way is to click the Save button on the top of Microsoft Word. Here's how to save a Microsoft Word file. Start by clicking the Save icon. Or, go to File > Save. Select the Save option from to drop-down menu to save your file. Alternatively, go to File > Save As to make a copy of the file.
Posted by u/Joeri_van_Ees - 7 votes and no comments
THE PRIDE OF THE NORTH! Our school district is a welcoming, high-performing, and thriving district with approximately 2130 amazing, unique, and special students who attend one of our three elementary schools, middle school, high school, or regional non-traditional high school. Centered on the boundary of the fertile, productive agricultural ...