
Slide Master in PowerPoint – A Complete Beginner’s Guide!
By: Author Shrot Katewa

When I first started using PowerPoint, I had no idea about the “Slide Master”. In fact, when I first learned about it, I was quite confused. I didn’t quite understand its purpose and how it worked. Furthermore, some of the changes I made to the slide master were scary at first simply because I didn’t understand how it worked!
Slide Master in PowerPoint allows you to have master control over all slides. It allows you to make changes to all slides at once. You can also use the slide master to create footers, add watermarks and slide numbers, generate custom presentation templates, edit placeholders, among other things.
Retrospectively thinking, having a “Slide Master” in PowerPoint is such an important feature! Knowing how to use the slide master properly can help you save a lot of time while creating a presentation!
So, in this article, I’ll share with you all the details you need to know about a Slide Master in PowerPoint. Without further adieu, let’s get started!
1. What is the Slide Master In PowerPoint and Why is it Used?
Slide Master is a Microsoft PowerPoint feature that allows you to easily edit all the slides at once or the individual slide layouts of a presentation.
1a. What is a Slide Master?
The slide master in Microsoft PowerPoint contains all the information on the slide layout as well as the theme of a presentation. This includes the fonts, color, effects, background, and the size and position of the placeholders.
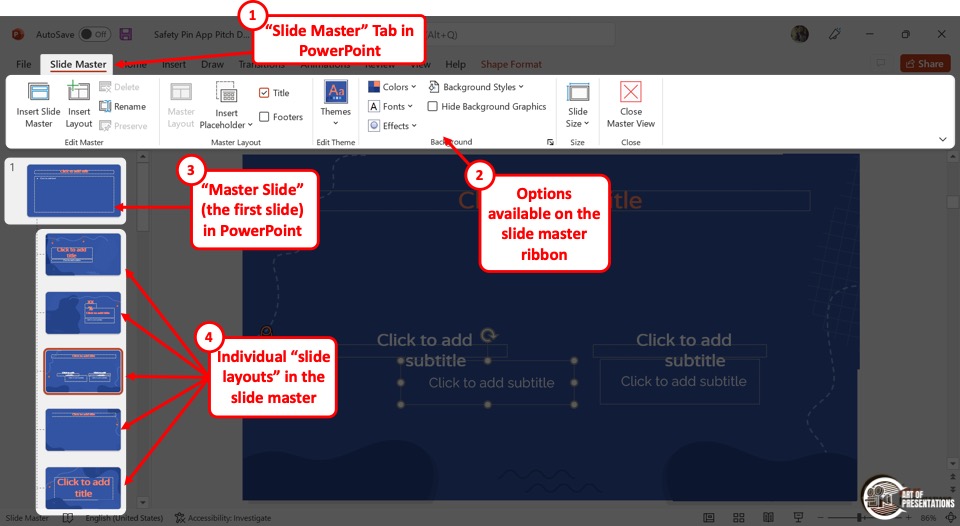
To access the slide master, first, click on the “View” tab in PowerPoint . Then, click on the “Slide Master” option. This will open the slide master view in PowerPoint.
The master slide is the top slide in a hierarchy of slides in a presentation (as shown in the image above). Changes that you make to the master slide impact all the slides in the slide master.
It is important to note that the actual design and content of the presentation must be added to the slides in the “Normal View”. Any images or content you add to the slide master will become uneditable in the normal view of the PowerPoint presentation.
The best way to use the slide master is by using “Placeholders”. I’ve written a detailed article on “Placeholders” in PowerPoint . Make sure to check out that article to learn more about them!
1b. Uses of Slide Master View in PowerPoint –
Since the slide master stores information about the theme and the layout of the slides in a PowerPoint presentation, you can use the “Slide Master” view to edit several elements in the presentation.
a. Change Slide Background
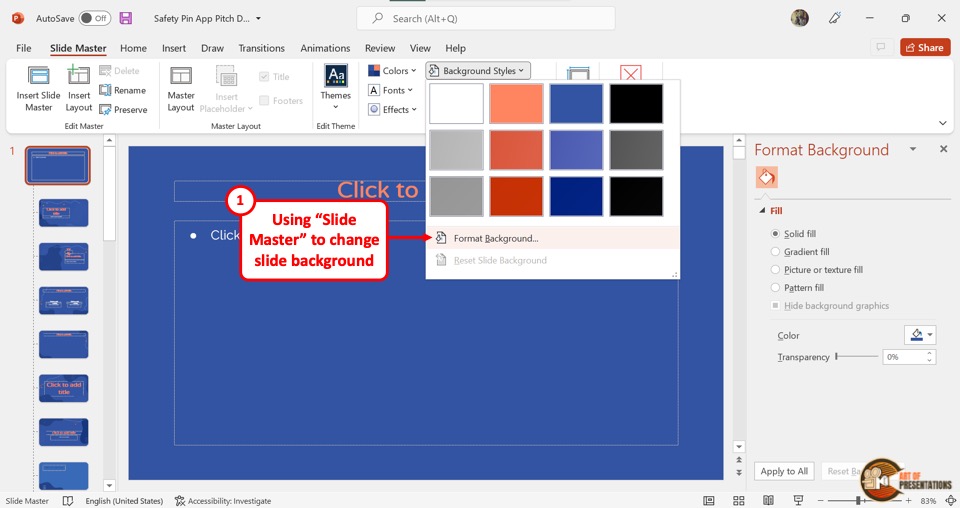
Using the “Slide Master” view, you can change the background of all the slides at once. The background editing features are available in the “Background” section of the “Slide Master” menu.
You can click on the “Colors” option to change the colors for the slides, the “Fonts” option to set a specific font for the presentation, and the “Effects” option for the background effects. Besides, you can click on the “Hide Background Graphics” option to remove all background graphics from the entire presentation.
Clicking on the “Format Background” option under the “Background Styles” button, you can access various customizable background colors and designs for the presentation.
b. Rearrange Placeholders in Slide Layout

In Microsoft PowerPoint “Slide Master” view, you can edit both the master slide and the slide layouts. By rearranging the placeholders in a slide layout, you will only create changes for the slides using that specific layout instead of the entire presentation.
To rearrange the placeholders, all you have to do is click on a placeholder and drag it to your preferred position on the slide.
c. Customize Overall Text Formatting
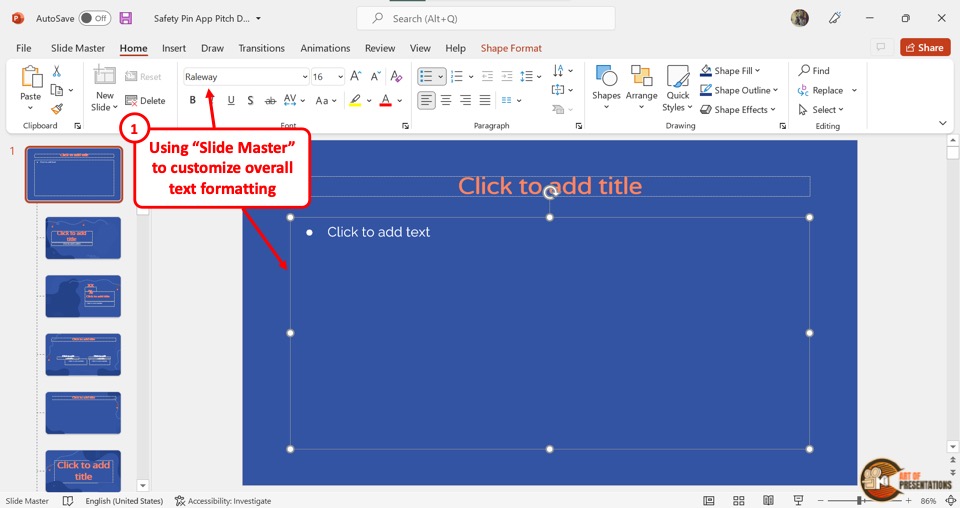
In the “Slide Master” view, you can easily change or customize the overall text formatting. You have to first click on the content placeholder in the master slide which is the top slide in the slide layout panel on the left side of the screen.
Then click on the “Home” tab from the menu ribbon. In the “Font” section of the “Home” menu, you can customize the fonts like the style, size, color, highlights, etc. This will customize the text of all the slides.
d. Customize Theme Fonts
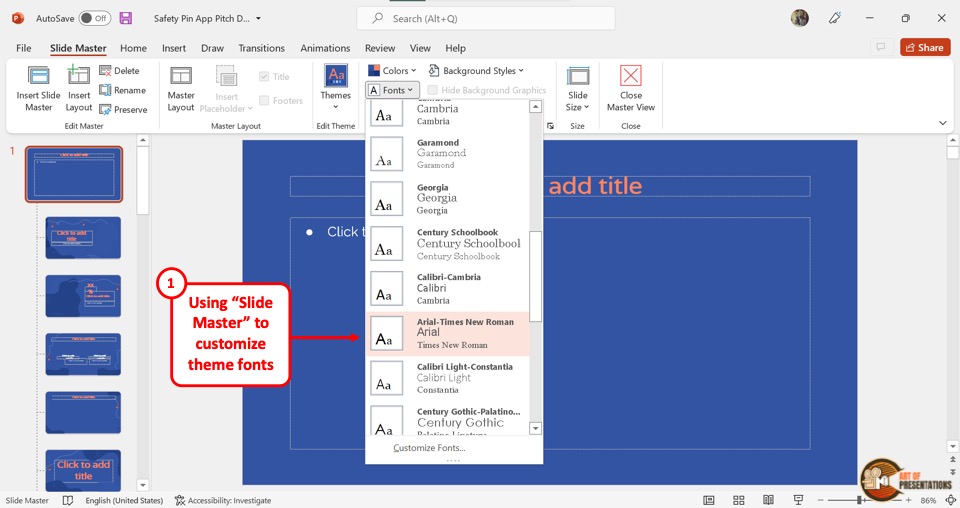
By customizing the theme fonts in the “Slide Master” , you can choose a set of fonts for various list levels of text in all the slides. To do so, click on the “Fonts” option in the “Background” section under the “Slide Master” tab. Then click on your preferred set of fonts from the dropdown menu.
e. Customize Theme Colors
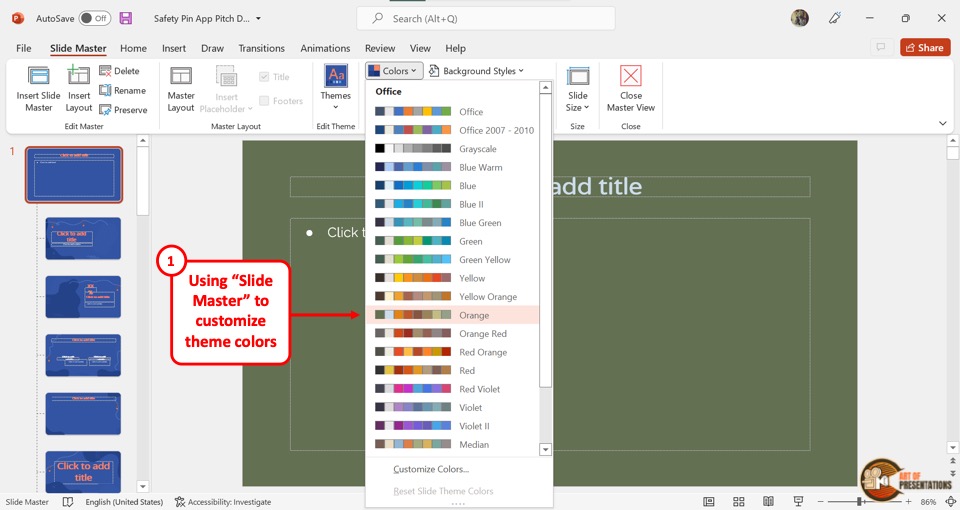
The theme color in a “Slide Master” contains a set of colors for various elements of the slides in a presentation like the background, heading, body text, etc. By customizing the theme color in “Slide Master” , you can customize the colors for the entire presentation.
All you have to do is click on the “Colors” option in the “Background” section of the “Slide Master” menu and select your preferred theme colors from the dropdown menu.
f. Create Unique Slide Layouts and Templates
Using the features in the “Slide Master” menu, you can edit any element and object in the presentation. You can change the color, font, arrangement, theme, etc. of the entire presentation.
You can also create and edit individual slide layouts. You can easily use the “Slide Master” view to create fully unique slide layouts and templates.
2. Difference Between Slide Master and a PowerPoint Template?
In Microsoft PowerPoint, a Slide Master contains information about the layout and the theme of the presentation.
A PowerPoint template, on the other hand, is a design or pattern of a slide or even a whole presentation. In short, a template is a copy of a presentation blueprint that can be edited to fit your needs, while the master slide stores the layout and theme of that template.
3. How to Access the Slide Master in PowerPoint?
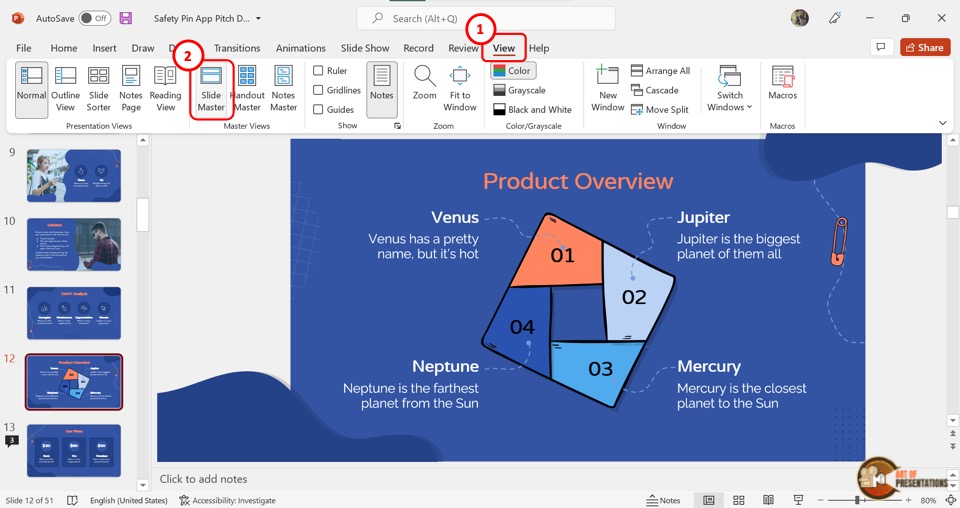
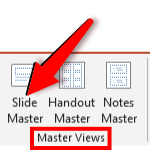
In Microsoft PowerPoint, you can access the slide master in the “View” menu. You have to first click on the “View” tab in the menu ribbon located at the top of the screen. Then click on the “Slide Master” option in the “Master Views” section of the “View” menu. This will open the “Slide Master” view where you can edit the master slide and the slide layouts.
4. How to Edit a Slide Master in PowerPoint?
Microsoft PowerPoint allows you to edit the slide master using the “Slide Master” view. You can edit the master slide itself, and also the slide layouts separately. You can even add or remove master slides and slide layouts.
4a. Using the Master Slide to Apply Changes to All Slide Layouts in PowerPoint
Since the master slide contains all the information on the theme and layouts of the entire presentation, any change in the master slide will be automatically applied to all the slide layouts under the master slide.
To apply changes in the master slide, all you have to do is click on the master slide from the slide layout panel and use the features available in all the tabs in the menu ribbon.
4b. How to Change Slide Background in the Slide Master?

In the “Slide Master” view, click on “Background Styles” and select the “Format Background” option from the dropdown menu. This will open a sidebar on the right side of the screen.
In the “Format Background” sidebar, you can change the color, gradient, or pattern of the background. You can also add an image as the background.
4c. How to Customize Fonts and Text Formatting in the Slide Master in PowerPoint?
To customize fonts and text formatting in the “Slide Master” view, you have to follow the 2 simple steps.
Step-1: Click on the “Customize Fonts” option
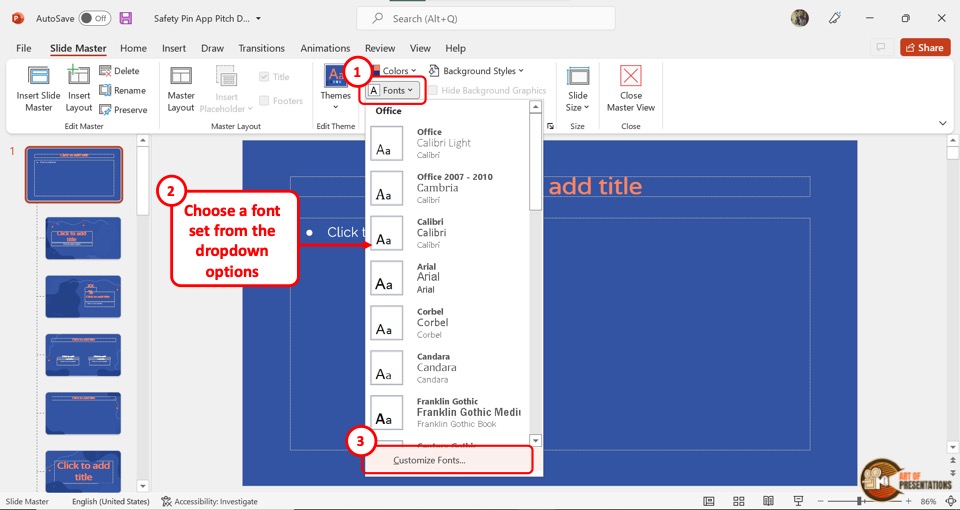
You have to first click on the master slide from the slide layout panel. Then click on the “Fonts” option from the “Background” section of the “Slide Master” menu. From the dropdown menu, click on the “Customize Fonts” option at the bottom.
Step-2: Click on the “Save” button

In the “Create New Theme Fonts” dialog box, click on the “Heading font” box to customize the heading and on the “Body font” box for the body text. Then click on the “Save” button at the bottom of the dialog box.
4d. How to Customize Theme Colors in Slide Master?
In the “Slide Master” view of Microsoft PowerPoint, you can customize the theme color by following the 2 easy steps.
Step-1: Click on “Customize Colors”
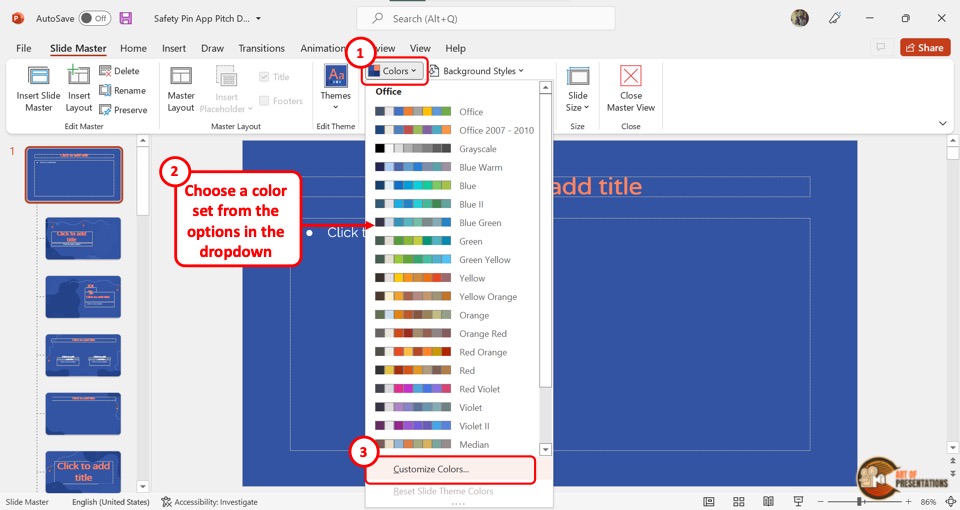
In the “Background” section of the “Slide Master” view, click on the “Colors” option. Then click on the “Customize Colors” option at the bottom of the dropdown menu.
Step-2: Click on “Save”
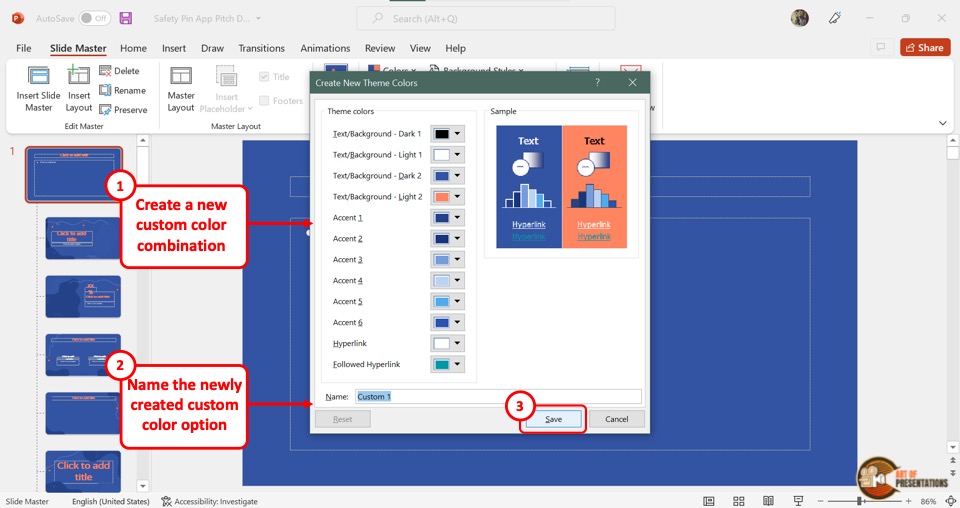
In the “Create New Theme Colors” dialog box, click on the box next to each option to select your preferred colors. Then all you have to do is click on the “Save” button at the bottom of the dialog box.
4e. How to Apply Effects in PowerPoint Slide Master?
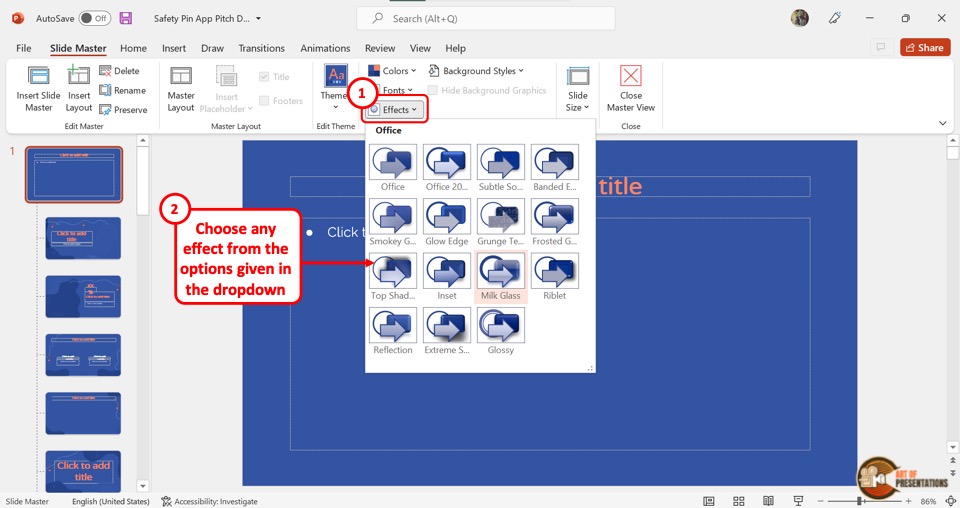
To apply effects in the “Slide Master” view of PowerPoint, click on the “Effects” option in the “Background” section. This will open a dropdown menu containing fifteen effect options to choose from. All you have to do is click on your preferred effect from the dropdown menu.
4f. How to Edit Footer in PowerPoint?
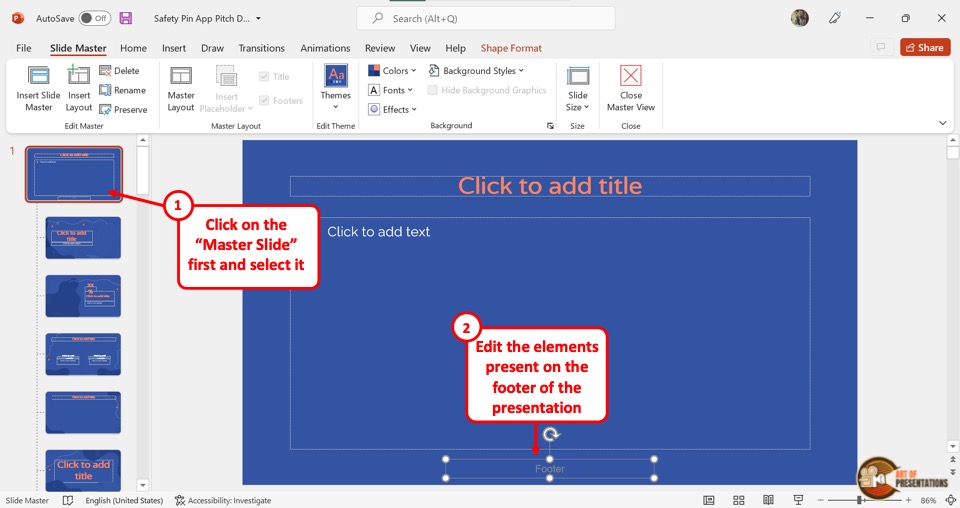
The footer in a PowerPoint presentation is a text that appears at the bottom of all slides. To edit the footer in the “Slide Master” view, all you have to do is click on the “Footer” box at the bottom of the master slide. Then type in the text you want in the footer.
Check out my other article on “How to Add a Footer in PowerPoint?” to learn more about editing, adding, and removing footers in PowerPoint.
4g. How to Add Logo to All Slides Using Slide Master in PowerPoint
Adding a logo to your Microsoft PowerPoint presentation can be a smart way of branding. It is quite easy if you know the correct steps.
In fact, I’ve written a detailed article on how to add a logo in PowerPoint . Do make sure to check out that article as well to get all the advanced tips and tricks and to know the correct way to do it!
Meanwhile, here are the key steps to add a logo to all slides using the “Slide Master” in PowerPoint –
Step-1: Click on the “Insert” tab
The first step is to click on the master slide from the slide layout panel on the left side of the screen in the “Slide Master” view. Then click on the “Insert” tab from the menu ribbon.
Step-2: Click on the “Pictures” button
The next step is to click on the “Pictures” button in the “Images” section of the “Insert” menu. Then click on the “This Device” option from the dropdown menu. This will open a dialog box.
Step-3: Click on the “Insert” option
In the “Insert Picture” dialog box, click on the logo you want to add to the presentation. Then click on the “Insert” button at the bottom of the dialog box to add the logo to the master slide. This will automatically add the logo to all the slides of the presentation.
4h. Use Slide Master to Add a Watermark in PowerPoint
A watermark is an identifying text or image that usually appears across a document and is semi-transparent. You can learn about how to add or remove watermarks in PowerPoint in my other article.
Meanwhile, I’ll share the key steps in a brief manner below –
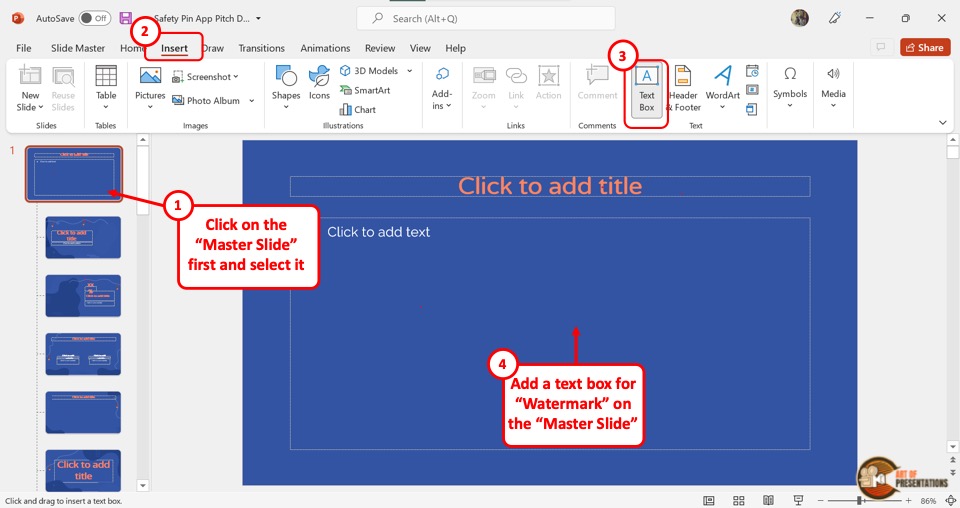
In the “Slide Master” view, click on the master slide which is the top slide in the slide layout panel. Then click on the “Insert” tab from the menu ribbon located at the top of the screen.
Step-2: Click on the “Text Box” option
In the “Insert” menu, click on the “Text Box” option from the “Text” section. Then draw the text box on the master slide. You can now type in the text you want as a watermark on all the slides.
Step-3: Click on the “Format Text Effects” option
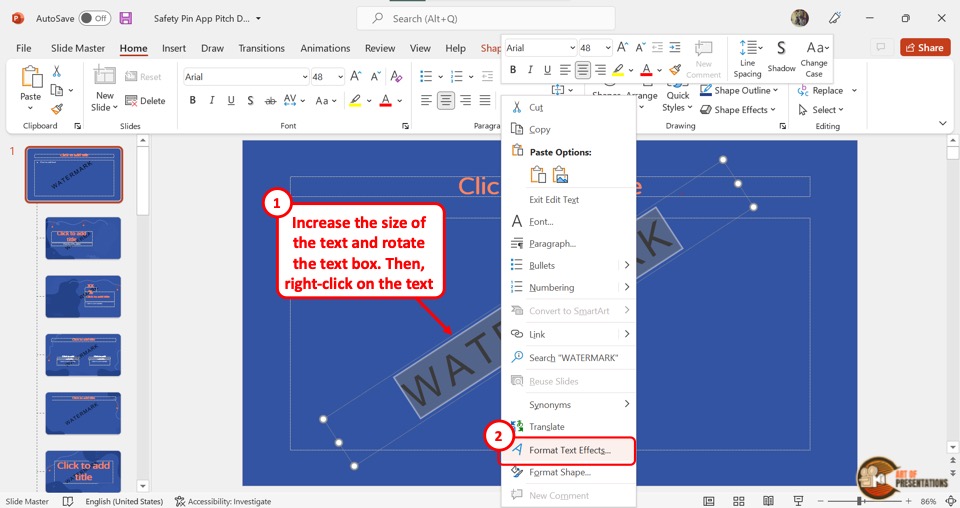
The next step is to select the text in the watermark text box. Then “Right Click” on the selected text and click on the “Format Text Effects” option. This will open the “Format Shape” sidebar on the right side of the screen.
Step-4: Increase the text transparency
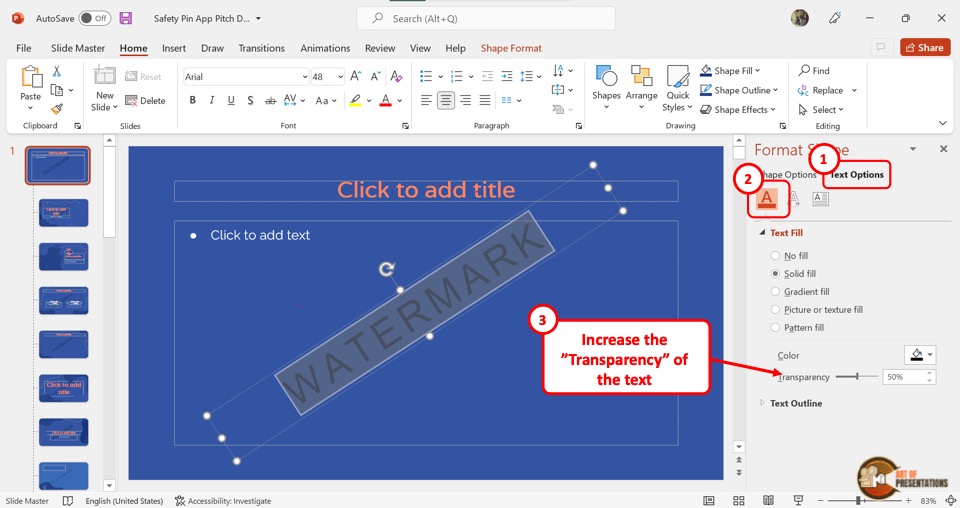
In the “Format Shape” sidebar, click on the “Text Fill and Outline” option which is the first icon. In the “Text Fill” section, click on the “Solid Fill” option. Then drag the slider next to the “Transparency” option to the right until the text reaches your preferred transparency.
5. Understanding Slide Layouts in PowerPoint Slide Master
Slide Layouts in Microsoft PowerPoint are slide designs that have pre-arranged placeholders that you can use to add your content quickly and easily. To understand the functions of slide layouts in PowerPoint and how to use them, you can read my article on slide layouts in PowerPoint .
5a. How to Know Which Slides Use What Slide Layouts
Using the “Normal” view in PowerPoint, you can see which slides are using what slide layouts. All you have to do is follow the 2 simple steps.
Step-1: Click on the “Normal View” option
In the menu ribbon located at the top of the screen, click on the “View” tab. In the “View” menu, click on the “Normal” option which is the first option in the “Presentation Views” section. This will return the screen to “Normal View” .
Step-2: Click on the “Layout” option
In the slide thumbnail panel at the left side of the screen, “Right Click” on a slide. Then click on the “Layout” option from the context menu. This will open a list of all the slide layouts available in the presentation. You will see the slide layout being used by the selected slide is highlighted in the list.
5b. How to Insert and Rename Slide Layouts
To insert or rename slide layouts, you have to first access the “Slide Master” menu from the “View” tab in the menu ribbon.
Inserting Slide Layouts
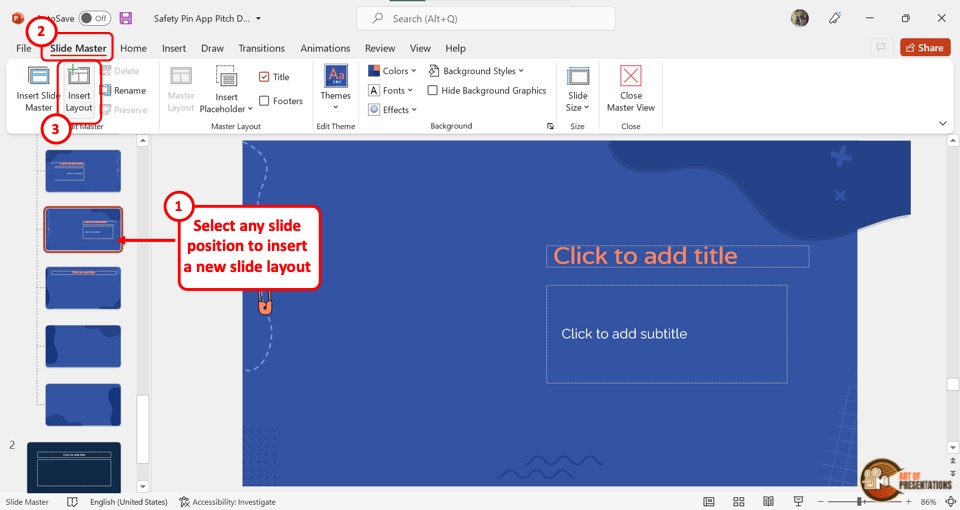
In the slide layout panel on the left side of the screen, you have to first click on the place where you want to insert a new slide layout. Then click on the “Insert Layout” button in the “Edit Master” section of the “Slide Master” menu.
Renaming Slide Layouts
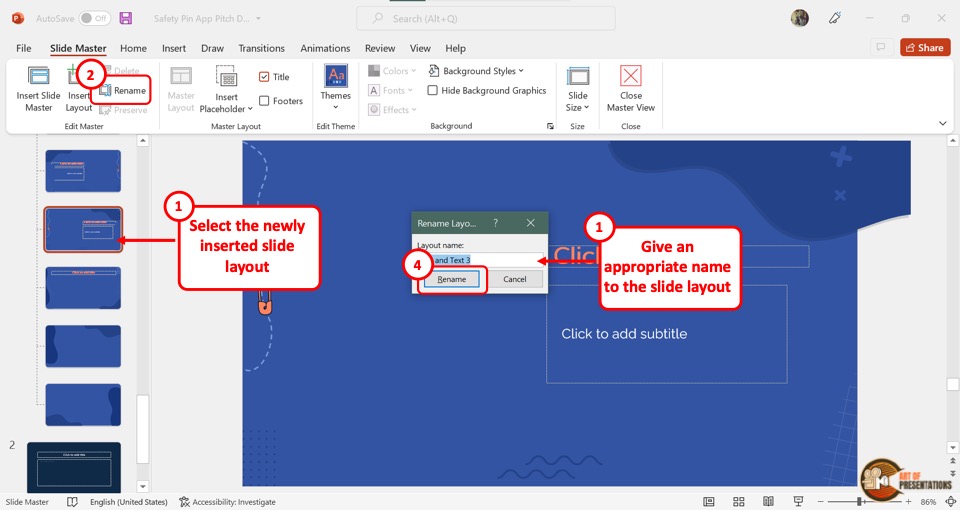
To rename a slide layout, you have to first click on the layout from the slide layout panel. Then click on the “Rename” option next to the “Insert Layout” button in the “Slide Master” menu. This will open the “Rename Layout” dialog box where you have to type in the new name for the slide layout.
Finally, you have to click on the “Rename” button in the dialog box to rename the slide layout.
6. Understanding Placeholders in Slide Master in PowerPoint
In Microsoft PowerPoint, a placeholder is a pre-formatted box on the slide where you can easily add content with a single click. You can learn more about placeholders in PowerPoint in my other article.
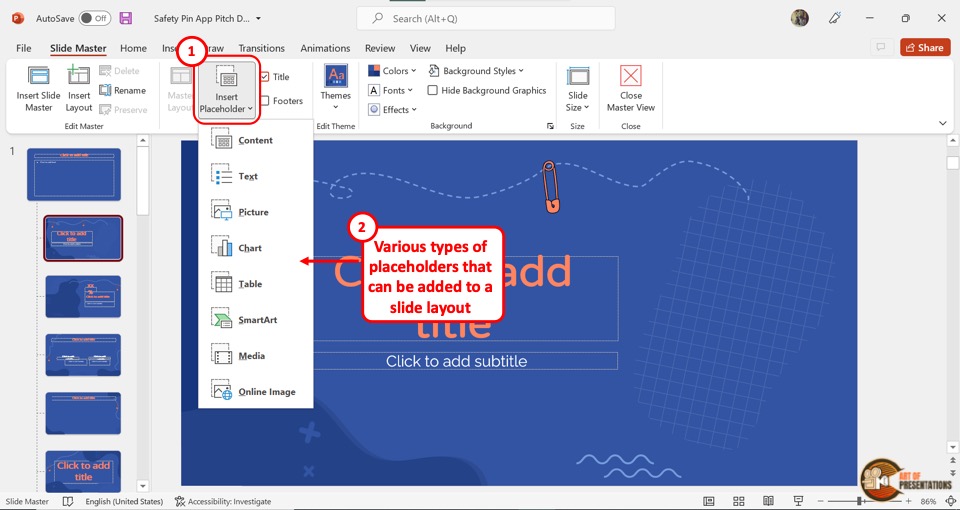
Using the “Slide Master” view, you can add, remove and edit the type and position of the placeholders in each slide layout. There are seven types of placeholders: “Text” , “Pictures” , “Chart” , “Table” , “SmartArt” , “Media” , and “Online Image” .
Besides, you can also use a “Content” placeholder which allows you to add any type of mentioned content.
7. How to Insert a Slide Master in PowerPoint?
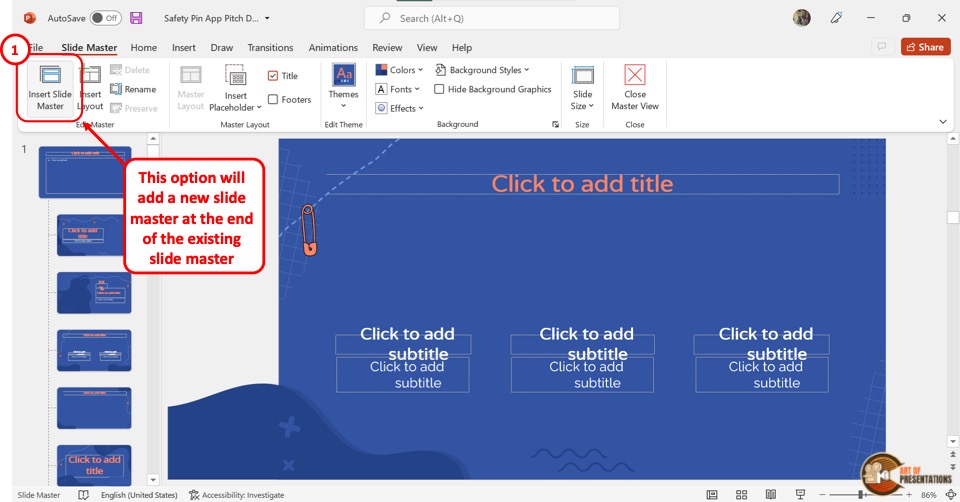
To insert a slide master in Microsoft PowerPoint, the first step is to open the “Slide Master” view from the “View” tab. In the “Slide Master” view, click on the “Insert Slide Master” button. It is the first button in the “Edit Master” section of the “Slide Master” menu.
Alternatively, you can press the “Ctrl+M” keys on your keyboard to insert a new slide master.
8. How to Delete a Slide Master in PowerPoint?
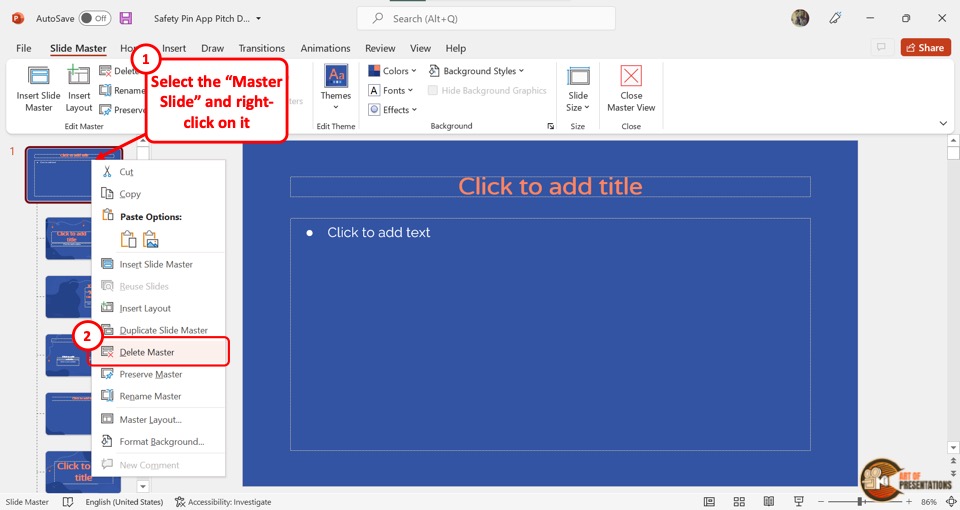
To delete an unused master slide in PowerPoint , you have to first “Right Click” on the master slide from the slide layout panel on the left side of the screen. Then click on the “Delete Master” option in the right-click menu. Alternatively, you can press the “delete” key on your keyboard.
9. How to Exit the Slide Master View in PowerPoint?
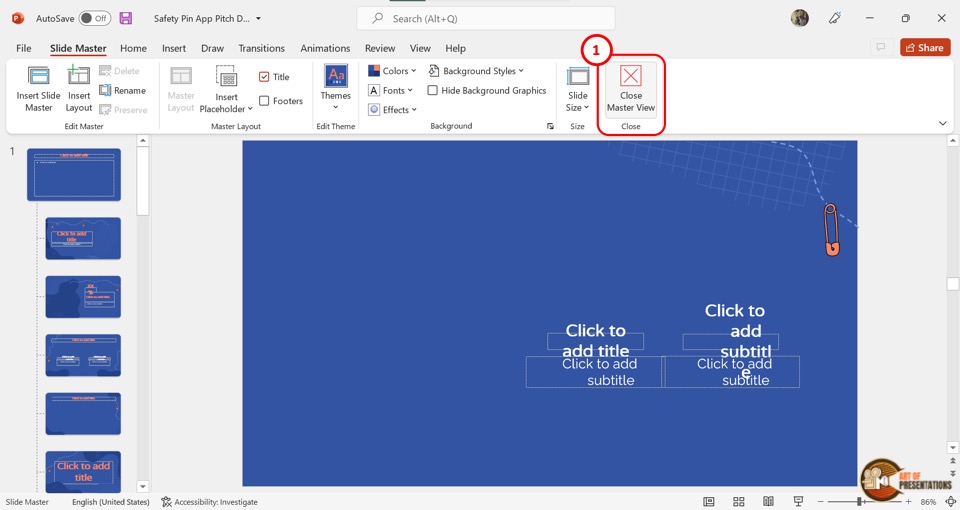
In Microsoft PowerPoint, you can exit the “Slide Master” view with one click. All you have to do is click on the “Close Master View” button. It is the last button under the “Slide Master” tab and is located in the “Close” section.
Home Blog PowerPoint Tutorials How to Work with Slide Master in PowerPoint
How to Work with Slide Master in PowerPoint

When editing PowerPoint templates or designing your own slides, you might need to repeat some slide elements in all slides, such as the company branding and tagline. Instead of manually adjusting each slide, such major changes can be made using the Master Slide in PowerPoint.
What is Slide Master in PowerPoint
PowerPoint Slide Master gives you control over how to display slides with uniformity based on your preferences. It is available via the View tab in PowerPoint and can be used to set logos, fonts, images, and other parts of your slides using a master view. The top slide or Master Slide in PowerPoint Slide Master is the primary slide, changes to which are reflected across the whole presentation. This is followed by other layouts available for your presentation that can also be adjusted in Slide Master.
How to Edit a Master Slide in PowerPoint
PowerPoint, by default, provides a Master Slide for every slide deck, even if you start with a blank presentation. For PowerPoint templates downloaded from the Microsoft Store or third-party sources, Master Slides are more refined than the default layout in PowerPoint. You can edit the Master Slide via View -> Slide Master .

The PowerPoint Master Slide is located at the top, and any changes made to it are reflected across all slides. For example, if you place a logo on the Master Slide, it will automatically appear on all slides in the presentation. Similarly, you can set the font style, font color, default image, and other elements for your slides by editing the Master Slide.

The below image shows how adding a logo to the Master Slide in PowerPoint reflected the changes across all slides in the PowerPoint template.

How to Create a Master Slide in PowerPoint
Creating a master slide that can be replicated across various presentations can help ensure that you can quickly apply the changes to new presentations while retaining your desired branding and theme style. To do this, you can create a PowerPoint Master Slide from scratch. To create a new Master Slide, open a blank PowerPoint presentation and go to View -> Slide Master .

From the Master Layout option in Slide Master, you can select the elements that you wish to single out for editing.

You can begin editing the master slide by adding a theme, logo, changing the font style, and adjusting other slide elements.

You can also add additional layouts and edit existing ones according to need. This is to edit not only the Master Slide but the overall design of your presentation. Once you are satisfied with the changes made to the Master Slide, click Close Master View from the Ribbon menu.

The changes you make to the Master Slide will be reflected on the presentation deck you are creating.

How to Apply Master Slides to an Already Existing PowerPoint Presentation
You can save and apply master slides to an existing PowerPoint presentation from one you might have saved earlier. To do this, you will require saving the original theme of your slides and then importing them to the presentation deck to which you intend to apply the master slides. Open the slide deck from where you wish to import the theme and go to View -> Slide Master .

From the Slide Maste r tab, go to Theme -> Save Current Theme .

Browse a location to save your theme from importing it to other PowerPoint presentations.

Open the PowerPoint presentation to import the theme style and go to View -> Slide Master .

From the Master Slide tab, go to Theme -> Browse for Themes .

Select the theme with the Master Slides to import to your PowerPoint presentation. Once the changes are applied, click Close Master View .

This will apply the changes to the existing presentation from the imported theme with your preferred Master Slide layouts.

Final Words
The Master Slide and associated layouts in Slide Master can help standardize various aspects of your slide design. Making it easier to manage branding, import slides for your preferred layouts, and help avoid manually editing slides in your presentation deck to apply specific layout changes.
Like this article? Please share
Design, PowerPoint Tools Filed under PowerPoint Tutorials
Related Articles

Filed under Design • August 14th, 2024
Creating Custom Themes for PowerPoint and Google Slides
Do you want your slides to go beyond the average result from a template? If so, learn how to create custom themes for presentations with this guide.

Filed under Google Slides Tutorials • August 13th, 2024
How to Curve Text in Google Slides
Despite Google Slides not offering a native tool for this, there are multiple ways to curve text in Google Slides. Check them out here!

Filed under PowerPoint Tutorials • July 30th, 2024
How to Add a Timer to PowerPoint
Generate expectations for your presentation introductions by mastering how to add a timer to PowerPoint. Step-by-step instructions + templates.
Leave a Reply
How-To Geek
How to create a slide master in microsoft powerpoint.

Your changes have been saved
Email is sent
Email has already been sent
Please verify your email address.
You’ve reached your account maximum for followed topics.
YouTube is Losing The War Against Adblockers
Why you need a longer password, things you can 3d print at home, but shouldn't, quick links, creating a slide master in powerpoint, save your customized slide master.
PowerPoint’s Slide Master lets you keep consistency throughout your presentation. If you want to customize a presentation’s fonts , headings, or colors in one place so that they apply to all your slides, then you’ll need to create a Slide Master.
Open your presentation, head over to the “View” tab, and then click the “Slide Master” button.

The Slide Master will appear in the left-hand pane. The Slide Master is the top thumbnail that appears in the pane, and each sub-thumbnail represents each slide layout available in your theme. Edits you make to the text of the Slide Master will affect the text in each slide layout. Alternatively, you can select and customize each slide layout.

Edit the Slide Master Theme
If you plan to use a specific theme with your presentation, it’s best to go ahead and select it now before making any other edits, as each theme will have its own unique text and image placeholders.
To edit the theme of the Slide Master, click “Themes” on the “Slide Master” tab.

A drop-down menu will appear, showing a large library of Office themes. Select the one you want to use.

Your Slide Master will now take on the selected theme.

Fine-Tune Your Slide Master
Now it’s time to customize the font, color, and background of the presentation. In the “Background” group of the “Slide Master” tab, you’ll have all of these options available to you. However, using the options provided here will affect all of the slide layouts in the presentation, as they are predefined schemes. You can hover your mouse over the available options for a live preview.
If you don't find a scheme you like, you can create your own or customize each slide the way you want by using the tools provided in the "Home" tab.
Also, note that any objects or text you place on the slide master will appear on all your slides. So, for example, it's a great way to put a company logo or disclaimer text that you might want to appear throughout your presentation.
Create Multiple Slide Masters
You can create multiple Slide Masters in a presentation. To do this, head over to the "Slide Master" tab and click "Insert Slide Master."

The additional Slide Master will now appear in the left-hand pane.

Edit the new Slide Master. Once you're finished, select "Close Master View" in the "Close" group.

In the "Slides" group of the "Home" tab, select "Layout."

A drop-down menu will appear. You'll now see both themes with your customized slide layouts!
You can save your customized Slide Master as a PowerPoint template for future use. To do so, head over to the "File" tab and select "Save As."

Next, click the "Browse" button in the "Other locations" section.

Navigate to the location of your Custom Office Templates folder, usually found here:
C:\Users\user\Documents\Custom Office Templates
Once there, select the arrow in the "Save as type" box.
In the menu that appears, select "PowerPoint Template."
Next, click "Save" at the bottom-right of the window.

Your template with your customized Slide Master is now saved!
- Microsoft Office
- Microsoft PowerPoint
- Office 2016
How To Use Slide Master In PowerPoint
Are you looking to take your PowerPoint presentations to the next level? Understanding Slide Master in PowerPoint is key to creating professional and cohesive slides.
Key Takeaways:
What is slide master in powerpoint.
Slide Master in PowerPoint is a powerful feature that allows users to precisely control the design and layout of all slides in a presentation.
One of the key advantages of using the Slide Master is its ability to apply themes seamlessly and efficiently throughout the presentation. Users can customize placeholders for text, images, tables, and other content elements to maintain a cohesive look and feel. This feature is especially beneficial for creating professional and visually appealing presentations with minimal effort.
Why Is Slide Master Important In PowerPoint?
By utilizing the Slide Master feature, users can establish a consistent look and feel throughout their presentation, thereby enhancing professionalism and reinforcing their brand identity. This results in a visually cohesive slideshow that captivates the audience’s attention effortlessly. Any changes made to the Slide Master automatically reflect on all slides, saving precious time and effort that would otherwise be spent on manually updating individual elements.
How To Access Slide Master In PowerPoint?
When you want to access the Slide Master in PowerPoint, you can easily do so by first opening your PowerPoint presentation. Then, navigate to the ‘View’ tab located in the top menu bar. Within the ‘View’ tab, you will find the ‘Slide Master’ option, which gives you direct access to the Master View.
Master View allows you to make universal design changes to the presentation, affecting all slides. By utilizing the design commands available in the Ribbon while in the Slide Master view, you can efficiently customize elements such as backgrounds, fonts, and placeholders across your entire presentation.
Using the Ribbon
Using the view tab.
Another method to access Slide Master in PowerPoint is through the View Tab, which offers options for font formatting, text alignment, and advanced design features.
How To Customize Slide Master?
When customizing the Slide Master in PowerPoint, users can personalize the overall look and feel of their presentation. By making these changes, users can ensure that their slides are visually cohesive and aligned with their branding. Adjusting layouts, such as the Picture with Caption Layout, allows for a more dynamic and visually appealing structure. Controlling text sizes helps maintain a professional and polished appearance throughout the presentation.
Changing the Theme
Applying a new theme will automatically update the design elements throughout the slides, ensuring consistency and professional appearance.
Adding Background Graphics
Enhancing Slide Master with background graphics in PowerPoint can be achieved through the Background group, allowing users to incorporate visual elements that align with the selected theme or create a new visual theme.
Editing Slide Layouts
Editing slide layouts in Slide Master involves adjusting placeholders, such as the title placeholder , and modifying text sizes to create consistent and visually appealing slide structures.
How To Add Slide Numbers In Slide Master?
Adding slide numbers in Slide Master through the PowerPoint Slide Master tab or using the Header and Footer Option allows users to maintain consistent numbering across presentation slides.
When you are working on a large presentation with multiple slides, having slide numbers displayed can help both the presenter and the audience stay oriented. To add slide numbers through the PowerPoint Slide Master tab, simply navigate to the View tab, select Slide Master, and then click on the Slide Master tab. From here, choose the ‘Insert Slide Number’ option to place the numbers in the desired location on the slides.
If you prefer to use the Header and Footer Option, go to the Insert tab, click on Header & Footer, and then select the Slide Number option. This method also allows you to customize the appearance and position of the slide numbers to fit your presentation’s style.
Using the Slide Master Tab
When you access the Slide Master tab, you can easily insert slide numbers through the ‘Slide Number’ command to keep your presentation organized and professional.
Using the Header and Footer Option
Employing the Header and Footer Option within Slide Master in PowerPoint allows users to customize slide numbers with a unique name and save these modifications for future presentations.
To ensure these customizations are saved for future use, go to the ‘Slide Master’ tab and select ‘Close Master View’. Now, all your slides will display the customized slide numbers with the unique identifier you specified.
How To Apply Slide Master To Individual Slides?
How to create custom slide layouts.
Creating custom slide layouts in PowerPoint allows users to design unique templates by customizing layouts, cleaning up unused slide masters, and ensuring a tailored presentation structure.
How To Save and Use Slide Master Templates?
Saving and using Slide Master templates in PowerPoint allows for easy access to customized themes, templates in Microsoft 365, and efficient design applications across various presentations.
What Are Some Tips and Tricks for Using Slide Master?
When practicing presentations, focus on consistency in layout, fonts, and color schemes throughout the slides to maintain a professional look.

Frequently Asked Questions
1. what is slide master in powerpoint.
Slide Master is a powerful tool in PowerPoint that allows you to create and customize a template for your slides. It allows you to save time by applying consistent formatting and design to all of your slides.
2. How do I access Slide Master in PowerPoint?
3. can i make changes to all my slides using slide master, 4. how do i create a custom layout on slide master.
To create a custom layout on Slide Master, click on the Insert Layout button in the Slide Master tab. This will allow you to add different elements such as text boxes, images, or shapes to your layout.
5. Can I apply different Slide Masters to different slides in my presentation?
6. how do i save my slide master for future use, similar posts, how to change from landscape to portrait in powerpoint, how to add slide numbers in powerpoint, how to create your own theme in powerpoint, how to break links in powerpoint, how to make poster in powerpoint, how to change language in powerpoint.
How to Use Slide Master in Microsoft PowerPoint to Create Impressive Presentations

Your changes have been saved
Email is sent
Email has already been sent
Please verify your email address.
You’ve reached your account maximum for followed topics.
Power Up Your PDFs: These 9 Apps Turn Them Into Fillable Forms
7 stream deck plugins to boost your productivity, why i use libreoffice instead of microsoft 365.
No one enjoys a presentation with mismatched colors, missing logos, or unstructured content. Consistency is the key to creating an impressive slide deck. How do you ensure that the presentation is well-formatted and looks professional? You can quickly achieve this by creating a master theme and defining layouts for different types of content.
Microsoft PowerPoint is commonly used to create presentations. You can make a deck from a blank canvas or use predefined themes. Before creating a presentation, let's understand how you can set a theme and style using the Slide Master feature.
Applying a Predefined Theme to Your Presentation
There are many styles and options for creating a theme that aligns with your brand.

Having a uniform color combination, font style, or picture layout on each slide makes a presentation look professional. You can select the theme based on the company's style guide. If there is none available, you can try out different inbuilt themes by Microsoft PowerPoint.
To select a theme, follow these steps:
- Click Themes and choose the desired theme. It is immediately applied to the presentation.
- If you have downloaded a theme on your laptop from Microsoft Office, select the Browse for Themes option.
What Is the Slide Master Feature?
The Slide Master feature in Microsoft PowerPoint helps you create a template or layout for the presentation. You can select a theme, add backgrounds styles, add a company logo, or set the slide size.
Your choices on slide master define the look and feel of the presentation. One presentation can have many master slides, which means you can create one look for the first half of your presentation and another for the second half.
Each master slide can have multiple layouts, which can help you define templates for different slides. In a way, the slide master serves as a master template for the slide decks. Different teams within the company can reuse the slide master or slide layouts.
To access the slide master, open the presentation and select View > Slide Master . You can view the parent and child slides with different formatting options.

How to Use Slide Master in Microsoft PowerPoint
You can create the slide master with nested layout slides and apply a combination of texts, images, or videos on each slide. On the slide master, you can define the master layout for the presentation.

- After opening the presentation, click View > Slide Master .
- Select the master slide and click the Master Layout button on the top ribbon.
- You can select a placeholder for title, text, date, footer, or slide number. These options are automatically applied to all layouts and slides.
Related: Microsoft PowerPoint vs. Google Slides: Which One Should You Be Using?
Inserting Slide Master or Layout
The layout acts as a template for the slides. You can create different layouts for every slide type.

- To insert a new slide master or layout, click Insert Slide Master or Insert Layout on the top ribbon.
- Alternatively, you can right-click on the left panel and choose the appropriate option.
- To rename a layout, select a layout and click the Rename button on the top ribbon. Alternatively, you can right-click on a layout and select Rename . You can also delete a layout.
- Click Preserve so that the slide layout remains in the presentation even if it is not used.
Configuring the Size of the Slide
You can set up the presentation in the standard size (4:3) or widescreen (16:9), which works well for most modern projectors. If you are not happy with the default size of the slide, you can change it. The slides can also be viewed or printed in A4 size, banner, or letter paper format.
- Click Slide Size, and from the drop-down option, you can choose the Standard or Widescreen layouts.

- You can select the orientation of slides, the notes section, and the slides to which you want to apply the size.
RELATED: The Best Sites for Free Animated PowerPoint Presentation Templates
Setting the Background of the Slide
You can select the background colors, fonts and apply effects to the slides. To view the style and format options, click Slide Master in the top ribbon.

- Click the Colors option to view the color combinations. Select your preferred option, and it is applied to the deck.
- Click Fonts to apply the selected font to the text. The font is applied when you exit the Slide Master mode.
- Select the Effects option to apply a specific effect to objects such as charts or graphs.
- Select the Background Style to choose the background color for the slide.
- You can also right-click on a background style to apply the same background to all layouts in the master.
- You can get more options for background colors, including gradient fill, texture, pictures, by clicking the Background Styles > Format Background menu.
- Select the Hide Background Graphics option to remove background graphics on selected layouts.
Inserting a Placeholder on the Slide
Every slide can have text, a chart, or images. These can be added while designing the theme of the presentation. To add a placeholder, follow these steps:
- Select Insert Placeholder .

RELATED: How to Make Professional Slideshows With PowerPoint's Designer Feature
Enjoy Creating Interesting Themes for Your Presentation
Creating a presentation with different slide layouts is an excellent practice. Depending on the type of content they want to present, diverse teams can reuse these slide layouts.
At first, the layouts and slide styles can seem overwhelming. But you can access learning resources by Microsoft to gain in-depth knowledge about all the features. Don't forget to experiment and create your custom themes.
Even though Microsoft PowerPoint is commonly used to create slide decks, you can also teach skills by creating online learning modules.
- Productivity
- Microsoft PowerPoint
- Microsoft Office Tips
Home » Microsoft Powerpoint » What is Slide Master in PowerPoint
What is Slide Master in PowerPoint
Slide Master is one of the most powerful tools that PowerPoint offers. Using this option, you can standardize the visual aspects of your presentation. You may not be familiar with this feature. But using Slide Master can truly make a difference.
Especially, when you work extensively with PowerPoint presentations. Here, we will explain the features of the Slide Master of PowerPoint, and how it can be useful.
Master Slide in PowerPoint
You will find the Master Slide option under the View tab in the main menu bar. The feature allows you to create master templates, also known as master slides. You can automatically add common elements you will be repeating throughout your slides. For instance, this might include a logo.
Using the feature, you can standardize the design of your presentation. You can add a common color scheme, typography, or background to all your slides. You can add whatever to your master slides.
It will show up automatically when you start working on your presentation. This way, you do not need to design each slide individually. With the slide master, you can add all your style requirements in one instance.
Using a Master Slide
Step #1: open a new presentation, step #2: pick any design theme for the presentation.
Click on the Design tab in the top menu bar to change the ribbon.

Select any design theme from the sections Themes and Variants.

Step #3: Use the Slide Master Option
Click on the View tab in the top menu bar to change the ribbon.

Under section Master Views, click on the Slide Master tab.
PowerPoint presents a series of slides with a specific background and color palette. It also adds the typography of the design theme you had chosen earlier.

Use any slide to duplicate a new slide. It will generate a pre-made design and layout.
How Master Slides Help?
It is necessary to understand some words when referring to master slides:
Master Slides: A feature under the View tab allowing the creation of master templates.
Layout: These are the elements in your slide. When you open a new layout, a Title Slide Layout comes up first. You can see other pre-made slides in the Layout section when you click on the Home tab. In short, the Layout is the organization of your slide.
Template: These are pre-made presentations, and you can fill them with your information. PowerPoint offers many templates for specific use. It offers templates for newsletters, diagrams, agendas, and many more.
Theme: These are pre-made sets of visual collectives you can apply to your slides. They include fonts, color palettes, and backgrounds. With themes, you can give your slides a more polished look. You can present a more cohesive design throughout the presentation. You will find Themes under the Design tab.
Why are Master Slides Useful?
Creating a master template means you basically create style guidelines. These you can apply to any slide in the presentation. Therefore, using the slide master feature allows you to create your own customized theme.
The slide master feature makes your presentation design process more efficient. You can significantly reduce the time you spend on each slide. For this, you must be familiar with the slide master feature.
For instance, your presentation can reflect your brand image in all your slides. You can use the color scheme of your brand in your presentation. The consistent design style can make your presentation look more professional. You use the slide master features to fully customize your master slides. This way you get a unified design style for all your presentations. Any element you add will follow your presentation style.
We have given a brief overview of the Slide Master feature in PowerPoint. Use it to customize the slides in your presentation.
Leave a Comment Cancel reply
Save my name, email, and website in this browser for the next time I comment.
- Video Tutorials
- Knowledge Base
- Group Licenses
- Why Choose Us?
- Certificates
- PowerPoint Tutorials
PowerPoint Slide Master: Full Tutorial, Video, and Sample Files
In this tutorial, you’ll learn how to use the Slide Master in PowerPoint, why it’s useful, and how to use it to create elements that appear on every slide in the presentation, such as company logos and slide numbers.
- Tutorial Summary
- Files & Resources
- Premium Course
The PowerPoint Slide Master is useful for creating templates in presentations and repeating specific elements on each slide .
For example, if you want to repeat your company logo, the date, or the client’s name in the bottom-left corner of each slide, you can do that with the Slide Master.
You can also use it to set the default colors, fonts, and other design elements and ensure that everything on your slides looks consistent.
In this tutorial (video above and written version below), you’ll learn why the Slide Master is useful, how to set it up, and how to use it to insert logos, headers, and footers in presentations.
Video Table of Contents:
0:52: Slide Master 101
11:24: Slide Master Setup
14:35: Exercise: Fix the First Layout Slide
24:31: Recap and Summary
[Click the “Files & Resources” tab to get all the PowerPoint files for this lesson.]

PowerPoint Pro
Master PowerPoint by creating a sell-side M&A / valuation pitch book for Jazz Pharmaceuticals - plus company/deal profiles and more.
The PowerPoint Slide Master: Why It’s Useful
To understand the value of the Slide Master, consider several of the slides in the “Before” file here :

As shown above, these slides have common elements: the divider line next to the title at the top, the “Goldman Stanley” logo in the bottom left, and the “Project Jaguar” text in the top left.
However, we manually inserted these elements on each slide , which is not ideal.
For example, what happens if something changes in the design? What if we need to replace the logo everywhere? Or what if we swap the positions of the logo and the project name?
We would have to go through each slide and manually change the positions and formatting of these elements.
If there are only 5-10 slides, that’s not a big deal, but with 50 or 100 slides, it would be extremely time-consuming to do this.
A better solution is to open the Slide Master (Alt, W, M on PC or ⌘ + Opt + 1 on Mac) and insert these common elements on a “Layout ” (template) so they repeat across all the slides in the presentation that use this particular Layout:

When you insert a normal slide in the standard view of PowerPoint (Alt, H, I on PC), you can base the slide on one of these “Layouts”:

The PowerPoint Slide Master: Key Shortcuts
The key shortcuts are as follows:
Slide Master View: Alt, W, M (PC) / ⌘ + Opt + 1 (Mac)
Close Slide Master: Alt, M, C (PC) / ⌘ + 1 (Mac)
Normal Edit Mode: Alt, W, L (PC) / ⌘ + 1 (Mac)
Move to Next or Previous Layout: Arrow Keys (PC and Mac)
Change Slide Layout (outside of the Slide Master): Alt, H, L (PC) / N/A on Mac
Reset Slide Layout (outside of the Slide Master): Alt, H, Q (PC) / N/A on Mac
Header & Footer (outside of the Slide Master): Alt, N, H (PC) / N/A on Mac
NOTE: The “,” in these shortcuts means that you press and release each button sequentially. The “+” means that you press and hold down each button and then release them all at the end.
For example, with Alt, W, M, you press and release Alt, press and release W, and press and release M.
But with ⌘ + Opt + 1 (Mac), you press and hold ⌘, press and hold opt, and press and hold 1 and then release all 3 keys at once.
You will enter and exit the Slide Master all the time in longer presentations, so you should know at least the first few shortcuts above.
The PowerPoint Slide Master: Placeholders vs. Shapes
When you’re on a Layout in the Slide Master, you can insert shapes, lines, and textboxes .
However, if you insert these objects within the Slide Master, you will not be able to edit them on normal slides that use the Layout .
Let’s look at a simple example, where we add a rectangle shape to the default “Title and Content” Layout in the Slide Master:

If we now return to the normal slides with Alt, W, L (⌘ + 1 on Mac) and insert a new slide that uses this “Title and Content” layout, it’s impossible to select or edit the shape:

To edit this shape, we need to return to the Slide Master and insert a Placeholder on this layout, which is in the “Slide Master” tab under “Insert Placeholder”:

We can insert a “Content” Placeholder here and then format it with the same fill color, font color, and other attributes:

Then, when we return to the normal slide view and reset the Layout of the slide we just inserted, the blue shape is now editable:

In real life, you would not use Placeholders for something trivial like this – you would normally use them for slide titles or blocks of text that change on each slide:

You need to consider the Shape vs. Placeholder distinction before using the Slide Master, or your templates will not work correctly.
Finally, note that Placeholders are not allowed on “Layout #1” in the Slide Master – the one that looks like this:
")
This Layout determines the default font and paragraph styles for all the other slides and Layouts.
You can add normal shapes, lines, and textboxes to Layout #1, but not Placeholders; the option is greyed out:
")
In real life, you might add the company or client logo to Layout #1 – but it’s rare to repeat any other element in the same spot everywhere in the presentation .
A better approach is to create a few Layouts, such as 1-column and 2-column designs, and add “repeated elements” like the title/header/footer divider lines on each Layout.
The Problems with the PowerPoint Slide Master
The Slide Master is great for ensuring consistency, creating templates, and repeating common elements across the slides, but it does have some drawbacks.
First , not all formatting carries through to normal slides the way you necessarily want.
Similar to the copy/paste shape format commands, only the formats of the first line of text in a Placeholder are carried through to normal slides.
Second , many people do not know about the Slide Master or do not use it properly, and it is cumbersome to “convert” a long presentation with normal slides into one that uses Layouts consistently.
Third , an existing slide will not update even if you change the slide’s Layout within the Slide Master.
You can “reset” the slide to its base Layout using the Alt, H, Q shortcut, and this will update all the elements on the slide, including additions/deletions and edits you’ve made in the Slide Master.
However, you’ll also lose any additional formatting you have applied to the Placeholders on this normal slide.
Because of these downsides, it’s best to keep the Slide Master simple and use it for tasks like inserting logos, headers, footers, and slide numbers rather than complex layouts.
Setting Up the PowerPoint Slide Master Properly
If you’ve just created a new presentation and you want to use the Slide Master extensively, here’s what we recommend:
Step 1: First, go to the Slide Master with Alt, W, M (PC) or ⌘ + Opt + 1 (Mac) and delete the default Layouts you will not use.
We recommend keeping the “Title and Content” Layout – ignore the recommendation in the video – but everything else can go:

Step 2: We also recommend removing the Drawing Guides in the Slide Master because they’re separate from the Drawing Guides in the normal presentation, and you usually don’t need multiple sets of Guides.
To do this, enter the Slide Master and go to Layout #1 there (the “Office Theme Slide Master”).
Press Alt, W, S (PC) or ⌘ + Opt + Ctrl + G (Mac) to show the Drawing Guides, which should appear in red, and drag them off the slide to remove them.

Next, go to each Layout you plan to use and do the same thing.
These Drawing Guides will appear in orange , and by default, they’ll be single vertical and horizontal lines.
We recommend removing these unless you plan to customize them for a more complex Layout in which specific alignments would be helpful:

Step 3: Add the company logo, the slide number, and the header or footer elements that should appear on all slides on Layout #1.
The logo is straightforward: insert a normal shape or textbox, format it appropriately, and drag it to the bottom left or right corner:

To add the slide numbers, press Alt, N, H (Insert –> Header & Footer on Mac) and make sure “Slide Number” is checked:

If you want to add something else in the header or footer, such as the client’s name or the project name, you can also do that at this stage.
But in most cases, elements like lines for the header and footer areas should be added directly on the custom Layouts because you usually don’t want to show these on the title slide or “section divider” slides.
Step 4: Set the default themes, colors, fonts, and background styles.
Within the Slide Master view, click the “Slide Master” tab and go to “Edit Theme” and “Background” to set these:

If you go to the normal slides and set the fill/font color of a shape or textbox, you can access all these theme colors easily:

The main benefit of this feature is that it lets you change all the colors in the presentation from within the Slide Master .
You just need to ensure that each shape, textbox, and line uses one of the “Theme Colors” you’ve selected.
If it does, you can return to this area of the Slide Master and change the colors here, and everything that uses one of these colors will update automatically.
Many companies have their own themes and color schemes, so you should follow your internal standards when doing this.
Practice Exercise: Create a Custom Layout in the Slide Master
Your task in this practice exercise is to start with the “Before” version of the file and modify it to set up the Slide Master properly, which means:
1) Remove the unused layouts.
2) Delete the unnecessary Drawing Guides.
3) Add the “Goldman Stanley” logo and the slide numbers.
4) Set the text and bullet styles on the first Layout in the Slide Master.
To save time, remember that you can copy and paste shapes, lines, and textboxes from normal slides into Layouts within the Slide Master.
Start by pressing Alt, W, M to enter the Slide Master and delete the unnecessary Layouts:

Then, press Alt, W, S and remove the unnecessary red Drawing Guides by dragging them off the edges:

Next, go to one of the normal slides with the “Goldman Stanley” logo at the bottom, copy the logo from that normal slide, and paste it into the bottom left corner of Layout #1 in the Slide Master:

Once you’ve done this, the “Goldman Stanley” logo will repeat on each slide, but all the existing slides have “duplicate logos” – because each one also had this logo as a separate shape!
So, you should go to each slide individually and delete the logo in its bottom-left corner:

You can press Alt, N, H to add the slide numbers in the footer, and you can format them as you want.
Make sure the slide number textbox in the bottom right corner is aligned properly to the right edge of the “main content area” on each slide (demonstrated in the video using extra lines).
Finally, as we do in the sample video, you can adjust the font sizes, bullet styles, and indentations on Layout #1.
These are standard PowerPoint commands/shortcuts not specifically related to the Slide Master.
More Advanced Features in the PowerPoint Slide Master
In our full PowerPoint Pro course , you’ll set up many slides and Layouts within the Slide Master, including ones for company profiles and the Table of Contents.
You’ll also get practice “retrofitting” existing slides to use Layouts.
Finally, in the VBA and macro module of the course, you’ll learn how to use Drawing Guides in the Slide Master to align and distribute shapes, and you’ll learn how to automatically generate a Table of Contents based on Layouts for the section markers.
The PowerPoint Slide Master will not solve every problem, but it could help you create presentations more quickly with fewer errors if you use it properly.

About Brian DeChesare
Brian DeChesare is the Founder of Mergers & Inquisitions and Breaking Into Wall Street . In his spare time, he enjoys lifting weights, running, traveling, obsessively watching TV shows, and defeating Sauron.
Files And Resources
Premium Courses
Other biws courses include:.
Perfect Your PowerPoint Skills
The BIWS PowerPoint Pro course gives you everything you need to complete pitch books and presentations in half the time and move straight to the front of the "top tier bonus" line.
- Editor's Choice: Best Back-to-School Tech Gifts
- Get These 12 Student Discounts!
How to Use PowerPoint Slide Master Layouts
Use the Slide Master to effect a uniform appearance for your presentation
- Brock University
What to Know
- Go to View > Slide Master and select the top thumbnail in the Slide pane. Use the Slide Master tab to change colors, fonts, and more.
- Use the Slides pane to choose a slide layout thumbnail and make changes to the layout master.
- When you're done making changes, select Slide Master > Close Master View to return to your presentation.
To ensure that all the slides in your PowerPoint presentation have the same look, use the Slide Master. Apply fonts and styles, add multimedia, and insert footnotes. These instructions apply to PowerPoint 2019, 2016, and 2013; PowerPoint for Microsoft 365; and PowerPoint for Mac.
Access the PowerPoint Slide Master
The PowerPoint Slide Master is like a style sheet for your presentations. Changes made to the Slide Master apply to the slides that are created after you format the Slide Master.
To access the Slide Master in a PowerPoint presentation, select View > Slide Master .
Change the Layout in the Slide Master
The Slide Master view contains all the slide layouts used in PowerPoint. The Slides pane displays thumbnail images of the slide master (the top thumbnail image) and the related slide layouts (the smaller thumbnail images located below the slide master).
Changing the font on the slide master affects the text placeholders on all slides. However, not all placeholders are affected by changes made to the slide master. You may need to make additional changes to the different slide layouts.
Make changes to the Slide Master before you create a presentation. If you change the font style or color on a slide before you edit the slide master and slide layouts, the formatting is retained on those slides.
To make changes in the Slide Master:
Select the slide master. It's the top thumbnail in the Slide pane.
Go to the Slide Master tab to change the theme, theme colors, fonts, and background for the entire presentation.
In the Slides pane, select a slide layout thumbnail and make changes to the layout master, if needed.
Close the PowerPoint Slide Master
After you've made all your changes to the slide master, select Slide Master > Close Master View to return to the presentation slides.
Each new slide you add to the presentation takes on the changes you made. You'll save time by not having to make edits to every individual slide. Your presentation will have a uniform and professional look.
Get the Latest Tech News Delivered Every Day
- The 10 Most Common PowerPoint Terms
- Slide Layouts in PowerPoint
- Use Multiple Design Themes in the Same Powerpoint Presentation
- Change the Default Font in PowerPoint Text Boxes
- How to Increase PowerPoint Slide Number Size
- Create a Default Presentation Template in PowerPoint
- How to Copy a PowerPoint Design Template to Another Presentation
- Print a PowerPoint Handout in PDF Format Without a Date
- How to Put a GIF in PowerPoint
- Create Pictures From PowerPoint Slides
- How to Change PowerPoint Slide Orientation
- How to Hide and Unhide a Slide in PowerPoint
- How to Use Speaker Notes in PowerPoint
- How to Do a Voiceover on PowerPoint
- Copy Slides to Another PowerPoint Presentation
- Loop a PowerPoint Slide Show
The Ultimate Guide to the Slide Master in PowerPoint
In this article, we will explore the Slide Master in Powerpoint feature in depth and discuss how it can be used to improve the overall look and feel of your presentations.
Slide Master in PowerPoint is a powerful tool that allows users to create a consistent and professional look for their presentations. It is a feature that is often overlooked by many PowerPoint users, but it can be a game changer when it comes to creating engaging and effective presentations.
Moving along, let’s get more in-depth into what is this slide master…
What is slide Master in PowerPoint?
The Slide Master is a special type of slide in PowerPoint that acts as a template for all the other slides in your presentation. It contains all of the design elements, such as background colors, fonts, and logos, that will be used throughout the presentation.
Where is slide Master in PowerPoint?
The Slide Master in PowerPoint can be found by going to the “View” tab in the PowerPoint ribbon, and clicking on “Slide Master.” This will open the Slide Master view, where you can make changes to the design elements for all the slides in your presentation.
Understanding Slide Master in Powerpoint
| Contains the commands used to alter the slide master and layouts. | |
| Controls all of the slide layouts below it. Changes you make to the placeholders or formatting on the slide master will be changed in the other layouts as well. | |
| Changes made to layout slides will affect any presentation slides created from that layout. Slide layouts are dependent on the theme chosen. | |
| Allow you to add, remove, or edit placeholders or make formatting changes just like you would in Normal view. | |
| Closes Slide Master view. |
So now, we are going to begin creating a master slide in our presentation.
How to create Master slide PowerPoint
How to edit master slide in powerpoint, tips for using the slide master.
1. Start with a blank Slide Master: When you create a new presentation, start by creating a blank Slide Master. This will ensure that your presentation has a consistent look and feel. Thus, will make it easier for you to make changes to the design elements later on.
For example, you might try using different font styles, or changing the background color to see what works best for your particular presentation.
Leave a Comment Cancel reply

Slide Master

In Microsoft PowerPoint, the Slide Master is the top slide that controls all information about the theme, layout, background, color, fonts, and positioning of all slides. Using the Slide Master is an easy way to adjust the look of an existing theme or make changes to all slides in your presentation.
- How to view the Slide Master.
- How to rename the Slide Master.
- Getting back to normal view.
- What to do after editing the Slide Master.
How to view the Slide Master
To view a Slide Master, click View at the top of PowerPoint and click the Slide Master icon. Once in the Slide Master view, you can edit the Slide Master by clicking the top slide and choosing the theme, font, color, or other settings for the presentation. If there are any slides you do not want in your presentation, highlight the slide and press delete.
The big first slide is the actual Slide Master and any changes you make in the master slide affect all other slides. However, any changes you make to a layout slide only changes that slide.
How to rename the Slide Master
To make it easier to find your Slide Master, right-click the Slide Master and click Rename Master . In the Rename box, type your new name and click the Rename button.
Getting back to normal view
After your changes are made to the Slide Master, click the Close master view button, or click View and then Normal to switch back to the normal view.
What to do after editing the Slide Master
After selecting the Slide Master (or any of the layout slides), when back in normal view, click the down arrow on the New Slide button under Home. Then select any of the new slides you modified.
PowerPoint , Slide , Slide layout , Software terms
In a Presentation, What is Layout?
Explore the importance of layout in presentations for enhanced readability, aesthetics, and effective communication.
Understanding Presentation Layout
Key components of a presentation layout.
- Text Placement : How and where you place your text can affect readability and audience engagement. Key points should be easily visible and should guide the viewer through your narrative.
- Visual Elements : Images, charts, and videos should be placed in a manner that complements the text, not overshadows it. These elements should enhance understanding and retention of the material.
- White Space : Often overlooked, white space refers to the areas of a slide that are left unoccupied. Proper use of white space avoids clutter and makes the content more digestible.
- Consistency : Consistency in fonts, colors, and style across all slides keeps the presentation cohesive and professional-looking.
Importance of Layout in Presentations
Enhanced readability, improved aesthetics, effective communication, tips for designing effective presentation layouts, start with a grid, use high-quality visuals, keep it simple, focus on typography, test on different screens, examples of good layout in presentations, create ppt using ai.
Just Enter Topic, Youtube URL, PDF, or Text to get a beautiful PPT in seconds. Use the bulb for AI suggestions.
character count: 0 / 6000 (we can fetch data from google)
upload pdf, docx, .png
less than 2 min
Mehjabi Khan
Which of the Following is NOT a Financing Option Suggested in the Presentation?
19 August 2024
What Activity Can Help You Improve Your Presentation?
Chelsea vs Man City: A Comprehensive Match Preview
What is a Capstone Presentation?
How to Repair a Corrupt PowerPoint Presentation
How to Write a Short Bio for a Presentation: A Step-by-Step Guide
18 August 2024
How to Cite Sources in Presentations: A Detailed Guide
How Many Words to Include in a 5-Minute Presentation?
Stunning presentations in seconds with AI
Install MagicSlides app now and start creating beautiful presentations. It's free!

Get AI-Generated Presentations Ready in Seconds
Free AI PPT Tools
How To Make Your PowerPoint Interactive: A Complete Guide

Are your audience being idle throughout your presentation? Do you want to know how to make a PowerPoint interactive? An interactive presentation will help you to make the inactive audience into active participants. You can use interactive elements to keep your audience engaged. Above all, an interactive PowerPoint presentation will give a dynamic and interesting experience for both the presenter and the audience. Whether you’re presenting in a classroom, a boardroom, or a conference hall, interactive presentations will help to get a better experience.
This guide will explain the different aspects of making your PowerPoint presentation interactive. You can learn what makes a PowerPoint presentation interactive, and tips to make the presentation more interactive and engaging. We have covered everything you need to know to make your next presentation a success.
Table of Contents
- What is an Interactive PowerPoint?
Advantages of Interactive PowerPoints
- Enhancing Understanding
- Participation
- Know Your Audience
- Setting Clear Goals
- Use Animations
- 3D Elements
- Triggered Animations
- Non-Linear Slide Navigation
- PowerPoint Morph Transition
Live Quizzes
- Running Polls
Brainstorming Sessions
- Draggable Objects
Creating Interactive Games
- Gathering Feedback
- Data Visualization
- Key Takeaways
- Tips for Continuous Improvement
What is an Interactive PowerPoint?
An interactive PowerPoint is a presentation that includes elements that allow audience participation and engagement. It can be animations, live polls, interactive charts, and other features that make the audience an active part of the presentation. Moreover, static presentations and interactive PowerPoints utilize non-linear navigation, allowing the presenter to adapt the flow of the presentation based on audience input and interaction.
Why Make Your Presentation Interactive?
Interactive presentations help to engage your audience more effectively than traditional presentations. By using interactive elements that promote audience participation, you can keep the audience focused, make the presentation memorable, and create a dynamic and engaging experience.
How do I make my PowerPoint engaging? To make your PowerPoint engaging, use interactive elements like animations, quizzes, polls, and multimedia to actively involve your audience and maintain their interest throughout the presentation.
Interactive PowerPoints will help you to improve audience engagement in your presentation. You can use polls, quizzes to engage your audience as active rather than passive listeners. This interaction and engagement will lead to better retention and presentation experience.
Enhancing Understanding
Audience interaction with the presentation will help you make the complex information more understandable. You can use interactive elements like animations and 3D models to illustrate your message more clearly.
Participation
An interactive PowerPoint presentation also encourages audience participation. You can use discussion prompts which can lead your audience to ask questions to make the environment more collaborative.
How To Create Interactive PowerPoint – Things to Remember
To make your PowerPoint interactive, include elements such as clickable links, live polls, quizzes, and non-linear navigation that could help in improving audience participation and engagement. Also try the use of animations, 3D models, and games to make your presentation dynamic.
Know Your Audience
Understanding your audience is the first and most important part of creating an interactive PowerPoint. Customize elements to retain their interest, knowledge levels, and preferences. And that could make your presentation to be the most relevant and engaging for your audience.
Setting Clear Goals
Next, set the exact goal of the presentation that you need to achieve. No matter what the presentation is about. It could be to educate or entertain, but having a clear goal and objective will help in selecting the most appropriate elements to use in the presentation design to engage your audience.
How Do You Make an Interactive PowerPoint – Pre-Presentation Tips
How do you add an interactive element to a presentation? To add an interactive element to a presentation, use the help of features like clickable links quizzes, polls, animations with triggers, or non-linear slide navigation in your PowerPoint slides. These elementsengage your audience and enhance their participation throughout the presentation.
Use Animations
Animations can bring your slides to life, but it’s essential to use them wisely. Overusing animations can be distracting and reduce the effectiveness of your presentation. Instead, use animations to highlight key points, illustrate concepts, and maintain audience interest.
Animations will help you to make your slides more impressive but don’t overload them. Overusing animations will distract the audience. Use animations to highlight key points and showcase concepts, to keep audience retention.
3D Elements
The use of 3D elements helps to make your presentation visually impressive and interesting, and it could also explain complex ideas in digestive form. It is possible to insert editable 3D models in PowerPoint to provide a more interesting experience for your audience. PowerPoint offers stock 3D elements and also you could use elements from external sources.
Triggered Animations
Another interesting feature is triggered animations which occur when anyone interacts with a specific element in the presentation. It could be a button, image, or any other. These triggered animations will help you to pop up additional pieces of information, get feedback on quizzes, or navigate into the different sections of the presentation.
Non-Linear Slide Navigation
Non-linear slide navigation helps you to jump to different slides based on audience input. This could help to make your presentation more flexible and responsive to the audience. Use hyperlinks or action buttons to create a non-linear navigational flow.
PowerPoint Morph Transition
The Morph transition in PowerPoint helps to create a seamless animation from one slide to another, making it look like objects moving within the same slide itself. This could be used to create engaging visuals and smooth transitions, keeping your audience’s attention.
How to Create an Interactive PowerPoint Presentation – During Presentation Tips

Live quizzes can be a fun and engaging way to make your presentation more interactive. It can also be used to test your audience’s knowledge and reinforce key points. You can use tools like Kahoot and Mentimeter which can be integrated into your Microsoft PowerPoint to conduct real-time quizzes and display results instantly.
Running Polls

Polls can gauge audience opinions, collect feedback, and make your presentation more and more interactive. Tools like Slido or Poll Everywhere help to run polls during your presentation and show live results on your slides.
Brainstorming sessions by using tools like virtual whiteboards and collaborative documents will make your PowerPoint presentation interactive and engaging. Encourage your audience to contribute ideas, discuss topics, and participate in problem-solving activities with the help of these brainstorming sessions.
Draggable Objects
As PowerPoint doesn’t have a prebuilt feature supporting draggable elements, you can use third-party tools like iSpring Suite to create drag and drop feature in your presentation.
Games will surely help to make your presentation more engaging and fun. You can add simple games like trivia, puzzles, or interactive stories to keep your audience entertained and involved.
How To Create an Interactive Presentation – Post-Presentation Tips
Gathering feedback.
Getting feedback after your presentation will help you understand what worked well and what you need to improve. You can use polls and surveys to collect audience opinions and suggestions that could help in delivering your next presentation.
Data Visualization
Interactive data visualizations allow the audience to explore data and information in more detail. Interactive charts and graphs are the best tools to present your data in a more engaging and informative way. Try them.
Summary and Best Practices
Key takeaways.
Now you have learned how to make PowerPoint Interactive. Interactive PowerPoint presentations will enhance the audience’s engagement, understanding, and participation. Use interactive elements to create a more dynamic and memorable presentation.
Tips for Continuous Improvement
- Experiment with Different Tools : Try new interactive tools and features to find what works best for the audience and your presentation.
- Practice : Always practice well and make sure you are comfortable with all interactive elements and tools before your presentation.
- Gather Feedback : Collect feedback and use them to continually improve your presentations and make them more effective.
At SlideBazaar, we help you create engaging and memorable presentations. Choose from our collection of professional templates or opt for our custom design services for a personalized touch. Your presentations deserve to be elevated to new heights, and we’re here to help you achieve just that!
BROWSE BY CATEGORY
- PowerPoint Templates
- Keynote Presentations
- Infographic
- Free slides
QUICK LINKS
- Frequently Asked Questions
- Terms & Conditions
- Privacy Policy
- DMCA Policy
EMAIL NEWSLETTER
Get updates of our PowerPoint templates and slide designs before anyone else.
- Powerpoint Tutorials
How to Add a Border to a Picture in PowerPoint

Adding a border to a picture in PowerPoint is a great way to make your presentations more visually appealing. Borders can help highlight important images, make your slides look more polished, and create a cohesive look across your presentation. This guide will walk you through the process of adding a border to a picture in PowerPoint.
Why Add a Border to Your Pictures?
Before we get into the steps, let’s briefly discuss why you might want to add a border to your pictures:
- Aesthetic Appeal: Borders can give your pictures a finished and professional look.
- Highlight Important Images: A border can draw attention to key images in your presentation.
- Consistency: Borders can help create a uniform look across multiple slides.
- Visual Interest: Adding borders can make your slides more engaging and visually appealing.
Step-by-Step Guide to Apply Borders to Pictures in PowerPoint
Step 1: open powerpoint and insert your picture.
- Start PowerPoint: Open Microsoft PowerPoint on your computer.
- Insert Your Picture: Go to the slide where you want to add a picture. Click on the “Insert” tab in the ribbon at the top of the screen. Select “Pictures” and choose the picture you want to insert from your computer.

Step 2: Select the Picture
- Click on the Picture: Once the picture is inserted, click on it to select it. You’ll see a border around the picture, indicating that it is selected.

Step 3: Add a Border Using Picture Tools
- Go to Picture Tools: With the picture selected, a new tab called “Picture Format” will appear in the ribbon. Click on “Picture Format.”
- Select Picture Border: In the “Picture Format” tab, look for the “Picture Border” option. Click on it to open a dropdown menu with various border options.

Step 4: Customize the Border
- Choose a Border Color: In the “Picture Border” dropdown menu, you can select a color for your border. You can choose from the theme colors, and standard colors, or click on “More Outline Colors” to select a custom color.
- Set the Border Weight: After choosing a color, go back to the “Picture Border” dropdown menu and hover over “Weight.” This will allow you to set the thickness of the border. Click on your preferred thickness.

- Adjust the Border Style: For more customization, you can also change the border style. In the “Picture Border” dropdown menu, hover over “Dashes” to choose from various dashed and dotted line styles.

Step 5: Fine-Tune Your Border
- Apply Shadow and Effects: To make your border even more interesting, you can add effects like shadows or glow. Still in the “Picture Format” tab, look for “Picture Effects.” Click on it to see options like “Shadow,” “Reflection,” “Glow,” and more. Select an effect and customize it according to your preference.

- Adjust Picture Position: Sometimes, adding a border might change how your picture fits on the slide. You can adjust the picture’s position and size by clicking and dragging the corners or edges of the picture.
Step 6: Save Your Presentation
- Save Your Work: Once you’re satisfied with the border and any other changes, make sure to save your presentation. Click on “File” in the top left corner, then select “Save” or “Save As” to save your presentation with the updated picture.
Tips for Adding Borders in PowerPoint
- Keep It Simple: A simple, clean border often works best and doesn’t distract from the main image.
- Match Colors: Choose border colors that complement the colors in your picture and the overall theme of your presentation.
- Consistency is Key: If you’re adding borders to multiple pictures, try to keep the style and color consistent for a cohesive look.
- Experiment: Don’t be afraid to try different border styles and effects to see what works best for your presentation.
Adding a decorative border to an image in PowerPoint is a quick and easy way to enhance your presentations. With just a few clicks, you can create a polished, professional look that will help your images stand out. Whether you’re preparing for a big presentation at work or creating a slideshow for a personal project, knowing how to add and customize picture borders in PowerPoint can make a big difference. So go ahead, give it a try, and see how a simple border can transform your slides! You can also visit Slide Egg’s Tips and Tricks page to learn more PowerPoint tips. Happy presenting!
Spread Love
Related blogs.

Arockia Mary Amutha
Recent blog.

Get Top 5 Free PowerPoint Templates of 2023 in Slide Egg!
15000+ Free PowerPoint Templates. Oh, that’s something crazy! 15 Free downloads per day. Come on; we are not kidding. That’s...

How to Create an Organizational Chart in Google Slides
Creating an organizational chart is essential for visualizing the structure of a company, and helping employees understand their roles and...

Free PowerPoint Templates and Google Slides Themes
Yes! Slide Egg offers you millions of free PowerPoint Presentations that enhance your presentation experience. Our ready-to-use and ready-to-modify PowerPoint templates and...
SIGNUP FOR NEWSLETTER
ROI of Design: How to Maximize Your Business Strategy?

Many organizations overlook the discipline of design because it’s often not considered important for financial success. However, taking your design strategies seriously might be the missing piece you were looking for to stand out in the market.
According to a McKinsey report , companies that integrate design as a core component of their strategy achieved 32% more revenue and 56% more total return to shareholders than their counterparts.
Thus, we can say that design actions are not merely about aesthetics; they are a crucial element of business strategies that can positively influence a company’s growth. In this context, it’s essential to measure the quality of these design initiatives and their respective return on investment (better known as ROI of Design).
Today, you’ll learn about:
What is ROI in Graphic Design?
How to calculate the roi of design, what is considered a good roi in business.
- The Impact of Outsourcing on Your ROI of Design (+ Success Story !)
Final Conclusions about the ROI of Design
Let’s dive into the essentials first!
The Return on Investment (ROI) of Design are all the benefits derived from the design strategies applied to your business .
These benefits can be measured using various indicators, which vary depending on your business sector (they can even vary depending on the type of design project).
Here are a few examples of how Design ROI can be measured based on its impact on:
- Reducing your website’s bounce rate
- Increasing qualified leads
- Boosting your sales rate
- Enhancing User Experience (UX)
- Strengthening your brand identity
- Increasing the perceived value of your product or service
- Improving long-term customer satisfaction
- Improving employee motivation in their daily work routine (learn more in our latest study !)
By understanding and measuring the Design ROI in your operations, you can determine which design actions are most beneficial for your business. Additionally, by properly tracking the evolution of this ROI over time, you can optimize your creative strategies and maximize the return on investment.
Remember, in the corporate world, if something isn’t measured, it doesn’t exist! Don’t get left behind, and discover how to calculate the ROI of Design for your company in the next section.

Calculating Design ROI can be challenging due to the mix of qualitative and quantitative factors involved . The complexity also varies depending on each company’s methodology and the unique characteristics of each design project.
However, here are some insights that will help you calculate Design ROI as realistically as possible:
- Identify Your Design Goals : Start by defining the specific goals of your design initiatives. These may include improving website usability, increasing newsletter subscriptions, boosting product sales, reducing delivery times, and improving brand perception, among others. Setting clear objectives provides a solid foundation for you to measure the impact of design in financial terms.
- Determine the Costs : Calculate the total costs associated with your design efforts. This includes designer salaries, software and tool expenses, and any other related costs. If you outsource the service, this calculation will be easier. We recommend being thorough in this part in order to obtain a more accurate ROI of Design.
- Measure the Benefits : In the ROI formula, the "benefits" of design are also known as revenue or income. These can include direct financial gains, such as increased revenue or cost savings, as well as indirect benefits, like improved website usability or long-term increases in customer satisfaction.
- Calculate the ROI : Use the standard ROI formula (see image) to determine the return on your design investment. This formula provides a percentage that indicates the return you get for every dollar spent on your design actions.

How to Measure the Benefits of a Design Project?
Due to the subjective nature of design, measuring the benefits of your design actions can often be a complex task. You’ll need to collect data and potentially establish a baseline to compare the results of your investments .
That being said, we want to detail some of the most important metrics for measuring the benefits of your creative projects:
Quantitative Metrics and KPIs
When applying the ROI formula, quantitative metrics can be directly added as financial benefits . For example, if the new design generates a $20,000 increase in sales, that amount is incorporated as part of the benefits.
Let’s start with the most common quantitative metrics in marketing and business:
- Increase in Sales : Additional sales value generated after implementing your design action. It’s crucial to compare the results with the previous period to determine the growth margin.
- Increase in Conversion Rate : The percentage of visitors who complete a desired action after the new design is implemented. For example, a new subscription to the newsletter.
- Increase in Web Traffic : The rise in the number of website visits after redesigning the interface or promotional graphic material.
- Repeat Purchase Rate : The increase in the frequency with which customers make repeat purchases after the redesign.
- Increase in Customer Retention Rate : The percentage of customers who remain loyal to your brand after the design update, compared to previous periods.
- Increase in Customer Lifetime Value (CLV) : The total value generated by a customer over the course of their relationship with the company. This composite metric includes the average purchase amount, purchase frequency, and the duration of the business relationship.
- Reduction in Customer Acquisition Cost (CAC) : The decrease in the average cost to acquire a new customer thanks to the positive impact of the new design on marketing campaigns.
- Reduction in Sales Cycle Time : The decrease in the average time it takes to close a sale due to improvements in the clarity and effectiveness of your design assets. This can include sales presentations or new visuals for your e-commerce.
- Reduction of Operational Costs: Includes savings from more efficient operations, such as reduced production costs, lower overhead, or fewer resources needed.
Qualitative Metrics and KPIs
Although they cannot be directly added in monetary terms, qualitative data can be converted into indirect financial estimates .
Let’s say you find an improvement in User Experience (UX) after a redesign, you can assess its impact by measuring its correlation with metrics like Customer Lifetime Value (CLV) or web conversion rates.
Here are some qualitative metrics you should consider when calculating your ROI of Design:
- Customer Satisfaction Score (CSAT) : The percentage of customer satisfaction regarding your products, services, or any specific action. It’s based on the direct question: “On a scale of 1 to 5, how satisfied are you with [product/service/interaction]?”
- Net Promoter Score (NPS) : Measures customer loyalty and their willingness to recommend your company, product, or service to others. It’s based on the question: “On a scale of 0 to 10, how likely are you to recommend [product/service/company] to a friend or colleague?”
- Improvements in User Experience (UX) : This includes qualitative feedback or scores that indicate enhancements in the ease of use and interaction with your product. Focus on how the design changes have positively impacted user satisfaction and influenced their purchasing decisions.
- Improvement in Brand Perception : Collect insights on how your customers perceive your brand, including their perceptions of product or service quality. Keep in mind that their perceptions affect their willingness to pay and their overall loyalty to your brand.
The most common tool for collecting this qualitative data is through surveys . If you want to make comparisons throughout the time, you need to take different surveys for each period.
Understanding how to measure the ROI of Design provides a more accurate basis for justifying your investments. If you haven’t already, it’s time for you to determine which KPIs should be your top priority!
Determining what constitutes a good ROI in business can vary depending on the industry, company size, and your specific goals .
Unsure if your ROI is on target? Evaluate these factors to see if your design investments are going in the right direction:
- Industry Standards : Research the Design ROI standards in your business sector in order to have a reference point for evaluating your performance.
- Positive ROI : At a minimum, a good ROI should be positive , meaning that the benefits outweigh the costs. A positive ROI indicates that your design investments are generating value for your business.
- Percentage Returns : A common benchmark for a good ROI is a return of 10% or more . However, some design initiatives can yield much higher returns, especially if they lead to significant improvements in user experience and customer satisfaction.
- Long-term Qualitative Impact : In addition to quantitative measures, consider the qualitative impact of design. A better user experience, improved brand perception, and long-term customer retention are valuable outcomes resulting from a good Design ROI.

The Impact of Outsourcing on Your ROI of Design
Outsourcing creative tasks can also significantly impact your final Design ROI. By trusting in external expertise, companies can achieve exceptional designs while managing costs effectively .
The biggest challenge lies in aligning the external team (agency, studio, or freelancer) with the internal team’s processes and standards. In this context, effective communication is key to ensuring a successful collaboration.
At 24Slides, we believe that when measuring the ROI of Design, you need to have an open mind and see the whole picture. According to our latest survey , 55% of the specialists say that creating slides is a really time-consuming task and generates demotivation at work .
"We often witnessed how being asked to redo a presentation could cause stress and demotivation. And with little time and extraordinary expectations, the end result is usually not satisfying for any parties involved."
-Marketing Manager interviewed for our latest study
At this point, we can say that delivering design tasks is not for everybody . And with good reason! Every employee is proficient in their area of expertise, and breaking that rule not only creates inefficiency but can also demotivate your team.
Time is a valuable resource, and at 24Slides, we understand that. Let’s see how we can improve this scenario for companies and specialists at all levels:
"Outsourcing design services can significantly impact your ROI in two key ways. First, it saves valuable time for your in-house team , allowing them to focus on strategic tasks rather than creating presentations. Second, with 24Slides, you have predictable costs. Unlike traditional agencies where prices fluctuate during peak seasons, 24Slides maintains steady rates, ensuring a solid ROI without the headache of constant price negotiations ."
- Dan Sørensen , Chief Marketing Officer at 24Slides
Success Story: Healthcare Company Optimizes 9,000 Work Hours by Collaborating with 24Slides
At 24Slides, we’re committed to delivering exceptional design , which is why we collaborate with leading companies worldwide. From investor pitch decks to high-impact presentations for various departments and marketing collateral after a brand refresh or rebranding, we handle it all!
With over 200 expert designers, we tailor our services to meet the unique needs of every client, whether you’re a local business or a multinational corporation with a global presence.
In 2023, a global leader in healthcare entrusted us with a large volume of their presentation design workload . We embraced the challenge with great enthusiasm!
A bit of a spoiler for what’s next: this collaboration delivered outstanding results, optimizing over 9,000 hours of our client’s work time and achieving an impressive Design ROI of 176%.
Calculating the ROI of Design
As a practical exercise, let’s calculate the Design ROI of this collaboration. First, it’s important to highlight some data collected in 2023:
- Total hours saved by the client with 24Slides’ partnership = 9,006 hours
- Salary per hour of the client’s employees = $63
- 24Slides’ Service = $205,705
- Total Benefits = Total hours saved by the client x Salary per hour
- Total Cost = 24Slides’ Service
Now, it’s time to refresh the ROI formula:

By applying the previous data to the formula, we achieved a Design ROI of 176% , which means that for every dollar invested, our client earned $1.76 in return . This is an excellent result, considering that a 10% ROI is the minimum acceptable for business.
While ROI is typically quantified with hard data, we’ve seen firsthand how design can create powerful effects beyond the numbers . Let’s see some of them for this case study:
- +9,000 hours saved, time redirected to core business activities
- +1,400 presentations designed, enhancing the client’s brand image
- 24-hour turnaround, boosting the client’s workflow
- Increased stakeholder satisfaction with presentation performance
- Improved employee motivation and satisfaction in their daily work routine

As design continues to play a crucial role in business growth, mastering the art of measuring ROI becomes increasingly important for small, medium, and large enterprises.
Here are some final thoughts:
- Adopt a Holistic Approach : Understanding and achieving a good Design ROI requires a holistic approach. By considering both quantitative and qualitative benefits, you can better justify your design investments and make more strategic decisions.
- Know Your Business : You can’t measure what you don’t know. While the general ROI formula seems simple, accurate measurement depends on knowing which metrics and KPIs apply to your specific situation. Understand your audience and set profit-driven objectives to achieve better results.
- Design Beyond Aesthetics : The role of design goes beyond a pretty illustration for social media; it can positively impact your marketing actions and the development of your product or service. Taking an integrated approach will enhance the user experience you deliver, which is a powerful differentiator in the market!
- Specialization Matters : Outsourcing your design tasks not only saves valuable time for your employees but also ensures higher product quality, shorter delivery times, and, most importantly, greater motivation for your team, who can focus on their primary tasks.
For a more accurate calculation of the costs your team incurs designing in PowerPoint, check out our hidden cost calculator to find your Design ROI with no problems!
Ready to unlock the full potential of our outsourcing model? Let our team be your creative partner, transforming your ideas into reality and driving your business to success.
Start the journey by booking a call with us here .

If you enjoy this article, you will love this content:
- How to Refresh Your Brand? Discover Our Strategic Approach
- AI vs. Professional Presentation Designer: A Comprehensive Comparison
- 10 Best AI Tools for Creating Impactful Presentations
- Mastering the Art of Presenting Data in PowerPoint
Create professional presentations online
Other people also read

How To Write Effective Emails That Will Improve Your Communi...
How to Make a Marketing Plan Presentation in PowerPoint

Alternative presentation styles: Takahashi

More From Forbes
From satire to satire: how gen z is revamping the legacy of “death by powerpoint”.
- Share to Facebook
- Share to Twitter
- Share to Linkedin
Young Cheerful Handsome Business Manager Wearing a Suit and Tie is Dancing like Crazy in the Office. ... [+] Diverse and Motivated Business People Work on Computers in Modern Open Office.
Fourteen years ago, Don McMillan, a Silicon Valley electrical engineer, recorded a YouTube video called “Life after Death by PowerPoint,” in which—as the title clearly states—he satirized the excesses and abuses of business presentation slides. In a key scene, McMillan says, “Here are the common PowerPoint® mistakes. Number One: People tend to put every word they are going to say on their PowerPoint® slides. Although this eliminates the need to memorize your talk, ultimately this makes your slide crowded, wordy, and boring. You will lose your audience’s attention before you even reach the bottom of your uh—first slide.”
What makes the scene funny is that every word McMillan speaks is on his slide, and that he reads them verbatim with his eyes glued to the screen and his back turned to his audience.
The video has amassed more than four million views and launched McMillan into a successful career as a professional comedian performing at corporate events.
Over the years, McMillan’s satirical campaign against the abuses and excesses of PowerPoint was picked up by New Yorker Magazine cartoons. One of the best, by Alex Gregory , shows the Devil interviewing an assistant and saying, “I need someone well-versed in the art of torture—do you know PowerPoint?”
Flash forward to last week when the Wall Street Journal ran a front page story titled, “Nothing Says ‘Party!’ to Gen Z Quite Like a 50-Deck PowerPoint and a Remote Clicker,” that describes a new trend in which the young generation uses the software to create presentations about frivolous—and therefore humorous—subjects. The authors of the story, WSJ Reporting Interns Sanvi Bangalore and Milla Surjadi, Gen Zers themselves, report that many of their peers “are amused by the irony of using professional technology to present NSFW content.” Bangalore and Surjadi call the trend “comedic ammo” because it used parody as criticism, just as McMillan did.
The reason that these abuses and excesses have persisted for so long can be traced back to the days before PowerPoint (as well as Google Slides and Keynote) and even before 35mm slides when presentations were done on flip charts. Those large cumbersome sheets mounted on rickety easels became the center of attention as a large surface that all the participants could see and share; but it also served to document the ideas that could later be copied and distributed to others who did not attend the session. In their earliest incarnation then, the flip chart served two purposes: as a display during the meeting and as a record capable of duplication and distribution after the meeting.
Best High-Yield Savings Accounts Of 2024
Best 5% interest savings accounts of 2024.
Thus, was born the “Twofer”—a mismatched conflation of a display and a document— composed of overloaded slides and inadequate documents. The dysfunctional practice persists despite years of “Death by PowerPoint” jokes and satire. Old habits die hard. Clearly the solution is to separate the functions by creating two entities: a simple headline for display in PowerPoint (or other slide software) and separate documents to record and distribute done with Word (or other word processing software).
The Gen Zers, who became fluent with PowerPoint during their childhoods, are now entering the workforce and creating slides for more senior people to present. Let’s hope that their skills, their satire, and their parties can break the mold.

- Editorial Standards
- Reprints & Permissions
Join The Conversation
One Community. Many Voices. Create a free account to share your thoughts.
Forbes Community Guidelines
Our community is about connecting people through open and thoughtful conversations. We want our readers to share their views and exchange ideas and facts in a safe space.
In order to do so, please follow the posting rules in our site's Terms of Service. We've summarized some of those key rules below. Simply put, keep it civil.
Your post will be rejected if we notice that it seems to contain:
- False or intentionally out-of-context or misleading information
- Insults, profanity, incoherent, obscene or inflammatory language or threats of any kind
- Attacks on the identity of other commenters or the article's author
- Content that otherwise violates our site's terms.
User accounts will be blocked if we notice or believe that users are engaged in:
- Continuous attempts to re-post comments that have been previously moderated/rejected
- Racist, sexist, homophobic or other discriminatory comments
- Attempts or tactics that put the site security at risk
- Actions that otherwise violate our site's terms.
So, how can you be a power user?
- Stay on topic and share your insights
- Feel free to be clear and thoughtful to get your point across
- ‘Like’ or ‘Dislike’ to show your point of view.
- Protect your community.
- Use the report tool to alert us when someone breaks the rules.
Thanks for reading our community guidelines. Please read the full list of posting rules found in our site's Terms of Service.

Customize a slide master
Use a slide master to add consistency to your colors, fonts, headings, logos, and other styles, and to help unify the form of your presentation.
You can change a slide master's colors, fonts, or effects. You can move, hide, or show placeholders. You can also change the orientation of the page from portrait to landscape, or vice versa.

Create and customize one or more slide masters
On the View tab, select Slide Master .

When you open Slide Master view, a slide master is shown in the thumbnail pane with the default, associated layouts below it. If you want to add another slide master, do the following:
Click a location in the slide thumbnail pane where you want the new slide master to appear.
On the Slide Master tab, select Insert Slide Master .
Note: In the slide thumbnail pane, the slide master is the larger slide image at the top, and the associated layouts are positioned below the slide master.
Do any of the following:
To create one or more custom layouts or to modify existing layouts, see Apply or change a slide layout .
To remove any of the built-in slide layouts that accompany the default slide master, in the slide thumbnail pane, click each slide layout that you want to delete, and then on the Slide Master tab, click Delete .
To apply a design or theme-based colors, fonts, effects and backgrounds, see Create your own theme in PowerPoint .
To set the page orientation for all of the slides in your presentation, on the Slide Master tab, select Slide Size > Custom Slide Size . Under Orientation, select the orientation you want.

To control whether footers (the slide number, date, and footer-text placeholders) are visible on a particular type of slide: In the thumbnail pane, select a slide layout, then on the Slide Master tab, select or clear Footers . To assign specific text to any of the footers, on the ribbon, select Insert > Headers, then select the options you want. See Insert or change the slide numbers, date, or footer for on-screen slides for more details.
After you make your changes, on the Slide Master tab, select Close Master View .
If you want to save this as a template to reuse again, select File > Save as (or Save a Copy ), change the file type to template, enter a file name, and select Save .
What is a slide master?
Learn more about themes
Add a placeholder to a layout
Change text alignment, indentation, and spacing
Use multiple slide masters in one presentation
On the View tab, click Slide Master .

When you open Slide Master view, a blank slide-master with the default, associated layouts appears. If you want to add another slide master, do the following:
On the Slide Master tab, click Insert Slide Master .
Note: In the slide thumbnail pane, the slide master is the larger slide image, and the associated layouts are positioned beneath the slide master.
To set the page orientation for all of the slides in your presentation, on the Slide Master tab, click Slide Size > Page Setup . Under Orientation, click the orientation you want.

To add text that will appear as a footer at the bottom of all of the pages in your presentation, on the Slide Master tab, click Slide Size > Page Setup > Header/Footer .
After you make your changes, on the Slide Master tab, click Close Master .
If you want to save this as a template to reuse again, click File > Save as Template , type a file name, and click Save .
Background information
Learn more about slide masters
Create or change slide layouts in PowerPoint for Mac
Add a transparent picture (watermark) to your slides in PowerPoint for Mac
Add a logo, company name, or header or footer text to handouts
Add page numbers, the date and time, or footer text to all slides in PowerPoint for Mac
Change footer formatting on all slides in PowerPoint for Mac

Need more help?
Want more options.
Explore subscription benefits, browse training courses, learn how to secure your device, and more.

Microsoft 365 subscription benefits

Microsoft 365 training

Microsoft security

Accessibility center
Communities help you ask and answer questions, give feedback, and hear from experts with rich knowledge.

Ask the Microsoft Community

Microsoft Tech Community

Windows Insiders
Microsoft 365 Insiders
Was this information helpful?
Thank you for your feedback.
IMAGES
COMMENTS
The master slide is the top slide in the thumbnail pane on the left side of the window. The related layout masters appear just below the slide master (as in this picture from PowerPoint for macOS): 1 Slide master. 2 Layout masters. When you edit the slide master, all slides that are based on that master will contain those changes.
Step-1: Click on the "Insert" tab. The first step is to click on the master slide from the slide layout panel on the left side of the screen in the "Slide Master" view. Then click on the "Insert" tab from the menu ribbon. Step-2: Click on the "Pictures" button.
The first step is creating the master slide, which you can do by clicking on the "View" tab and then the button marked "Slide Master." When you click the slide master button, the program generates a set of slides under the first slide in the presentation. These slides feature a template and a simple design. 2. Adjust the master slide.
From the Master Slide tab, go to Theme -> Browse for Themes. Import an existing PowerPoint theme using Browse for Themes option. Select the theme with the Master Slides to import to your PowerPoint presentation. Once the changes are applied, click Close Master View. Choose and existing theme in PowerPoint.
The slide master is the larger thumbnail at the top in the thumbnail pane. The smaller thumbnails below it are all the layouts that go with the master. The slide master contains all the design elements for your slides, including the background design (in this example, it is plain white), font styles, color scheme, types of placeholders, even ...
Learn how to use Slide Master in PowerPoint to control the look and feel of your whole presentation, including colors, fonts, background, effects, and just a...
Just like for creating a master template, the first thing is to access the master view. Go to View tab > Slide Master to see exactly all the design guidelines your presentation has at the moment. #2. Edit the Master Slide. If there's a common element that you want to change, the Master Slide is the place to do it!
Open the slide master for editing. On the View tab, select Slide Master. In Slide Master view, the slide master is at the very top of the thumbnail pane, with related layouts beneath it. Click to select that master slide, and then select Master Layout on the Slide Master tab. To show or hide the title, text, date, slide numbers, or footer ...
Creating a Slide Master in PowerPoint. Open your presentation, head over to the "View" tab, and then click the "Slide Master" button. The Slide Master will appear in the left-hand pane. The Slide Master is the top thumbnail that appears in the pane, and each sub-thumbnail represents each slide layout available in your theme.
Click on 'Slide Master' to access the master slides. Here, you can see the current theme applied to your slides. To change the theme, go to the 'Slide Master' tab and select the 'Themes' command. A collection of various themes will appear, allowing you to preview and select the one that best suits your presentation.
After opening the presentation, click View > Slide Master . Select the master slide and click the Master Layout button on the top ribbon. You can select a placeholder for title, text, date, footer, or slide number. These options are automatically applied to all layouts and slides.
Learn the secrets to using PowerPoint Slide Master effectively and save a ton of time and headache. This video covers basic as well as advanced Tips and Tric...
The slide master feature makes your presentation design process more efficient. You can significantly reduce the time you spend on each slide. For this, you must be familiar with the slide master feature. For instance, your presentation can reflect your brand image in all your slides. You can use the color scheme of your brand in your presentation.
Creating a slide master in PowerPoint is like making a custom design template. Use a theme, set up a slide style, and apply it to your slide show. This video...
The PowerPoint Slide Master is useful for creating templates in presentations and repeating specific elements on each slide. For example, if you want to repeat your company logo, the date, or the client's name in the bottom-left corner of each slide, you can do that with the Slide Master.
What to Know. Go to View > Slide Master and select the top thumbnail in the Slide pane. Use the Slide Master tab to change colors, fonts, and more. Use the Slides pane to choose a slide layout thumbnail and make changes to the layout master. When you're done making changes, select Slide Master > Close Master View to return to your presentation.
Here are the steps to create a Master Slide in PowerPoint: Open your presentation and go to the " View " tab in the PowerPoint ribbon. Click on " Slide Master " to open the Slide Master view. In the Slide Master view, you will see a series of slides, with the first slide being the Master Slide. To create a new Master Slide, click on the ...
Slide Master. In Microsoft PowerPoint, the Slide Master is the top slide that controls all information about the theme, layout, background, color, fonts, and positioning of all slides. Using the Slide Master is an easy way to adjust the look of an existing theme or make changes to all slides in your presentation. How to view the Slide Master.
Key Components of a Presentation Layout. Text Placement: How and where you place your text can affect readability and audience engagement.Key points should be easily visible and should guide the viewer through your narrative. Visual Elements: Images, charts, and videos should be placed in a manner that complements the text, not overshadows it.These elements should enhance understanding and ...
An interactive presentation will help you to make the inactive audience into active participants. You can use interactive elements to keep your audience engaged. Above all, an interactive PowerPoint presentation will give a dynamic and interesting experience for both the presenter and the audience.
Adding a border to a picture in PowerPoint is a great way to make your presentations more visually appealing. Borders can help highlight important images, make your slides look more polished, and create a cohesive look across your presentation. This guide will walk you through the process of adding a border to a picture in PowerPoint.
In this video, you'll learn the basics of working with Slide Master view in PowerPoint 2019, PowerPoint 2016, and Office 365. Visit https://edu.gcfglobal.org...
According to our latest survey, 55% of the specialists say that creating slides is a really time-consuming task and generates demotivation at work. "We often witnessed how being asked to redo a presentation could cause stress and demotivation. And with little time and extraordinary expectations, the end result is usually not satisfying for any ...
The slide master is the larger thumbnail at the top in the thumbnail pane. The smaller thumbnails below it are all the layouts that go with the master. The slide master contains all the design elements for your slides, including the background design (in this example, it is plain white), font styles, color scheme, types of placeholders, even ...
Training: Use a slide master to add consistency to your colors, fonts, headings, logos, and other styles, and to help unify the form of your presentation. Watch this video to learn how.
Create the Jeopardy game board. You'll first make the game board with the categories and score. Create a table in Google Slides with the subjects in the top row and the scoring system in the ...
Presentation slide design has resisted change despite years of satirical derision. Can Gen Z achieve a breakthrough? Subscribe To Newsletters. BETA. This is a BETA experience.
MasterChef Australia fans were left confused after none of the 2024 judges went up on stage to collect the Logie award for Best Competition Reality Program, despite two of the judges, Poh Ling Yeow and Sofia Levin being at the awards ceremony.. The long-running reality series welcomed three new hosts this year - Jean-Christophe Novelli, Poh, and Sofia - after the tragic passing of Jock ...
Learn how to add slide masters to your presentation. To control whether footers (the slide number, date, and footer-text placeholders) are visible on a particular type of slide: In the thumbnail pane, select a slide layout, then on the Slide Master tab, select or clear Footers.To assign specific text to any of the footers, on the ribbon, select Insert > Headers, then select the options you want.
What is the PowerPoint Slide Master?Would you like to save hours of work editing and customizing your PowerPoint presentations? Are you wasting time changing...