
Outline View in PowerPoint – Everything You Need to Know!
By: Author Shrot Katewa

Not a lot of people are aware that you can actually make a presentation by outlining your key points in a simple bulleted list format! This is where the Outline View in PowerPoint comes in handy!
In today’s article, we will take a look at the “Outline View” in PowerPoint, how to access it, and how to work with your presentation in the outline view!
So, let’s get started!
1. What is Outline View and Why is it Used?
The “Outline View” in Microsoft PowerPoint is a way of accessing the slides in a more simplistic manner. It removes the clutter of images and other infographics from your slides and helps you focus specifically on the text present on the slides.
In the outline view, you can see a list of the titles, subtitles as well as text on each slide. Using the outline view you can easily organize key information on your slides. You can also export or import the outline to and from other documents.
Furthermore, the outline view is also editable, which makes it easier to add or remove any text from the PowerPoint presentation.
2. How to Access the Outline View in PowerPoint?
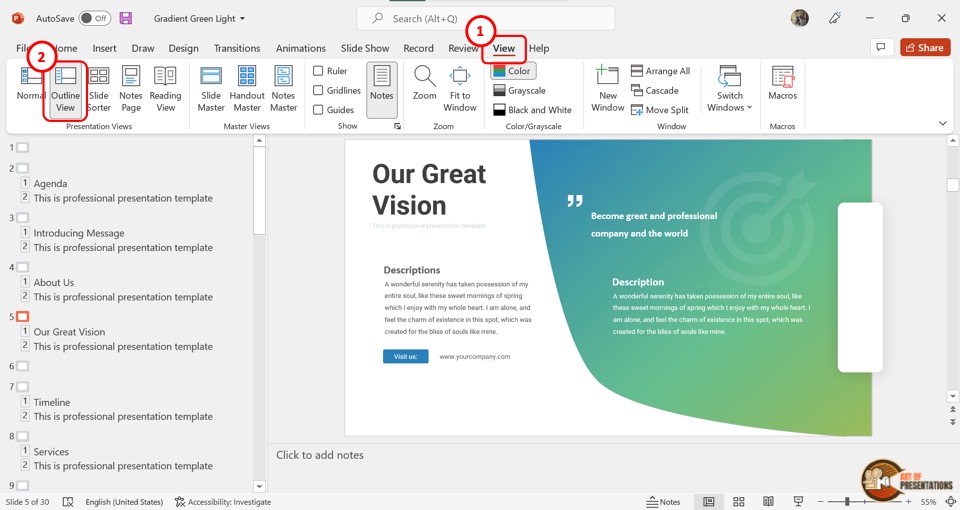
In Microsoft PowerPoint, you can very easily access the outline view and navigate it.
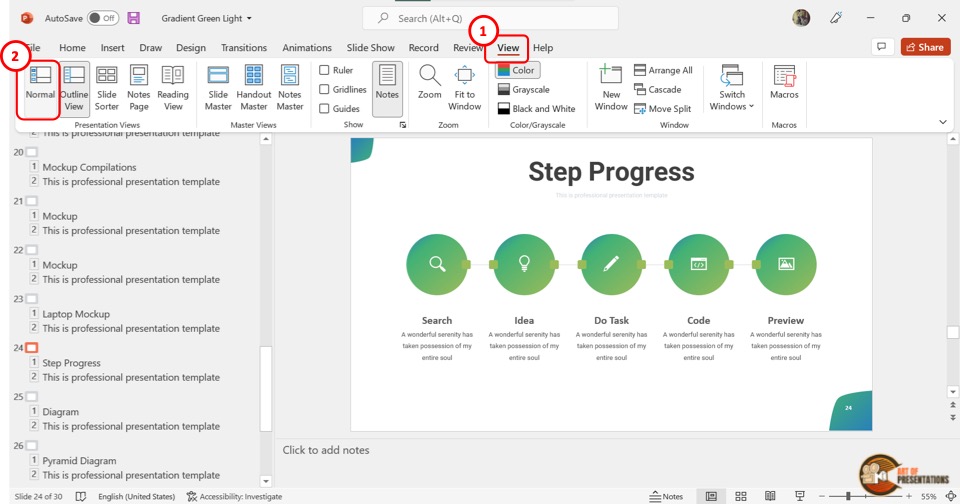
To access the outline view in PowerPoint, first, click on the “View” tab in the menu bar located at the top of the screen. In the “View” menu, click on “Outline View” which is the second option in the “Presentation Views” section.
This will show the presentation outline in a sidebar on the left side of the screen.
3. How to Expand Slides in Outline View?
In the “Outline View” , you can expand any or all slides to view all the content within the slide. There are 3 different methods you can use to expand the slides in the outline view.
3a. Method 1 – Using Right-Click
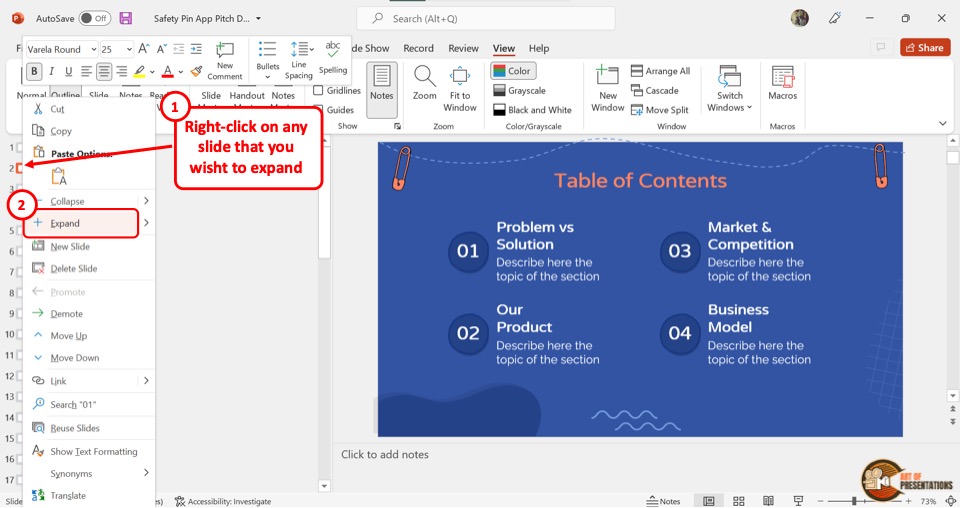
You have to first open the “Outline View” from the “View” menu. In the outline sidebar located at the left side of the screen, “Right Click” on the box beside the slide number which you want to expand.
Then click on the “Expand” option from the right-click menu.
3b. Method 2 – Using Double-Click
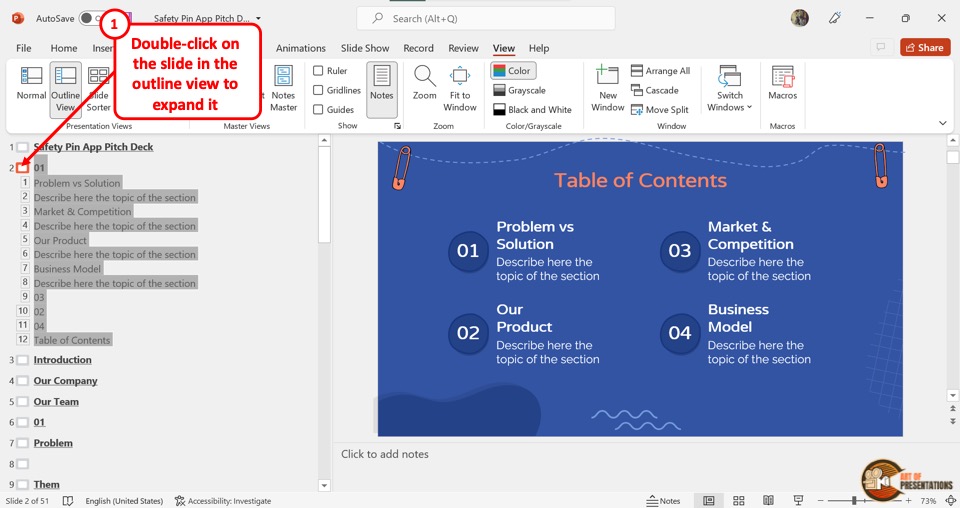
You can use the double-click method to quickly expand the slide outline. All you have to do is “Double Click” on the box located between the slide number and the slide title.
3c. Expand All Slides Using Expand All Feature
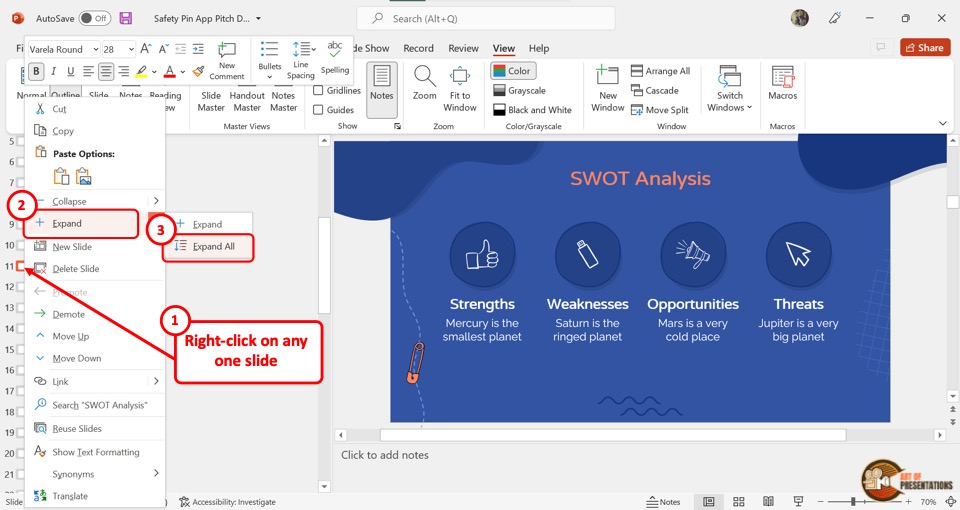
In the “Outline View” , you can also expand all the slides at once. To do so, “Right Click” on the box next to any slide. In the right-click menu, click on the arrow beside the “Expand” option to open another dropdown menu.
Then click on the “Expand All” option to expand all the slides.
4. How to Collapse Slides in Outline View?
Microsoft PowerPoint offers various methods to collapse slides in the “Outline View” . Collapsing the slides can help you see the list of the slides in a presentation easily.
4a. Using Right-Click
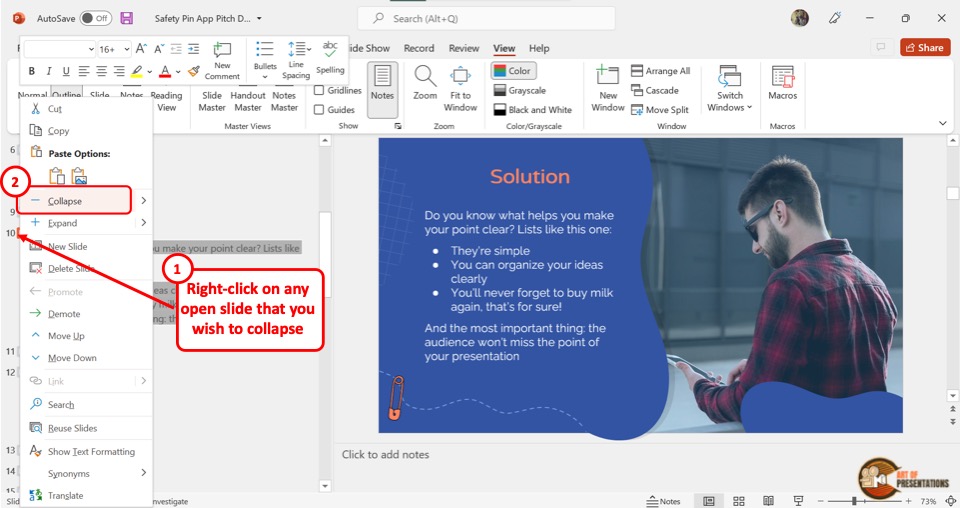
In the “Outline View” , locate the expanded slide from the sidebar on the left side of the screen. Then “Right Click” on the box next to the slide number and click on the “Collapse” option from the pop-up menu.
4b. Using Double-Click
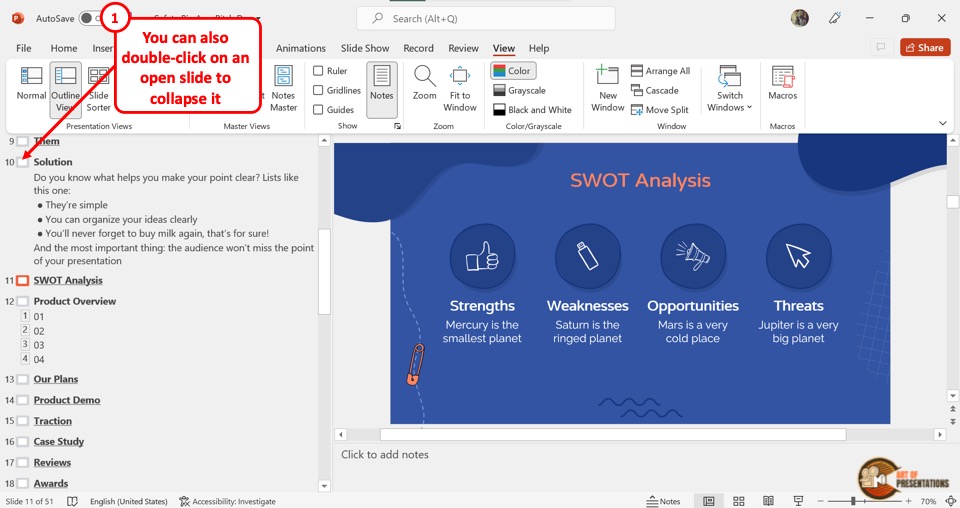
To collapse a slide using the double-click method, all you have to do is “Double Click” on the box at the left side of the expanded slide. The slide will immediately collapse hiding all the text except the heading.
4c. Collapse All Feature
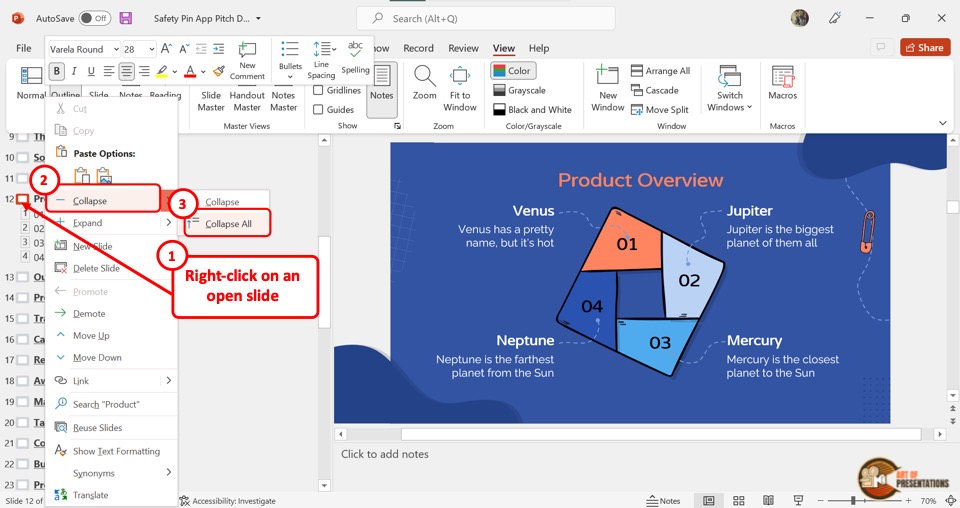
You can also collapse all the slides at once. To do so, “Right Click” on any slide in the outline. Then click on the arrow beside the “Collapse” option.
Finally, you have to click on the “Collapse All” option from the secondary pop-up menu.
5. How to Rearrange Slides in Outline View?
When reviewing the outline of a PowerPoint presentation, you may need to rearrange some slides based on their contents.
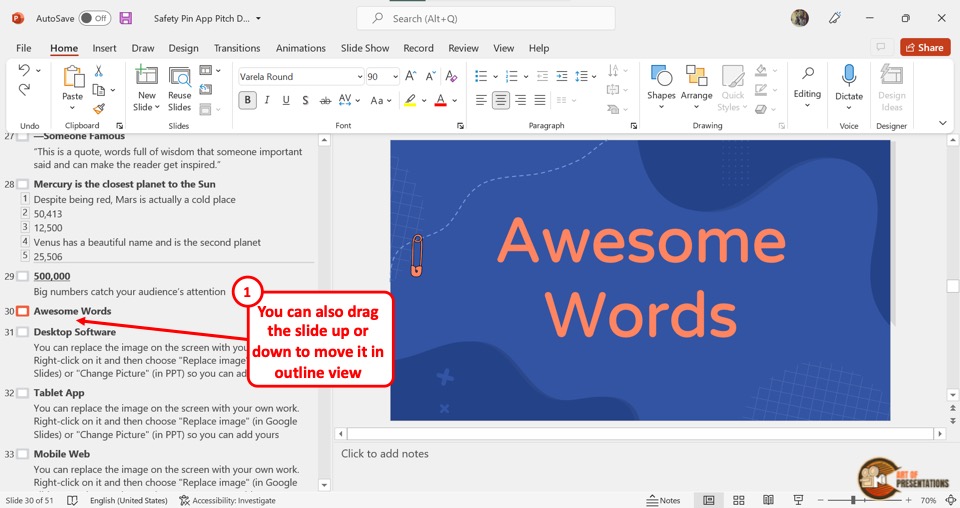
In the “Outline View” , you can move a slide in between the contents of another slide. You can also simply move a slide up or down.
5a. How to Move Up Slides in Outline View?
In the “Outline View” , you can move a slide up by one or even more slides. There are different methods to move up slides in PowerPoint. The first step is to click on the “Outline View” option from the “View” menu.
Method 1 – Using Right-Click
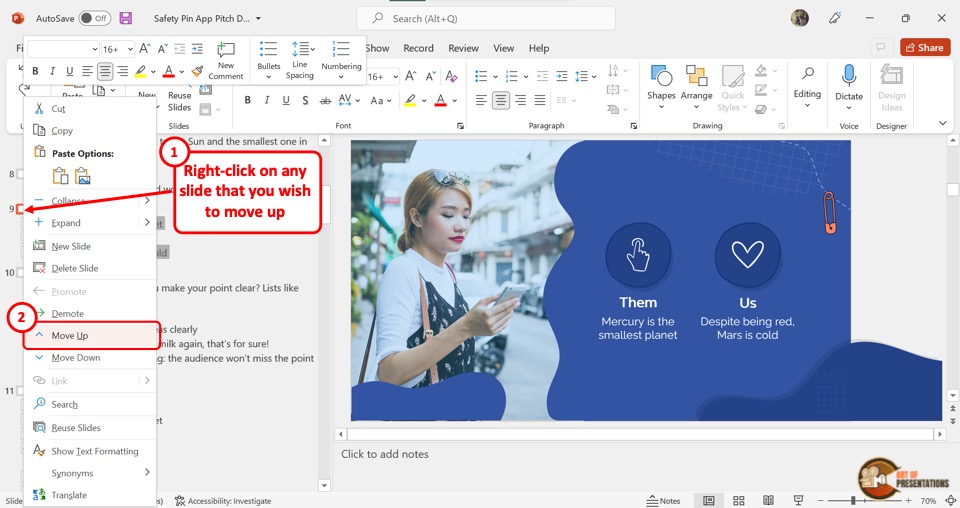
In the “Outline View” sidebar at the left side of the screen, “Right Click” on the slide you want to move up. Then click on the “Move Up” option from the right-click menu.
To move up the slide further, repeat the process until the slide reaches the preferred position in the outline.
Method 2 – Using Drag & Drop
You can also move up a slide quickly by using the drag and drop method. All you have to do is click and hold on to the box next to the slide number and then drag the slide up as much as you need.
5b. How to Move Down Slides in Outline View in PowerPoint?
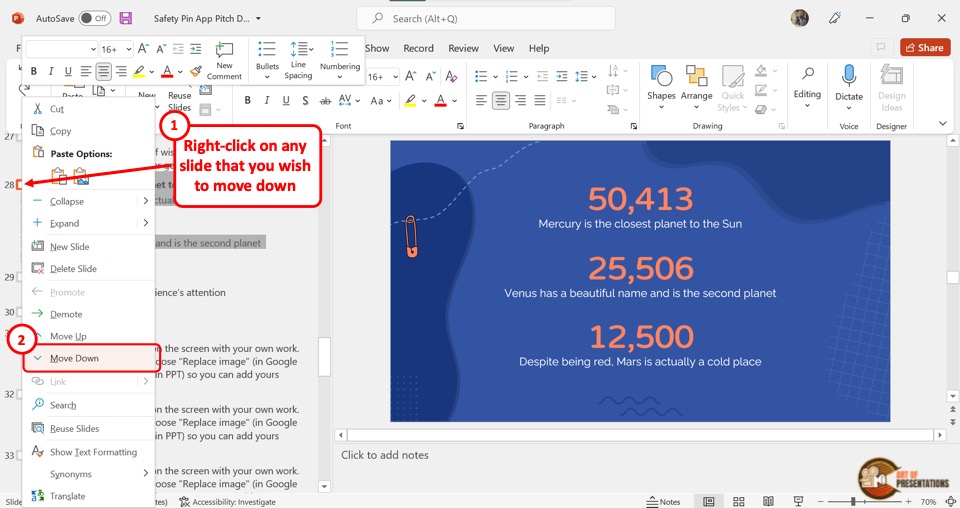
Similar to the process of moving up a slide, you can easily move down a slide. All you have to do is “Right Click” on the slide from the outlines on the left side of the screen.
Then click on the “Move Down” option from the pop-up menu. Alternatively, you can drag and drop the slide to the preferred position.
6. How to Add Content on Slides Using Outline View?
The presentation outline in the “Outline View” is editable. Thus, you can edit the content of a slide by editing the outline. To add content on slides using the “Outline View” , follow the 2 simple steps.
Step-1: Open the Outline View
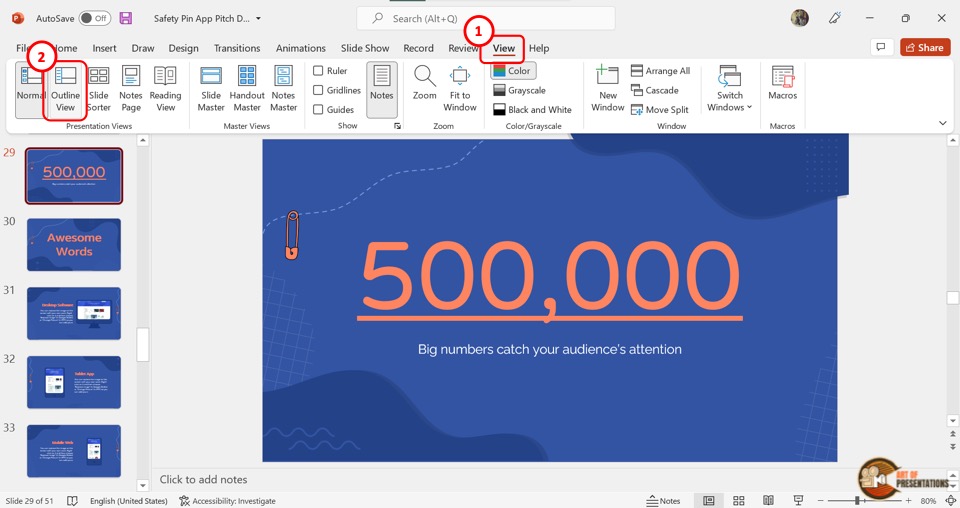
In the menu ribbon located at the top of the screen, click on the “View” tab. You have to then click on the “Outline View” option which is the second option in the “Presentation Views” section of the “View” menu.
Step-2: Click on the slide and add content to the outline
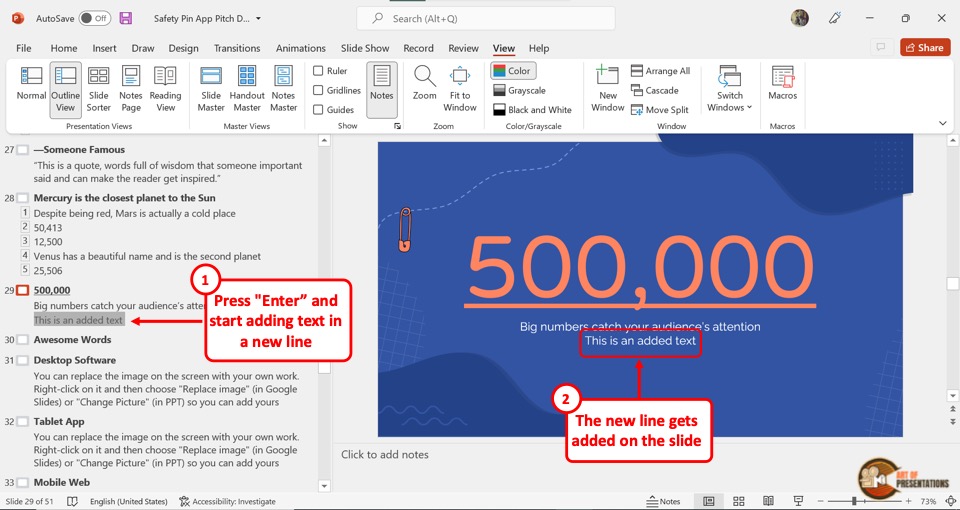
In the outline sidebar at the left side of the screen, click on the slide and heading level where you want to add content. Then type in the content. You will see the text being added to the presentation slide.
If you want to add text in a new line, simply press “Enter” and start adding the content. It will be visible separately on the slide.
6a. How to Increase or Decrease Indent of Content in Outline View?
To increase or decrease the indent of content in the “Outline View” , click on the “Home” tab in PowerPoint . Next, you have to click on the content in the outline sidebar for which you want to change the indentation.
Increase Indentation
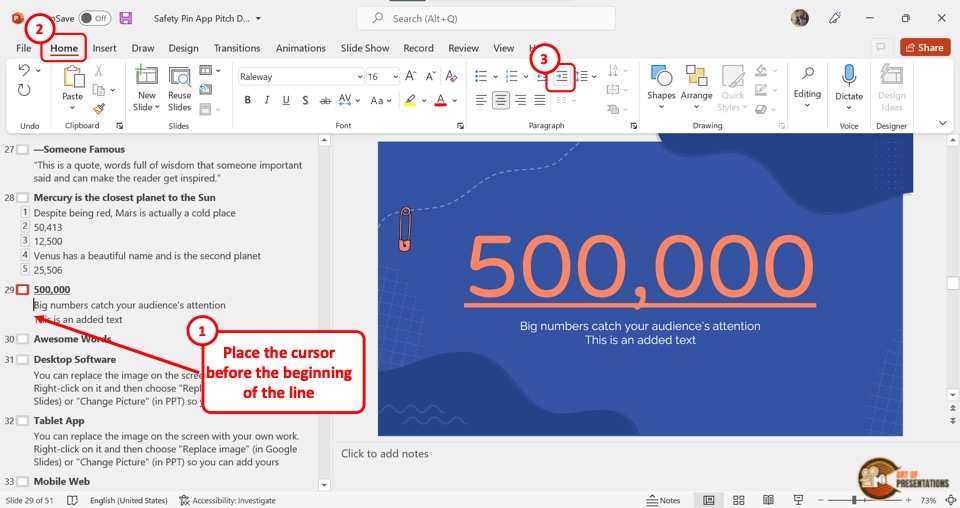
By increasing the indent level, you push the content to the right. The content is thus moved to a higher list level. To increase the indentation, click on the “Increase List Level” option in the “Paragraph” section of the “Home” tab in PowerPoint.
Decrease Indentation
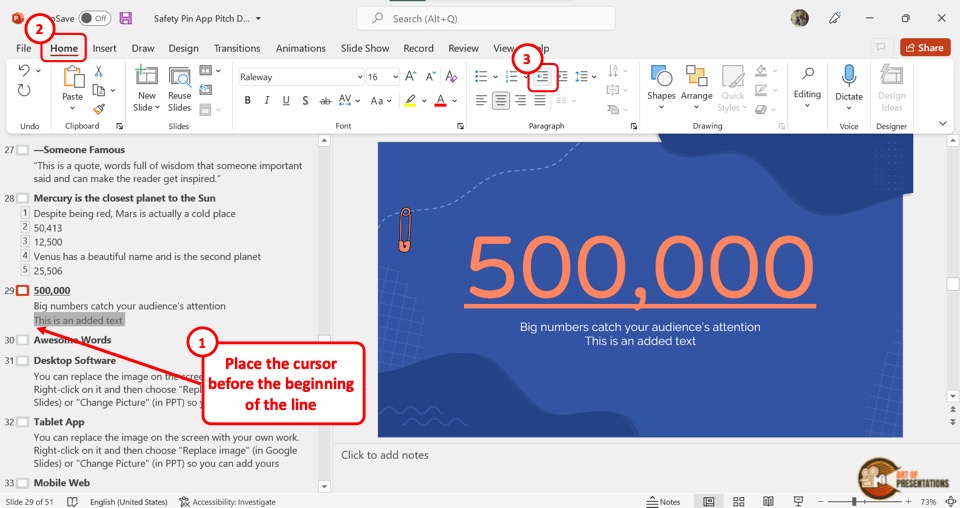
By decreasing the indent level, you can push the content to the left, and decrease the list level. To do so, click on the “Decrease List Level” option in the “Paragraph” section of the “Home” menu.
7. How to Change Content Hierarchy Using Outline View in PowerPoint?
In the “Outline View” , you can change the content hierarchy of the contents within a slide.
Content hierarchy is the order of the content in a slide. The top of the hierarchy is the heading and then the “List level 1” , “List level 2” and so on.
7a. Promote Content in Outline View in PowerPoint
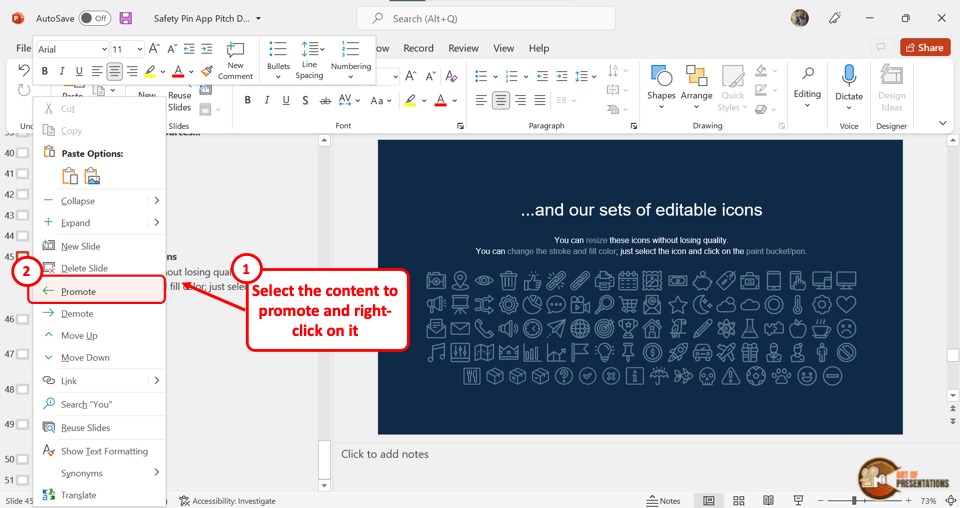
Promoting content pushes the content up the hierarchy.
To promote content in outline view in PowerPoint, you have to first “Right Click” on the content in the outline sidebar. Then click on the “Promote” option from the right-click menu.
You can repeat this process to promote the content up to a few hierarchy levels. However, you cannot promote a “Heading” since it is the highest level in the hierarchy.
7b. Demote Content in Outline View in PowerPoint
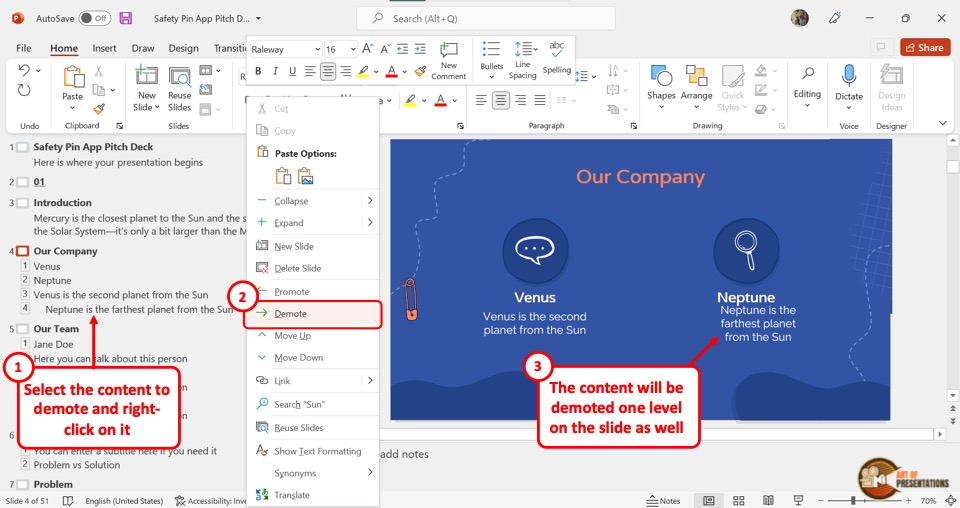
When you demote content, it is pushed down the hierarchy.
To demote content in outline view in PowerPoint, “Right Click” on the content in the outline that you want to demote. Then click on the “Demote” option.
You can repeat the process to move the content further down the hierarchy. For headings, you can only demote the heading of a text-only slide.
8. How to Go Back to Normal View from Outline View in PowerPoint?
If you want to exit the “Outline View” , you can easily return to the “Normal View” in PowerPoint.
To go back to “Normal View” from “Outline View” , all you have to do is click on the “View” tab in the menu ribbon. Then click on the “Normal” option which is the first option in the “View” menu.
9. How to Save Your PowerPoint Presentation as an Outline?
Besides viewing the presentation outline, you can also save your PowerPoint Presentation as an outline. All you have to do is follow the 4 easy steps.
Step-1: Click on the “Save As” option
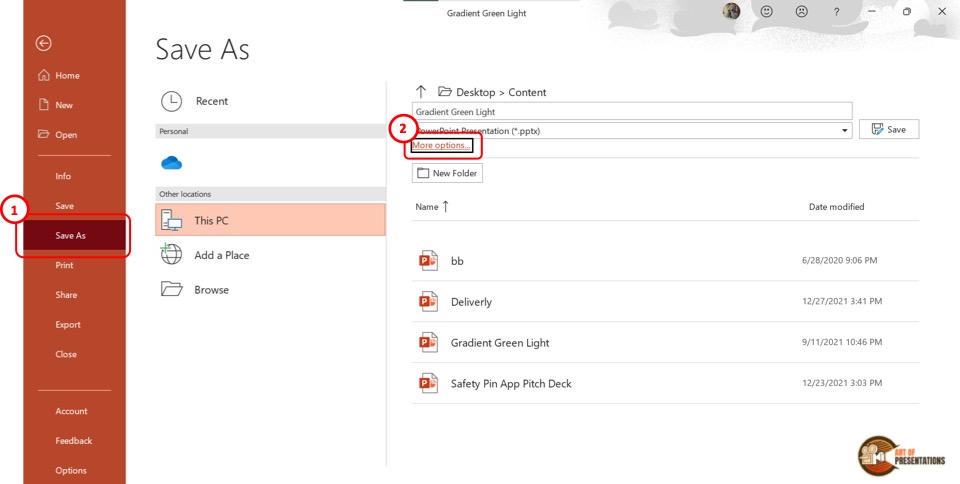
In the menu ribbon at the top of the screen, click on the “File” tab to open the “File” menu. Then click on the “Save As” option in the “File” menu.
Step-2: Click on “More options”
In the “Save As” screen, click on the “More options” option which is above the “New Folder” button (as shown in the image in step 1). This will open a dialog box.
Step-3: Click on “Outline/RTF”
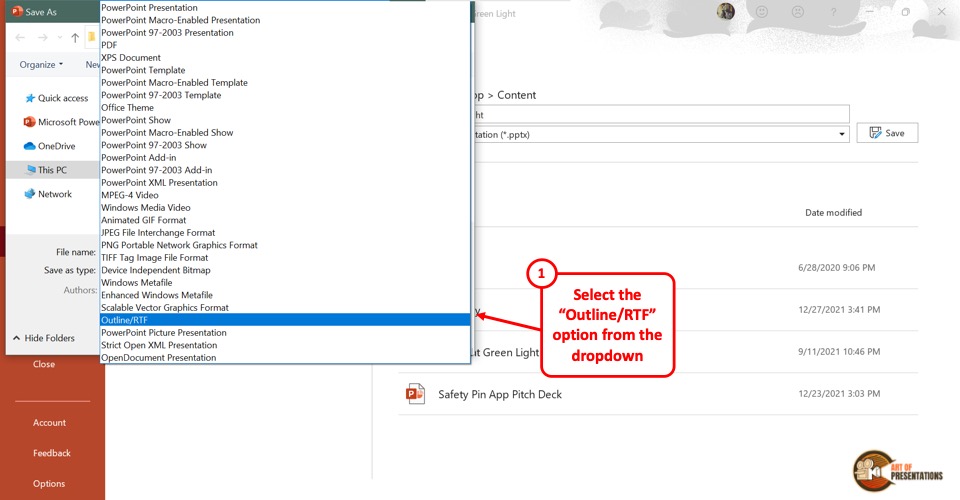
In the “Save As” dialog box, click on the “Save as type” box at the bottom. Then click on the “Outline/RTF” option from the pop-up menu.
Step-4: Click on the “Save” option
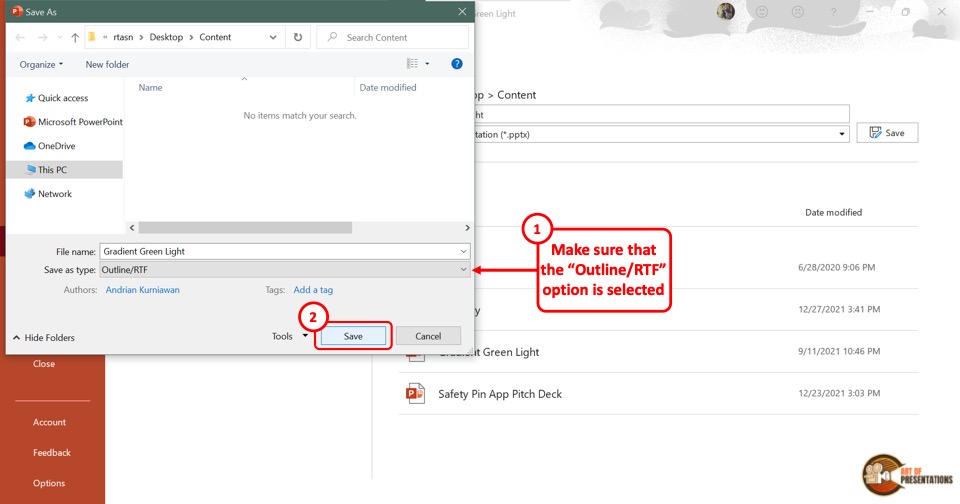
Now all you have to do is click on the “Save” button at the bottom of the “Save As” dialog box. This will save the PowerPoint presentation as an outline.
10. How to Print Outline View in PowerPoint?
Microsoft PowerPoint allows you to print the outline of the presentation only. All you have to do is follow the 3 simple steps.
Step-1: Click on the “File” tab
In the open PowerPoint presentation, click on the “File” tab from the menu ribbon located at the top of the screen. In the sidebar of the “File” menu, click on the “Print” option.
Step-2: Click on the “Print Layout” option
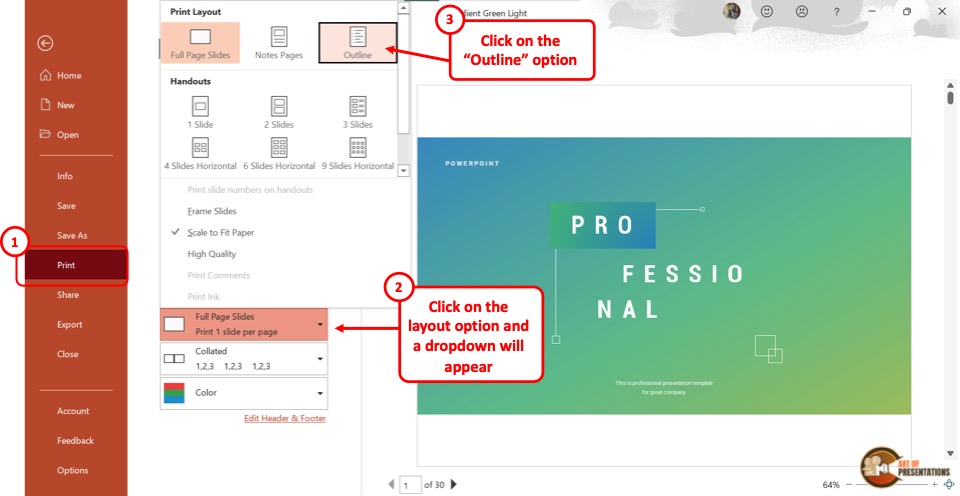
Under the “Settings” section, click on the box that says “Full Page Slides” . It will open a “Print Layout” pop-up menu. In the pop-up menu, click on the “Outline” option.
The presentation outline will appear on the preview screen.
Step-3: Click on the “Print” option
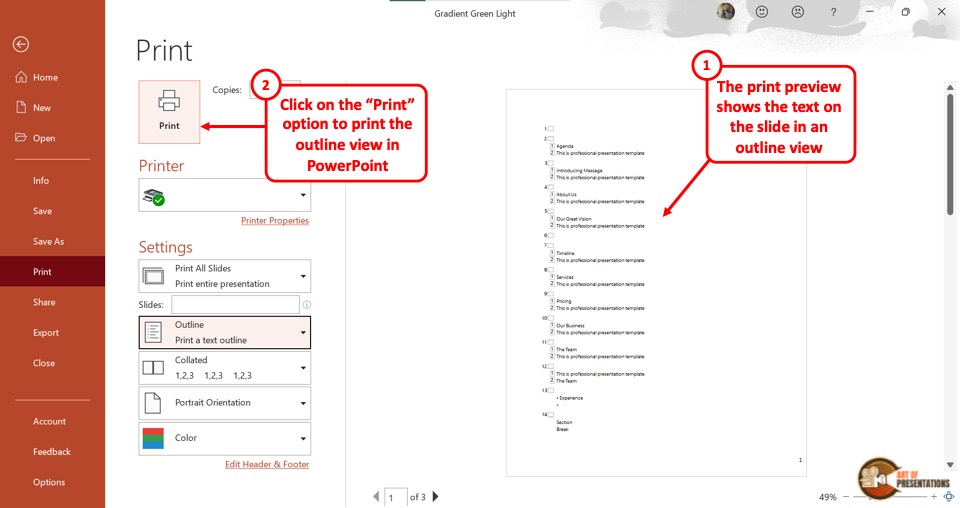
Finally, you have to make sure the device is connected to a printer. Then all you have to do is click on the “Print” button at the top of the screen.
11. How to Convert a Word Outline into a PowerPoint Presentation Using Outline View?
Microsoft PowerPoint allows you to import the outline from a Microsoft Word file. Importing an outline will automatically create slides for you. All you have to do is follow the 3 easy steps.
Step-1: Click on the “Slides from Outline” option
The first step is to click on the “Home” tab in the menu ribbon. In the “Slides” section of the “Home” menu, click on the “New Slide” option to open a dropdown menu.
Click on the “Slides from Outline” option from the bottom of the dropdown menu.
Step-2: Click on the “Insert” button
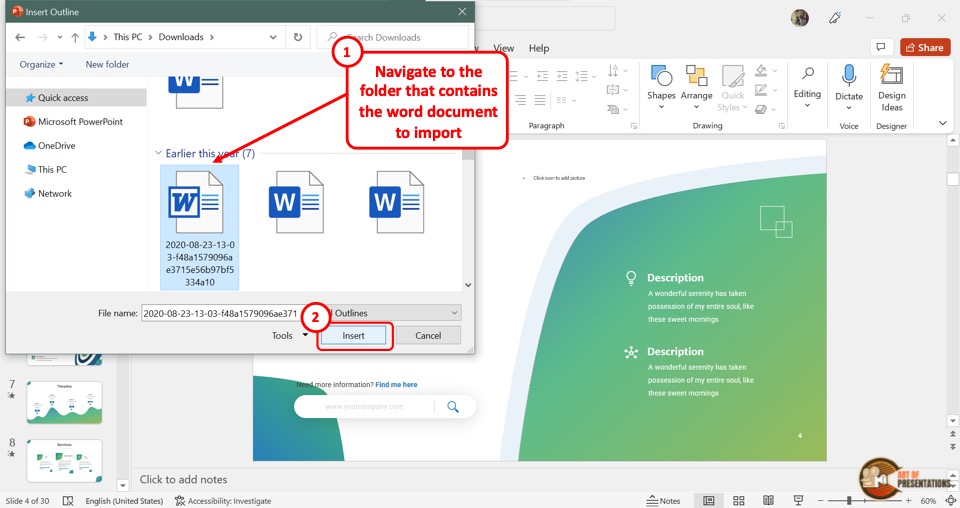
In the “Insert Outline” dialog box, click on the Microsoft Word document which you want to import. Then click on the “Insert” button at the bottom of the dialog box.
Step-3: Arrange the content
Since the process automatically transforms the Word outline into a PowerPoint outline, the content may need some adjustments. If the Word outline does not have any headings, each paragraph will be converted into a slide.
To arrange them, “Right Click” on the content, and then click on the preferred option from the “Move Up” , “Move Down” , “Promote” and “Demote” options in the right-click menu.
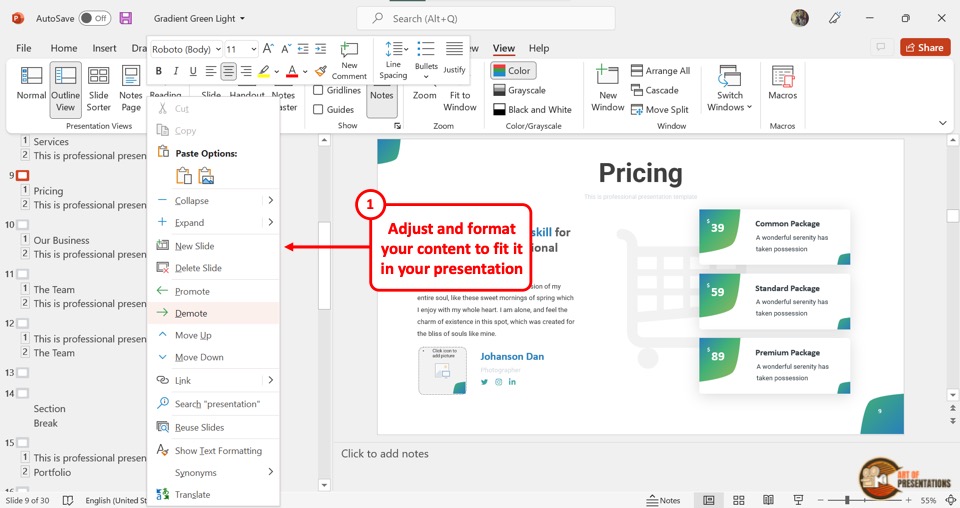
12. Outline View Not Showing Text? Here’s Why!
In Microsoft PowerPoint “Outline View” , the text in the content placeholder is automatically shown in the outline. So when a slide has no content placeholder, the outline will not show any text.
To solve the problem, you will first need to add a placeholder in PowerPoint . Follow the steps mentioned below –
Step-1: Click on the “Slide Master” option
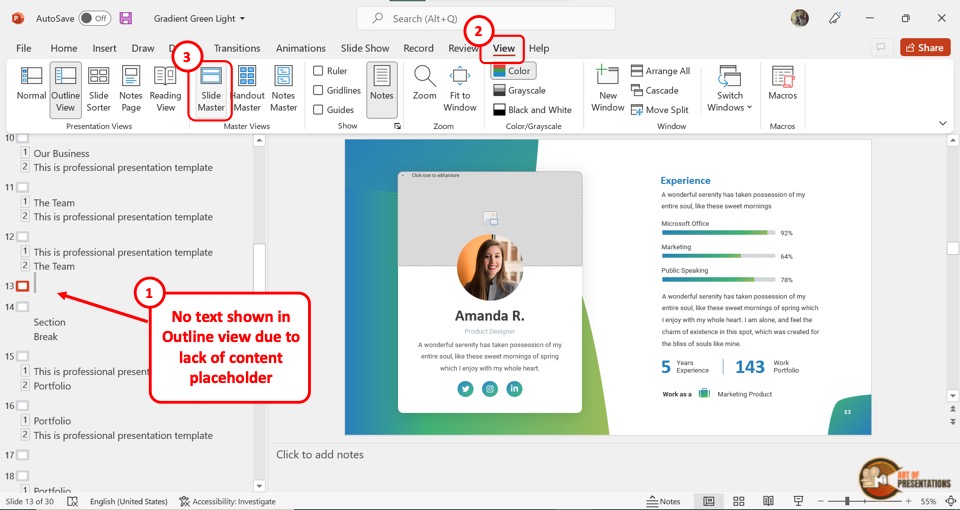
The first step is to open the slide where the “Outline View” is not showing any text. Then click on the “View” tab from the menu ribbon. In the “Master Views” section of the “View” menu, click on the “Slide Master” option.
Step-2: Click on the “Insert Placeholder” button
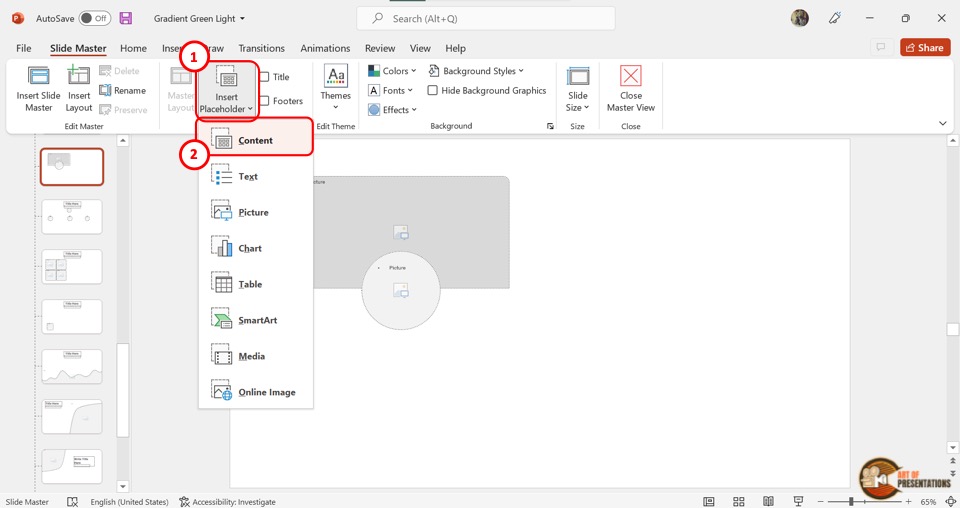
The next step is to click on the “Insert Placeholder” option in the “Master Layout” section of the “Slide Master” view. Then click on the “Content” option from the dropdown menu.
Step-3: Draw the “Content Placeholder”
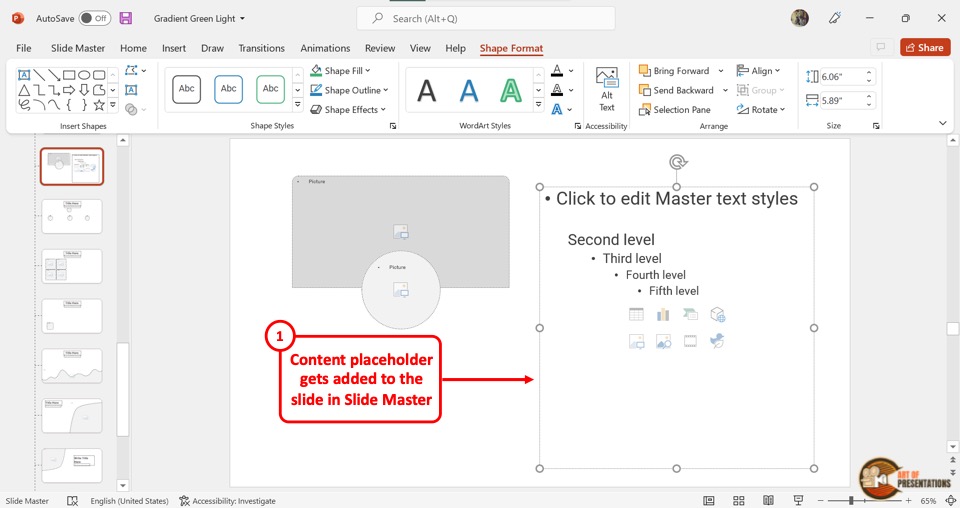
Now all you have to do is draw the “Content Placeholder” into the slide layout. You can also resize and reposition the placeholder.
Click on the “Shape Format” tab in the menu ribbon to access more options to edit the content placeholder.
Step-4: Click on the “Close Master View” option
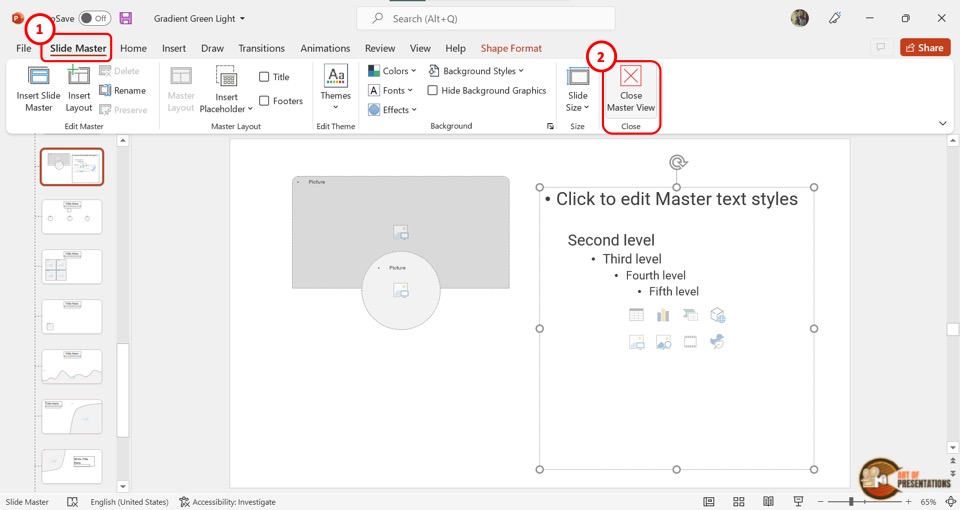
To save the content placeholder, click on the “Close Master View” option under the “Slide Master” tab. The screen will return to “Normal View” .
Step-5: Paste the text to the “Content Placeholder”
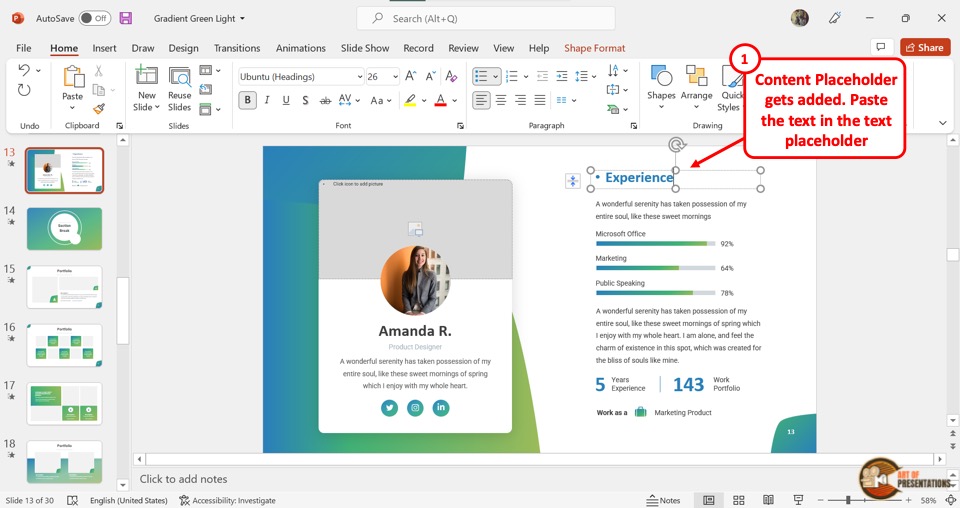
The final step is to cut the text in the slide and paste it into the “Content Placeholder” . To do so, select the text and press the “Ctrl+X” keys on your keyboard. Then click on the “Content Placeholder” and press the “Ctrl+V” keys.
Step-6: Click on the “Outline View” option
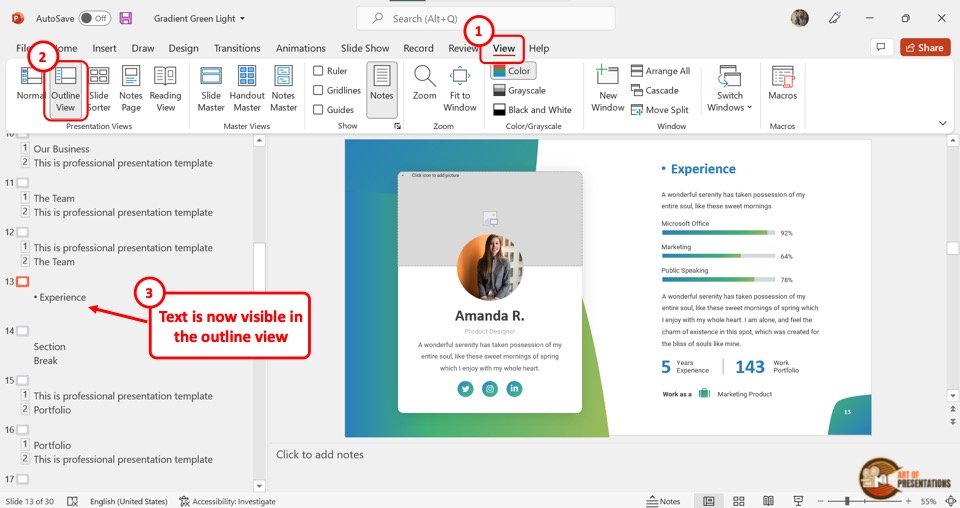
In the menu ribbon, click on the “View” tab and then click on the “Outline View” option. You will see that the text is now showing in the outline view.
Credit to Katemangostar (on Freepik) for the featured image of this article (further edited)
How to Print an Outline of the Presentation in Powerpoint
When you are creating a slideshow in Powerpoint for school or work, someone might ask you to also make an outline.
At first, this might seem like a lot of extra work, but there is actually a way to generate this document in Microsoft Powerpoint without needing to create an entirely separate document.
Our tutorial below will show you how to print an outline of the presentation in Powerpoint by adjusting an option on the Print menu.
Summary – How to Print an Outline View in Powerpoint 2010
- Click the File tab at the top-left corner of the window.
- Click Print in the left column.
- Click the second dropdown menu (it says Full Page Slides by default), then click the Outline option.
- Confirm that the outline is correct, then click the Print button.
Our guide continues below with additional information on how to print an outline of the presentation in Powerpoint , including pictures of these steps.
Learning how to print the outline view in Powerpoint 2010 is a valuable skill for someone that spends a lot of time working with Powerpoint presentations.
Many presentations can be incredibly large, and printing out every slide can be both unwieldy and unproductive.
But the outline view in Powerpoint 2010 provides a summarized version of your spreadsheet’s information, and printing an outline from Powerpoint 2010 can give you a condensed list of the slides and the information contained on them.
While we have previously discussed ways to print out handouts and speaker notes in Powerpoint 2010, one of those options might not be ideal for every situation.
Sometimes you want to print out a short summary of the information contained in your slideshow, whether it is for you or your audience.
Luckily Powerpoint 2010 also generates an outline from your slideshow information, so you will want to learn how to print an outline from Powerpoint 2010.
Generally speaking, an outline will usually be much smaller than if you printed handouts for everyone in your audience, as the outline will only include the text from your slides.
This will reduce the amount of paper that you use and will present the bulk of your slideshow information in a format that is easy to manage.
Printing Outlines in Powerpoint 2010 (Guide with Pictures)
The outline of your slideshow in Powerpoint is something that Powerpoint generates automatically. You do not need to do anything special for the outline to be created
It will take all of the text on each of your slides, then it will organize that information, by slide, into one complete outline document.
You can follow the steps below to learn how to print your outline in Powerpoint 2010.
Step 1: Double-click your Powerpoint presentation to open the slideshow in Powerpoint 2010.
Step 2: check each slide to ensure that you have included all of your text information and that everything is spelled correctly..
Note that there is a spell check utility available in the Proofing section of the ribbon on the Review tab.
Step 3: Click the File tab at the top-left corner of the window.
Step 4: click print in the column at the left side of the window., step 5: click the full page slides drop-down menu at the center of the window, then click the outline option in the top section..

Step 6: Check the outline document in the preview section at the right side of the window to see what information will be included on the printout.
If something is incorrect or does not make sense without also including a video or image to which it refers, then consider revising the text so that it is more helpful in the outline format.
Step 7: Click the Print button at the top of the window to print out the outline document.
Now that you know how to print an outline of the presentation in Powerpoint , you will be able to generate one of these documents whenever you need a summary or a shorter version of the complete presentation that you created.
Would a slide in your presentation, or even the entire presentation itself, look better in portrait orientation? Learn how to switch to portrait orientation in Powerpoint 2010 and look at your slide shows from a different perspective.
More Information on How to Print an Outline From Powerpoint 2010
When you follow the steps above to create a presentation outline of your PowerPoint slides, you will not only be able to see how many slides are in the presentation, but you will also get a helpful overview of the entire presentation.
This outline can be a good way to convert the presentation to a Word document if you also need to make a document from the slideshow. Since it contains only the text and none of the images, you won’t need to go through a lot of work to adjust the layout by removing all of those images or objects.
While the outline view is the main focus of this article, you can also use a similar option to create a notes page for each of the slides that you have created.
A notes page is going to include a single page for each slide, but any of the content in the Notes pane at the bottom of the slide editor.
If you need to create handouts for your audience, then you might want to select one of the Notes options rather than select Outline.
One other option that you have for viewing the presentation outline instead of going to the Print Preview is to select the View tab at the top of the window, then click Outline View in the Presentation Views group at the left side of the window.
This will open a column at the left side of the window that shows the outline. There is also a slide number next to each section of information so that you know which slide to attribute that content to.
You can click the Normal view button when you are finished working with the Outline view.

Matthew Burleigh has been writing tech tutorials since 2008. His writing has appeared on dozens of different websites and been read over 50 million times.
After receiving his Bachelor’s and Master’s degrees in Computer Science he spent several years working in IT management for small businesses. However, he now works full time writing content online and creating websites.
His main writing topics include iPhones, Microsoft Office, Google Apps, Android, and Photoshop, but he has also written about many other tech topics as well.
Read his full bio here.
Share this:
Join our free newsletter.
Featured guides and deals
You may opt out at any time. Read our Privacy Policy
Related posts:
- How to Save Powerpoint as PDF with Notes
- How to Set Time for Slides in Powerpoint
- How to Add Page Numbers in Powerpoint 2010
- Can I Convert My Powerpoint to Google Slides?
- How to Delete a Slide in Powerpoint 2010
- How Do I Print Just the Notes in Powerpoint 2010?
- How to Hide a Slide in Powerpoint 2010
- How to Loop a Slideshow on Powerpoint 2013
- How to Unhide a Slide in Powerpoint 2013
- How to Check Word Count on Powerpoint 2010
- How to Drag Slides From One PowerPoint to Another: A Step-by-Step Guide
- How to Email a PowerPoint Slideshow: A Step-by-Step Guide
- How to Insert Slides from Another Presentation in Powerpoint 2010
- How to Show Speaker Notes in Google Slides
- How to Change Line Spacing in Powerpoint for Every Slide at Once
- How to Make a Powerpoint Slide Vertical in Powerpoint 2013
- How to Change Hyperlink Color in Powerpoint 2010 (An Easy 5 Step Guide)
- How to Delete Multiple Slides in Google Slides
- How to Change the Font on All Slides in Google Slides
- How to Duplicate a Slide in Powerpoint 2010
Leave a Comment Cancel reply
You must be logged in to post a comment.
Validate Email Name * Email * Phone number * Message GDPR Agreement * I accept Acuity Training’s privacy policy
- Dates & Prices
- News & Tips
- Southampton
- Basingstoke
- 01483 688488

[Comprehensive Guide] Outline View In PowerPoint
- Date: 15th October 2021
- Read Time 5 mins
What is this unknown and brilliant Microsoft PowerPoint view I hear you cry?
It’s the PowerPoint Outline view, found in the View Ribbon in the Presentation Views group.
I’ve circled the View tab and the Outline view command below so you can see it clearly.
Do you know this view and how to use it? If not, stay right where you are! It’s quite different to Normal View in Microsoft PowerPoint. It shows you the presentation outline.

Why show you this view? The answer is, we’ve been teaching Microsoft PowerPoint for over 20 years (yes it did exist back then!) and noticed that this isn’t a well-known view despite it containing so many ways to speed up your work.
For those of you keen to learn more about PowerPoint Outline is covered in our PowerPoint Training Courses .
Let’s take a look at Outline View.
What Does Outline View Show You?
As you can see in the screenshot below, the Outline view is all about the presentation text and nothing else.

It’s where you can focus on the words in your presentation, so there are no distractions from the formatting, colour, or design.
It’s a really clean and productive view to start creating a presentation from.
The Outline view shown above has been customised slightly. I’ll show you how to recreate this exact view next.
To recreate the customised Outline view shown above, we need to make the text panel on the left sidelarger (the Outline pane) and the slide area on the right smaller.
The divider (which has been highlighted with an arrow and is shown below) is dragged to the right with the white double-headed cursor. You will see this cursor when pointing to the divider.
This creates a bigger left text panel and what’s called a slide miniature on the right.

If you are looking to learn more about how you can insert slides from other presentations easily , view our guide here!
How Do I Use PowerPoint Outline View?
Here’s how, you use the left text panel as if you were typing in Word. It’s remarkably simple to use!
The numbers and text circled above are the slide numbers and the slide titles.
Let’s create a presentation in Outline view. A new presentation has been created below and Outline view has been selected and customised as shown earlier.
The text PowerPoint Course has been typed onto slide 1. We then press enter and move onto slide 2. This is an amazingly quick way of creating and then typing into a new slide!

We can either use this new slide 2 or press the tab key to create and type subheadings onto slide one like this shown below.

By pressing enter after the subheading Tutor: Lucinda Thomas followed by shift+tab. This changes a subheading into the main slide heading like this below and Course Aims and Objectives can be typed in.

So, to summarise, we use enter after typing text and then alternate between tab (moves text right) to produce a subheading and shift+tab (moves text left) to produce a slide heading. Its that simple to use!

Looking for something a little different? Check out our AutoCAD for architects guide here!
What other features are there in Outline view?
We can Collapse and Expand all or individual slides in a presentation. This is incredibly useful for managing large presentations and organising ideas too. To collapse or expand slides we need to be in Outline View and right-click on a slide selector which is the box on the right of a slide number.
As you can see below, slide 2 has been right-clicked on. The speed menu shows the Collapse and Expand options. Collapse will just affect slide 2 whereas Collapse All will affect all slides in the presentation.

When Collapse All is selected, we only see the slide headings in the entire presentation as shown below. This helps when checking the flow and logic of a presentation. To show all headings again right-click on a slide selector and select Expand or Expand All .

Reorganising slides can also be carried out in Outline view so there’s no need to change to a different view for this.
By pointing to a slide selector, a white 4 headed arrow appears. By keeping the left mouse button pressed the 4 headed arrow turns black and the slide and all its text can be dragged up or down.
The grey positioning line shows the slides new position. The picture below demonstrates slide 3 being positioned between slide 1 and 2.

Lines of text can also be rearranged in Outline view. This is done by right clicking on the line of text and using the Move Up and Move Down options on the speed menu shown below.
The first point on slide 3 has been right-clicked on and this text has now been moved down and relocated as the first subheading on slide 4.

If you want to read information in your presentation or Outline, you can read our guide on zooming in using your mouse here.
Can I print PowerPoint Outline View?
Great news! Yes, you can print the Outline of a PowerPoint presentation. Many people use outline view to create speaker notes when making a presentation .
To print the Outline the Print options will be needed. Use the keyboard shortcut Control+P which takes you to Backstage View and the Print options which are shown below. The Full Page Slides option is selected, and Outline is clicked on from the menu (highlighted by the arrow) as shown below.

You are now able to print the Outline text only as shown below. This technique is covered in our comprehensive guide to all printing options in PowerPoint .

Want to see how people are using PowerPoint today? Check out our PowerPoint statistics here!
Related Articles

Top 10 Public Speakers (Worldwide!)
How popular is powerpoint in 2024 new statistics, 10 tips for delivering professional presentations.
Home Blog PowerPoint Tutorials How to Use Outline View in PowerPoint
How to Use Outline View in PowerPoint

PowerPoint provides different views to help presenters manage their presentations and PowerPoint templates . The Normal view is often used when creating presentations, the Slide Sorter view helps sort slides easily, the Reading view gives ease of reading the slides for review purposes, whereas the Slideshow mode is used for presenting presentations. Similarly, if you need to review and manage your outlines, the Outline View in PowerPoint is the right option.
How to Switch to Outline View in PowerPoint
By going to View -> Outline View , you can see the outline for your presentation. This view displays the presentation as titles and text within slides to give you an overview of the slide content.

The PowerPoint Outline View can also help to define the structure of your presentation beforehand, or review your slides after you have created a basic outline and need to start working on your slides. This can help you review if the outline makes sense. You can also use it during or after the completion of your presentation for the same purpose.

There are numerous handy options in the PowerPoint Outline view accessible via the right-click context menu. This includes options to expand or collapse the list and delete, move, or add new slides.

How to Print an Outline of the Presentation
To print an outline for your slides, go to File -> Print and select Outline via Settings . Select the printer and click Print .

Outline View in PowerPoint is a view that displays your presentation in the form of titles and text outlines, allowing you to manage and review the structure of your slides.
To switch to Outline View, go to the View tab and select “Outline View.” This will display your slides as an outline of titles and text.
Outline View helps you easily review the structure of your presentation, manage content, and ensure that the flow of your presentation is logical. It also allows you to quickly move, add, or delete slides and text.
Yes, you can edit your slide titles and text directly in Outline View, which can help streamline the process of organizing and refining your presentation content.
To print an outline of your presentation, go to File -> Print, then select “Outline” in the Settings dropdown. Choose your printer and click “Print.”
The right-click menu in Outline View offers options to expand or collapse the outline list, add, delete, or move slides, and adjust the text within the outline.
You should use Outline View when you want to focus on the structure of your presentation, review your slide content in a simplified form, or make adjustments to the organization of your slides.
Final Words
When designing your presentation outline in PowerPoint, a few considerations should include the title, introduction to your topic, subheadings, the number of slides you intend to use, a summary of your slides to make your content memorable with key action points, and a conclusion. The Outline View in PowerPoint can be a good option to review the basic outline for your presentation to remain on track when working on your slides.
Like this article? Please share
Microsoft PowerPoint, PowerPoint Tools Filed under PowerPoint Tutorials
Related Articles

Filed under PowerPoint Tutorials • July 30th, 2024
How to Add a Timer to PowerPoint
Generate expectations for your presentation introductions by mastering how to add a timer to PowerPoint. Step-by-step instructions + templates.

Filed under PowerPoint Tutorials • July 24th, 2024
How to Find Quick Access Toolbar in PowerPoint
Easily customize PowerPoint’s UI by locating and editing the Quick Access Toolbar in PowerPoint

How to Translate in PowerPoint
Unlock the experience of PowerPoint translation! Learn methods, tools, and expert tips for smooth Spanish conversions. Make your presentations global.
Leave a Reply
- Start the presentation and see your notes in Presenter view Article
- Add speaker notes to your slides Article
- Rehearse and time the delivery of a presentation Article
- Record a slide show with narration and slide timings Article
- Print your PowerPoint slides, handouts, or notes Article
- Create a self-running presentation Article

Print your PowerPoint slides, handouts, or notes
In PowerPoint, you can print your slides, your speaker notes, and create handouts for your audience.

Print your presentation
Select File > Print .
For Printer , select the printer you want to print to.
For Settings , select the options you want:
Print All Slides : To print each slide on a single sheet or change to just print a range of slides.
Slides : From the drop-down, choose to print all slides, selected slides, or the current slide. Or, in the Slides box, type which slide numbers to print, separated by a comma.
Print Layout : Choose to print just the slides, just the speaker notes, an outline, or handouts. The number of slides per page is also an option, an effective way to save paper.
The Outline prints only the text in the slides, without images. The Notes of a presentation show the slide and the related speaker notes below it. If you choose to print Handouts, you can print several slides on one page using a variety of layouts, some with space for note-taking.
Color : Choose whether you want color, grayscale, or pure black and white.
Edit Header & Footer : Select to edit the header and footer before printing.
For Copies , select how many copies you want to print.
Select Print .
Printed handouts: Add or remove slide numbering
|
This feature is available only to for Windows desktop clients. |
By default, in PowerPoint for Microsoft 365 (beginning with version 1810), printed handouts include a slide number below each slide image.
You can turn off this option in the Print dialog box on the same menu where you chose to print Handouts. At the bottom of the menu are several toggle options with check marks. Clear the check mark next to Print slide numbers on handouts :

Select a heading below to open it and see the detailed instructions.
Print slides
On the File menu select Print .
Select Show Details at the bottom of the dialog box.

In the Layout box, select Slides .

Set the other printing options you want, and select Print .
Print slides with speaker notes
In the Layout box, select Notes .

Print an outline
In the Layout box, select Outline .

Print handouts (with or without slide numbering)
In the Layout box, select one of the Handout options, depending on how many slides per page you want.

By default, in PowerPoint for Microsoft 365 for Mac (beginning with version 16.30), printed handouts include a slide number below each slide image.

Select Print .
Add speaker notes to you slides
For files stored on OneDrive, OneDrive for work or school, or SharePoint in Microsoft 365, you can print slides, notes, or handouts.
|
| A Notes Page prints the slide on the upper half of the page and the related speaker notes on the lower half. |
|
| A Handouts page consists of three slide thumbnail images on the left side and several printed lines for note-taking to the right of each thumbnail. To print handouts in other layouts, see . |
To get more advanced printing layout options, use a desktop version of PowerPoint.
Important: If you use an add-in in your presentation, any content added to a slide via the add-in will not be printed successfully in PowerPoint for the web. In order to print such content, you would need to switch to the PowerPoint desktop app on Windows or macOS and print the slide from there.
Print in Chrome
From your PowerPoint for the web slide show, select File > Print and then choose the kind of sheets you want to print:

Wait for the Print panel to open.

Next to Destination , click Change to choose a printer. Set any other print layout options you want, such as which slides to print and one-sided versus two-sided printing. (Available options vary by printer.)

Click Print .

Print in Microsoft Edge
From your PowerPoint for the web slide show, click File > Print and then choose the kind of sheets you want to print:
Wait for the Print dialog box to open.

Under Orientation , choose the option that matches the orientation of your slides. Set any other print layout options you want, such as which slides to print and one-sided versus two-sided printing. (Available options vary by printer.)

Under Printer , choose a printer.

Click Print to print your slide show (you might have to scroll to find Print on the print panel).

Print in Firefox
Click Open PDF .

Click the printer icon in the upper right above the slide show.

In the Print dialog box that appears, under Printer , choose a printer.

Click OK to print your slide show.

When you are finished printing, close the PDF file that was opened for printing in step 2.
Print in Safari
From your PowerPoint for the web slide show, click File > Print and then choose the kind of sheets you want to print: .
From the open presentation hover your pointer over the bottom of the presentation and click this image.

In the Print dialog box, under Orientation , click Landscape . Set any other print layout options you want.

In the Printer box, choose a printer.
Click Print to print your slide show.

Need more help?
Want more options.
Explore subscription benefits, browse training courses, learn how to secure your device, and more.

Microsoft 365 subscription benefits

Microsoft 365 training

Microsoft security

Accessibility center
Communities help you ask and answer questions, give feedback, and hear from experts with rich knowledge.

Ask the Microsoft Community

Microsoft Tech Community

Windows Insiders
Microsoft 365 Insiders
Was this information helpful?
Thank you for your feedback.
Byte Bite Bit
How to Print an Outline in PowerPoint: Step-by-Step Guide
When we’re working on a PowerPoint presentation, it’s often helpful to see a streamlined view of our content. That’s where printing an outline can save the day. To print an outline in PowerPoint, you simply need to access the “File” tab, go to “Print,” and select the “Outline” option from the dropdown menu. This gives us a clean, text-only version of our slides, allowing us to focus on the core messages without the distraction of graphics and layout.

Imagine you’re preparing for a big meeting and need to review all the key points quickly. Instead of flipping through each detailed slide, a printed outline provides a bird’s-eye view of your main ideas and structure. This can be a real time-saver, especially when collaborating with others or making last-minute tweaks to the presentation’s flow.
Additionally, having a printed outline is valuable for feedback purposes. It enables colleagues to review and comment on the structure and content more effectively. Whether it’s for personal review, team brainstorming, or just a quick overview, printing an outline in PowerPoint is a fantastic way to keep everything organized and accessible. Ready to learn the step-by-step process and make your presentation prep a bit smoother? Let’s dive into it!
- 1.1 Design and Layout Considerations
- 1.2 Using Outline View to Organize Slides
- 1.3 Importance of Concise Messaging
- 2.1 Editing and Reviewing Slides
- 2.2 Navigating Between Different Views
- 3.1 Options for Printing Outlines and Handouts
- 3.2 Exporting to PDF and Other Formats
- 4 Conclusion
Creating an Effective PowerPoint Presentation
Crafting a PowerPoint presentation that resonates with your audience requires thoughtful design, strategic organization, and clear messaging. Let’s break it down into the crucial components that can make your presentation shine.
Design and Layout Considerations
An effective design ensures your presentation captures attention and maintains interest. Start by choosing a clean, professional template. Microsoft PowerPoint offers various templates, but you can also explore options from platforms like Envato Elements.
Use consistent fonts and color schemes that fit your content and audience. Incorporate your company’s logo and include relevant images to enhance your message. Keep slides uncluttered by limiting the number of elements. Bulleted lists and whitespace are your friends. Ensure key information stands out using bold text or highlights.
Using Outline View to Organize Slides
Outline view helps us structure our presentation efficiently. It focuses on the textual content of our slides, allowing us to organize and prioritize our main points without getting distracted by design elements.
To access Outline view, go to View > Outline View in Microsoft PowerPoint. Here, we can quickly add, edit, and rearrange slide titles and text. This view is particularly useful for ensuring our presentation has a logical flow and covers all necessary topics.
You can easily see where information may be lacking or redundant. This helps in refining the content and improving clarity.
Importance of Concise Messaging
Clarity and brevity are critical in getting our message across effectively. Audiences often lose interest if we overload them with information. Each slide should focus on a single idea or point. Use short, impactful sentences and avoid jargon.
Consider using bullet points and short paragraphs to present information clearly. If a slide includes too much text, break it down into multiple slides. Visuals should support the text, not overwhelm it. Remember, the purpose of a presentation is to enhance the speaker’s talk, not to serve as a standalone document.
By maintaining a concise and focused message throughout, we ensure that our audience can easily follow and remember the content.
Efficient Presentation Management
Efficiently managing a PowerPoint presentation involves both editing and reviewing slides, as well as navigating between different views to ensure a seamless workflow.
Editing and Reviewing Slides
Editing and reviewing slides is crucial for creating impactful presentations. We need to access the slide’s text and content without getting bogged down by complex layouts. PowerPoint offers a robust “Review” tab where we can add comments , track changes, and collaborate effectively.
Using this feature, we can highlight text changes, see who made specific edits, and respond to comments – all within the presentation. It’s also useful to use the “Compress” and “Expand” options in Outline View to focus on specific slides or sections.
Navigating Between Different Views
Navigating between different views, such as Normal View and Outline View, allows us to work efficiently on various presentation aspects. The View tab in PowerPoint 2010 includes the “Presentation Views” group, making it simple to switch views.
Here’s a quick look at some useful views:
| View Name | Description | Usage |
| Default view showing slide and notes pane | Detailed editing | |
| Text-focused view for easy review | Quick edits | |
| Thumbnail view of all slides | Rearranging slides |
Switching between these views lets us navigate , review, and modify our presentation with ease. This way, we ensure every aspect of our presentation is polished and ready for the audience.
Printing and Sharing Presentations
Printing and sharing PowerPoint presentations is essential for meetings, lectures, and collaborative work. Knowing how to convert your slides into outlines and different formats efficiently can save time and ink.
Options for Printing Outlines and Handouts
We can print outlines and handouts from PowerPoint to suit various needs. Begin by navigating to the File tab and clicking on Print .
Next, we select the second drop-down menu under Settings , which defaults to “Full Page Slides.” Here, by choosing the Outline option, we ensure only the text from our slides is printed without the visuals. We can also choose multiple slides per page for better paper and ink utilization.
For printing handouts, instead of selecting Outline, we choose the Handouts option. This allows the flexibility to print several slides per page, reducing ink usage and making it more convenient for audience note-taking.
It is wise to double-check the Printer Properties to select the correct page orientation —Portrait or Landscape—based on your presentation format.
| Prints only text from slides. | |
| Prints multiple slides per page. |
Exporting to PDF and Other Formats
We often need to share presentations as PDFs or other formats for easy distribution. In PowerPoint, we go to the File tab and select Export .
Choosing Create Handouts provides various layout and formatting choices, including an Outline Only option. This boils down to exporting just the outline, ideal for text-focused reviews.
For a standard PDF, we hit Save As , select PDF from the file type dropdown menu and adjust settings. This action ensures that our presentation retains its design while making it universally accessible.
Exporting to other formats like Word or Images follows similar steps but be sure to select the correct format to maintain the presentation’s usability for the intended audience. Such flexibility ensures seamless sharing, regardless of the recipients’ software capabilities.
| Retains design, universally accessible | |
| Editable text, common document format | |
| Easy to share visually-rich slides |
We’ve walked through the steps to print an outline in PowerPoint, and it’s clear that this is a valuable skill for anyone looking to present their work concisely.
First, let’s remember to access Outline View :
- Open the presentation.
- Click ‘View.’
- Select ‘Outline View.’
Once you’re in Outline View , printing is easy:
| Go to ‘File’ > ‘Print’ | Select ‘Full Page Slides’ > ‘Outline’ |
| Adjust settings | Choose your layout and orientation |
| Click ‘Print’ | And you’re done! |
This process ensures your audience receives the most important information from your presentation without the distraction of full slides. It’s efficient and gets the message across swiftly.
If we’ve missed a step, or you have any tips to share, feel free to add your input. We love learning from each other. Happy printing!
Related posts:
- How to Do Hanging Indent on PowerPoint: Step-by-Step Formatting Guide
- How to Embed a YouTube Video in PowerPoint: Step-by-Step Guide
- How to Add a Video to PowerPoint: Step-by-Step Tutorial
- How to Add Speaker Notes in PowerPoint for Effective Presentations
- How to Add Music to PowerPoint: A Step-by-Step Guide for Seamless Presentations
- How to Curve Text in PowerPoint: Step-by-Step Guide
- How to Record a PowerPoint Presentation: Step-by-Step Guide for Professionals
- How to Crop a Picture into a Circle in PowerPoint: A Step-by-Step Guide
- How to Copy a Slide from One PowerPoint to Another: A Step-by-Step Guide
- How to Save PowerPoint as Video: Step-by-Step Guide for Beginners
- How to Make a Picture a Circle in PowerPoint: Step-by-Step Guide
- How to Print Notes in PowerPoint: A Step-by-Step Guide
Leave a Comment Cancel reply
Save my name, email, and website in this browser for the next time I comment.
How to Print an Outline in PowerPoint

Do you find yourself needing to print an outline of your PowerPoint presentation? Well, you're in luck! In this article, we will guide you through the process of printing an outline in PowerPoint. Whether you need a physical copy for reference or prefer to review your presentation on paper, we've got you covered. So, let's get started!
Understanding PowerPoint's Outline View
Before diving into how to print an outline in PowerPoint, it's essential to understand the importance of the Outline View. The Outline View presents your presentation content as a structured list, making it easier to organize and manage your slides. By using the Outline View, you gain a clear overview of your presentation's flow and content hierarchy.
Delving deeper into the significance of the Outline View, it not only aids in structuring your presentation but also streamlines the editing process. This view allows you to focus on the core message of each slide, ensuring that your content is concise and impactful. Moreover, by utilizing the Outline View effectively, you can easily identify any gaps or redundancies in your presentation, leading to a more polished final product.
Importance of Outline View in PowerPoint
The Outline View in PowerPoint serves as a valuable tool for creating and editing your presentation. It allows you to focus on the structure and logical flow of your content rather than being distracted by the visual elements of individual slides. By using the Outline View, you can effortlessly rearrange, add, or delete slides, ensuring a coherent and captivating presentation.
Furthermore, the Outline View promotes collaboration among team members working on the same presentation. With a clear text-based representation of the content, it becomes easier for multiple stakeholders to provide feedback and suggestions, fostering a more cohesive and well-rounded presentation.
Navigating the Outline View
Navigating the Outline View is easy and intuitive. To access it, simply click on the "View" tab in the PowerPoint ribbon and select "Outline View." You will be presented with a simplified version of your presentation, where each slide's content is displayed as text. To move between slides, use the arrow keys or click on the desired slide in the left pane. By familiarizing yourself with the Outline View, you'll be one step closer to efficiently printing an outline of your PowerPoint presentation.
Additionally, within the Outline View, you have the flexibility to make bulk changes to your presentation. Whether it's adjusting the formatting of multiple slides at once or reordering sections with ease, this view empowers you to make quick and effective modifications to enhance the overall structure and coherence of your slides.
Preparing Your PowerPoint for Printing
Before you print an outline of your PowerPoint presentation, it's crucial to ensure that everything is in order. Take a moment to review the following steps to guarantee a successful printing experience.
Printing a PowerPoint presentation can be a useful way to share information in a concise and organized format. By following a few key steps, you can ensure that your printed outline effectively conveys the main points of your presentation.
Checking Slide Content
First and foremost, carefully review the content of each slide. Ensure that all the text is error-free, concise, and conveys your intended message. Make any necessary edits or adjustments to enhance clarity and readability. Remember, the outline will serve as a summary of your presentation, so it should reflect your key points accurately.
Additionally, pay attention to the visual elements on each slide. Check that images, charts, and graphs are clear and relevant to the content. Consider whether any visuals need to be adjusted or removed to improve the overall cohesiveness of the outline.
Adjusting Slide Layout
When printing an outline in PowerPoint, it's important to consider the layout. You want to ensure that the text is legible and well-structured. Adjust the slide layout if needed, taking into account the font size, spacing, and alignment. Keep in mind that the outline should be easy to read at a glance, so make any necessary adjustments before proceeding to the printing stage.
Moreover, think about the overall design aesthetic of your outline. Consider incorporating consistent colors and fonts to maintain a professional look. A cohesive design will not only enhance the visual appeal of the printed outline but also help reinforce your branding and messaging.
Steps to Print an Outline in PowerPoint
Now that your PowerPoint is ready for printing, let's walk through the steps to print an outline.
Printing an outline of your PowerPoint presentation can be a useful way to review the textual content without the distraction of images or design elements. Follow these steps to create a clean and concise outline for your reference.
Accessing the Print Menu
To access the Print menu, click on the "File" tab in the PowerPoint ribbon and select "Print." This will open the Print menu, where you can customize your print settings and preview the outline before printing.
Within the Print menu, you will find various options to tailor your printing preferences. From adjusting the page layout to selecting specific slides, the Print menu allows you to fine-tune how your outline will appear on paper.
Selecting the Outline Print Option
Within the Print menu, locate the "Settings" section and select the "Outline" print option. This will ensure that only the text content of your presentation is printed, excluding any visuals or slide elements. You can further customize the print settings, such as the number of slides per page, to suit your preferences.
By choosing the outline print option, you can create a document that focuses solely on the key points and information shared in your PowerPoint presentation. This can be particularly helpful for reviewing the structure and flow of your content, making it easier to identify areas for improvement or revision.
Troubleshooting Common Printing Issues
During the printing process, you may encounter some common issues that can hinder the desired outcome. Here are a couple of troubleshooting tips to help you address these problems:
Dealing with Formatting Problems
If you notice formatting issues in the printed outline, double-check your PowerPoint document for any formatting inconsistencies that might affect the printing process. Ensure the font styles, sizes, and bullet points are consistent throughout the slides. You can also try adjusting the print settings to resolve any formatting discrepancies.
Another aspect to consider when troubleshooting formatting problems is the use of images and graphics within your PowerPoint presentation. Sometimes, complex images or graphics can cause formatting issues during the printing process. To address this, try simplifying the images or converting them to a different format before printing to see if that resolves the problem.
Resolving Printer-Related Issues
In some cases, printer-related problems may arise. If your printed outline doesn't match your expectations, ensure that your printer is properly connected and has sufficient ink or toner. Additionally, update your printer drivers to the latest version to avoid compatibility issues. If the problem persists, consider seeking assistance from your printer manufacturer or a technical expert.
When dealing with printer-related issues, it's also important to check the paper settings in both your document and the printer. Mismatched paper settings can lead to misalignment or cropping of content on the printed page. Make sure the paper size and type settings in your document match those in the printer settings to ensure accurate printing results.
Tips for Efficient PowerPoint Outline Printing
Now that you know the essential steps to print an outline in PowerPoint let's explore a few tips to ensure an efficient and hassle-free printing experience.
Utilizing Print Preview
Before finalizing your outline print, make sure to utilize the "Print Preview" feature. This will give you a visual representation of how your outline will appear on paper. Use this opportunity to review the layout, formatting, and overall presentation of your outline. Make any necessary adjustments before proceeding with the actual printing.
When using the "Print Preview" feature, take note of the different options available, such as adjusting the margins, selecting the number of slides per page, and choosing whether to include speaker notes. This feature allows you to customize your outline printing preferences to suit your specific needs and ensure a polished final result.
Saving Your Outline as a PDF
If you want to share your printed outline digitally or ensure its compatibility across different devices and platforms, consider saving it as a PDF file. To do this, simply click on the "File" tab, select "Save As," and choose the PDF format. This will render your outline as a portable and universally accessible document.
Additionally, saving your outline as a PDF file preserves the formatting and layout of your presentation, ensuring that it appears consistent regardless of the device or software used to view it. This can be particularly useful when sharing the outline with colleagues or clients who may have varying software preferences.
By following these tips and steps, you are now equipped with the knowledge to print an outline in PowerPoint efficiently. Whether you prefer a physical copy for reference or need to review your presentation on paper, this method allows you to condense your content into a clear and concise format. So go ahead, give it a try, and enhance your PowerPoint printing experience!
Upgrade Your Presentation Workflow with Bricks
While mastering the art of printing outlines in PowerPoint is valuable, imagine a world where your presentations are always in sync with your latest data. That's the seamless experience Bricks offers. With Bricks, you eliminate the hassle of manual updates, as it integrates spreadsheets, documents, and presentations into one dynamic tool. Embrace the power of AI to create compelling content, build accurate models, and collaborate effectively—all within a single platform. Say goodbye to the tedious task of copying and pasting charts and tables, and hello to real-time data visualization. Ready to revolutionize the way you present? Get started for free with Bricks and transform your productivity today.
Get the spreadsheet powered by AI
You shouldn't have to be a spreadsheet expert to get your work done. Bricks makes it easy to create & share reports, presentations, charts, and visuals — all backed by your data.

Share this post:
Other posts you might like..., how to change margins in powerpoint, how to group things in powerpoint, how to make an animation in powerpoint, how to create a hanging indent in powerpoint, how to apply a gradient to a shape in powerpoint, how to cite a picture in powerpoint, how to make pictures the same size in powerpoint, how to cite images in powerpoint mla, how to outline letters in powerpoint, inspiration for every use case.
Get started fast with pre-built templates made by industry experts.

Spread sheets

Project Management
- PowerPoint Training
Outline View in PowerPoint
How to Use Outline View in PowerPoint

PowerPoint Training Features:
Interactive bite-sized lessons
Get Certified
Accurate skill assessments
Customizable, LMS-ready content
4.9 out of 5 on G2

Outline View shows your presentation arranged as an outline and is ideal for quickly adding text to a slide or previewing the structure of a presentation.
View an Outline
- Click the View tab.

The Outline pane appears at the left, showing only the text in your presentation.
You can quickly create an entire presentation by pasting an outline from Word into the Outline pane.
Collapse and Expand Headings
In Outline View, you can collapse or expand headings, subheadings, and text.
- Right-click any slide title in the Outline pane.
- Click the Collapse list arrow.
- Collapse : Collapse only the selected slide.
- Collapse All : Collapse all slides in the Outline view.

You can expand or collapse a heading by double-clicking a slide icon in the Outline pane.
Rearrange Outline Content
- Right-click the slide you want to move.

Adjust the List Level
You can also change the level of slide text using the Outline pane.
- Select an Outline item.
- Increase List Level : Demotes a paragraph by moving it down one level in the outline, increasing its indent level.
- Decrease List Level : Promotes a paragraph by moving it up one level in the outline, decreasing its indent level.

FREE Quick Reference
Free to distribute with our compliments; we hope you will consider our paid training.
- LinkedIn-ready certificate
- Skill assessments
- Bite-sized, interactive lessons
- Saved progress
How to Print an Outline in PowerPoint

PowerPoint presentations are an essential component of modern presentations. They enable users to create engaging and interactive presentations that captivate their audience and convey information in a concise and visually appealing manner. However, when presenting to a large audience, it can be difficult to deliver these presentations without accompanying handouts or notes. This is where the outline function in PowerPoint comes in, allowing users to print out a concise and easy-to-read summary of their presentation. In this article, we will take a detailed look at how to print out outlines in PowerPoint, from understanding their importance to advanced printing techniques and troubleshooting.
Table of Contents
Understanding the Importance of Printing an Outline in PowerPoint
An outline in PowerPoint is essentially a hierarchical list of the presentation’s main topics and subtopics. It provides a concise summary of the presentation’s content, enabling viewers to follow along with the presentation without being overwhelmed with details or the visual distractions of the slides. This is particularly useful for longer presentations, which can be difficult to follow and remember without accompanying notes. Moreover, the outline function also enables presenters to share the presentation’s content in a different format, such as printed handouts or digital documents.
Another benefit of printing an outline in PowerPoint is that it allows presenters to review and edit their presentation more efficiently. By having a clear and organized summary of the presentation’s content, presenters can easily identify areas that need improvement or further development. They can also make changes to the outline itself, which will automatically update the corresponding slides in the presentation.
Additionally, printing an outline can be a useful tool for audience members who may have difficulty following along with the presentation due to language barriers or hearing impairments. By providing a written summary of the presentation’s content, these individuals can better understand and engage with the material being presented.
Step-by-step Guide to Printing an Outline in PowerPoint
The process of printing an outline in PowerPoint is quite straightforward and can be done in a few simple steps:
- Open PowerPoint and select the presentation you wish to print an outline for.
- Click on the ‘File’ menu at the top-left corner of the screen.
- Select ‘Print’ from the options available on the left-hand side of the screen.
- Under the ‘Settings’ section, select ‘Outline’ from the ‘Print Layout’ options.
- Adjust the font size and style, as well as other printing settings to your preferences.
- Click on the ‘Print’ button, and your outline will be printed.
What are the Different Ways to Print an Outline in PowerPoint?
There are several different ways to print out an outline of your presentation in PowerPoint. The first way is to use PowerPoint’s built-in function, which we have discussed in the previous section. You can also save the outline as a PDF file and print it as you would any other document.
One advantage of using the built-in function to print an outline in PowerPoint is that it allows you to customize the level of detail included in the outline. You can choose to include only the slide titles or also include the text on each slide. This can be helpful if you want to provide a summary of your presentation to your audience.
Another option for printing an outline in PowerPoint is to use a third-party add-in or plugin. These tools can provide additional features and customization options beyond what is available in PowerPoint’s built-in function. However, it’s important to research and choose a reputable add-in to ensure compatibility and security.
How to Customize Your Printed Outline in PowerPoint
You can customize your printed outline in PowerPoint in various ways. For example, you can choose to include or exclude specific elements of the presentation, such as notes or slide numbers. Additionally, you can adjust the font size and style to make the text more readable and visually appealing. Moreover, you can add logos or branding elements to your outline to make it more professional and aligned with your organization’s visual identity.
Another way to customize your printed outline in PowerPoint is to change the layout and formatting. You can choose from different layout options, such as portrait or landscape, and adjust the margins and spacing to fit your needs. You can also add colors and background images to make your outline more visually engaging. Furthermore, you can include hyperlinks in your outline to direct readers to additional resources or related content. By customizing your printed outline, you can create a professional and polished document that effectively communicates your presentation’s key points.
Common Issues and Troubleshooting Tips for Printing Outlines in PowerPoint
While printing an outline in PowerPoint is a relatively simple process, there can be some common issues that you may encounter. These can range from formatting issues to printing errors. To troubleshoot these issues, ensure that you have selected the correct printer and that the printer is functioning correctly. Additionally, check that your printer settings are correctly configured for the type of paper and print quality you want.
Another common issue that you may encounter when printing outlines in PowerPoint is that the text may appear too small or too large on the printed page. To fix this issue, adjust the font size and formatting of your outline in PowerPoint before printing. You can also try adjusting the scaling options in your printer settings to ensure that the text is printed at the correct size.
If you are still experiencing issues with printing outlines in PowerPoint, it may be helpful to try printing from a different computer or printer. You can also try saving your outline as a PDF file and printing from there, as this can sometimes resolve formatting and printing issues. Additionally, you can seek help from online forums or support communities to find solutions to specific issues you may be facing.
How to Choose the Right Printer Settings for Printing Outlines in PowerPoint
To get the best results when printing outlines in PowerPoint, it’s essential to choose the right printer settings. This includes selecting the correct paper size and type, as well as the optimal print quality for your needs. For example, if you’re printing a document to distribute to attendees at a conference, you may want to use a higher-quality paper stock and print resolution.
Another important factor to consider when choosing printer settings for printing outlines in PowerPoint is the color mode. If your document contains color, you’ll want to make sure that your printer is set to print in color. However, if your document is black and white, you may be able to save ink and toner by selecting the grayscale option.
It’s also worth noting that some printers offer additional settings that can help you save money on ink and toner. For example, you may be able to select a draft mode that prints at a lower quality but uses less ink. This can be a great option if you’re printing a large number of documents that don’t require high-quality printing.
Tips for Saving Time and Paper When Printing Outlines in PowerPoint
Printing outlines in PowerPoint can be time-consuming and costly, particularly if you have a large audience. To save time and paper, consider printing 2, 4, or 6 slides per page instead of just one. Additionally, you can print on both sides of the paper to reduce the amount of paper used. Finally, consider printing black and white instead of color to reduce ink and toner usage.
Another way to save time and paper when printing outlines in PowerPoint is to use the “Notes Pages” option. This allows you to print the slide with speaker notes, which can be helpful for reference during a presentation. You can also choose to print only the slides that are necessary for your audience, rather than printing the entire presentation.
It’s also important to consider the type of paper you are using. Using recycled paper or paper with a lower weight can help reduce costs and environmental impact. Additionally, you can adjust the print quality settings to a lower resolution, which can also save ink and toner.
Advanced Techniques for Creating a Professional-looking Printed Outline in PowerPoint
If you want to take your printed outlines in PowerPoint to the next level, there are several advanced techniques you can use. These include adding images or graphics to the outline, using color-coding to highlight key points, and using advanced typography techniques to make the text more visually appealing. Additionally, you can consider using third-party tools, such as Adobe InDesign or Canva, to create more customized and professional-looking outlines.
Another advanced technique for creating a professional-looking printed outline in PowerPoint is to use custom templates. By creating your own template, you can ensure that your outline has a consistent and cohesive design. You can also include your company’s branding or logo to make the outline more personalized and professional.
Finally, it’s important to consider the overall layout and formatting of your printed outline. Make sure that the text is easy to read and that there is enough white space to prevent the outline from looking cluttered. You can also experiment with different font sizes and styles to create a hierarchy of information and make the most important points stand out.
How to Use Third-party Tools for Printing Outlines in PowerPoint
Third-party tools, such as Adobe InDesign or Canva, can be extremely useful for creating customized outlines in PowerPoint. These tools enable presenters to add more advanced graphics, typography, and other design elements to their outlines, making them more engaging and professional-looking. Additionally, these tools often offer more advanced customization options than PowerPoint, enabling presenters to create highly customized and tailored outlines for specific audiences or events.
Choosing the Right Paper Type and Size for Your Printed Outline in PowerPoint
When printing your outlines in PowerPoint, it’s essential to choose the right paper type and size. This can vary depending on your needs and the type of event or audience you are presenting to. For example, if you are presenting to a professional audience, you may want to use a higher-quality paper stock, such as glossy or matte. Additionally, you may want to consider using a larger paper size, such as A4 or letter, to enable viewers to read the outline easily.
Best Practices for Creating an Engaging and Effective Printed Outline in PowerPoint
To create an engaging and effective printed outline in PowerPoint, it’s essential to follow some best practices. These include using a clear and concise writing style, using bullet points or numbering to break up the text, and using images or graphics to help illustrate key points. Additionally, make sure to include all the necessary information and avoid overwhelming the viewers with too much detail, as this can have the opposite effect of what you intended. Lastly, make sure to proofread and edit the outline for spelling and grammar errors, as these can detract from the presentation’s credibility and professionalism.
By humans, for humans - Best rated articles:
Excel report templates: build better reports faster, top 9 power bi dashboard examples, excel waterfall charts: how to create one that doesn't suck, beyond ai - discover our handpicked bi resources.
Explore Zebra BI's expert-selected resources combining technology and insight for practical, in-depth BI strategies.

We’ve been experimenting with AI-generated content, and sometimes it gets carried away. Give us a feedback and help us learn and improve! 🤍
Note: This is an experimental AI-generated article. Your help is welcome. Share your feedback with us and help us improve.

Article Categories
Book categories, collections.
- Technology Articles
- Software Articles
- Microsoft Products Articles
- PowerPoint Articles
How to Work in PowerPoint 2019's Outline View
Powerpoint 2019 for dummies.

Sign up for the Dummies Beta Program to try Dummies' newest way to learn.
Such presentations lend themselves especially well to outlining. PowerPoint’s Outline View lets you focus on your presentation’s main points and subpoints. In other words, it enables you to focus on content without worrying about appearance.
How to switch your PowerPoint presentation to Outline view
In Normal View, the left side of the PowerPoint window is devoted to showing thumbnail images of your slides. But you can easily switch your presentation into Outline View by clicking the Outline View button in the Ribbon’s View tab (shown in the margin). Then, your presentation appears as an outline, with the title of each slide as a separate heading at the highest level of the outline, and the text on each slide appears as lower-level headings subordinate to the slide headings. See the following figure. (Note that if a slide doesn’t have a title, the slide still appears in the outline, but the top-level heading for the slide is blank.)

You can expand the area devoted to the outline by clicking and dragging the border of the Outline pane.
- The outline is comprised of the titles and body text of each slide. Any other objects that you add to a slide — such as pictures, charts, and so on — are not included in the outline. Also, if you add any text objects to the slide in addition to the basic title and body text placeholders in the slide layout, the additional text objects are not included in the outline.
- Each slide is represented by a high-level heading in the outline. The text of this heading is taken from the slide’s title, and an icon that represents the entire slide appears next to the heading. Also, the slide number appears to the left of the Slide icon.
- Each text line from a slide’s body text appears as an indented heading. This heading is subordinate to the slide’s main title heading.
- An outline can contain subpoints that are subordinate to the main points on each slide. PowerPoint enables you to create as many as nine heading levels on each slide, but your slides will probably get too complicated if you go beyond two headings.
How to select and edit an entire PowerPoint slide
You can delete, cut, copy, or duplicate an entire slide:
- Delete: To delete an entire slide, select it and then press Delete.
- Cut or copy: To cut or copy an entire slide to the Clipboard, select the slide and then press Ctrl+X (Cut) or Ctrl+C (Copy), or use the Cut or Copy button on the Home tab on the Ribbon. You can then move the cursor to any location in the outline and press Ctrl+V or use the Paste button to paste the slide from the Clipboard. (You can also cut or copy a slide by right-clicking the slide and choosing Cut or Copy from the menu that appears.)
- Duplicate: To duplicate a slide, select it and then press Ctrl+D. This step places a copy of the selected slide immediately after it. (Actually, you don’t have to select the entire slide to duplicate it. Just click anywhere in the slide’s title or body text.)
How to select and edit one paragraph in PowerPoint 2019
To cut or copy an entire paragraph to the Clipboard along with its subordinates, select it and then press Ctrl+X (Cut) or Ctrl+C (Copy). You can then press Ctrl+V to paste the paragraph anywhere in the presentation.
How to promote and demote entire paragraphs in PowerPoint
To promote a paragraph, place the cursor anywhere in the paragraph and then press Shift+Tab or click the Decrease List Level button in the Paragraph group on the Home tab. (Note that you can’t promote a paragraph that is already at the highest outline level.)
To demote a paragraph is to do just the opposite: The paragraph moves down one level in the outline. When you demote a paragraph, the paragraph’s indentation is shifted to the right. If you demote the “Shakespeare was 46 years old in 1611” paragraph in the figure, it becomes a subpoint under “King James Bible published in 1611” rather than a separate main point.
To demote a paragraph, place the cursor anywhere in the paragraph and then either press the Tab key or click the Increase List Level button in the Paragraph group on the Home tab.
Note that you can’t promote a slide title. Slide title is the highest rank in the outline hierarchy. If you demote a slide title, the entire slide is subsumed into the preceding slide. In other words, the slide title becomes a main point in the preceding slide.
You can promote or demote paragraphs by using the mouse, but the technique is a little tricky. When you move the cursor over a bullet (or the Slide button), the pointer changes from a single arrow to a four-cornered arrow. This arrow is your signal that you can click to select the entire paragraph (and any subordinate paragraphs). Then, you can use the mouse to promote or demote a paragraph along with all its subordinates by dragging the selected paragraph left or right.
Be gentle when you demote paragraphs. Being demoted can be an emotionally devastating experience.
How to add a new paragraph in PowerPoint's Outline view
Note that if you move the insertion point to the end of the title line and press Enter, PowerPoint creates a new slide. However, you can then press the Tab key to change the new slide to a paragraph on the preceding slide.
If you position the insertion point at the beginning of a paragraph and press Enter, the new paragraph is inserted above the cursor position. If you position the cursor in the middle of a paragraph and press Enter, the paragraph is split in two.
After you add a new paragraph, you might want to change its level in the outline. To do that, you must promote or demote the new paragraph (as described in the preceding section). To create a subpoint for a main point, for example, position the cursor at the end of the main point and press Enter. Then, demote the new paragraph by pressing the Tab key.
How to add a new PowerPoint slide
- Promote existing text: Promote an existing paragraph to the highest level. This method splits a slide into two slides.
- Promote new text: Add a new paragraph and then promote it to the highest level.
- Press Enter: Place the cursor in a slide’s title text and press Enter. This method creates a new slide before the current slide. Whether the title text stays with the current slide, goes with the new slide, or is split between the slides depends on the location of the cursor within the title when you press Enter.
- Press Ctrl+Enter: Place the cursor anywhere in a slide’s body text and press Ctrl+Enter. This method creates a new slide immediately following the current slide. The position of the cursor within the existing slide doesn’t matter; the new slide is always created after the current slide. (The cursor must be in the slide’s body text, however, in order for this method to work. If you put the cursor in a slide title and press Ctrl+Enter, the cursor jumps to the slide’s body text without creating a new slide.)
- Insert a new slide: Place the cursor anywhere in the slide and use the keyboard shortcut Ctrl+M or click the Add Slide button in the Slides group of the Home Ribbon tab.
- Duplicate an existing slide: Select an existing slide by clicking the slide’s icon or triple-clicking the title, and then press Ctrl+D to duplicate it.
Because the outline focuses on slide content rather than on layout, new slides receive the basic Title and Content layout, which includes title text and body text formatted with bullets.
How to move text up and down in PowerPoint's Outline view
You can rearrange your presentation by right-clicking the paragraphs that you want to move and then clicking the Move Up or Move Down button in the menu that appears. Or you can point to the bullet next to the paragraph that you want to move. Then, when the cursor changes to the four-cornered arrow, click and drag the paragraph up or down. A horizontal line appears, showing the horizontal position of the selection. Release the mouse button when the horizontal line is positioned where you want the text.
Be careful when you’re moving text in a slide that has more than one level of body text paragraphs. Notice the position of the horizontal line when you drag the selection; the entire selection is inserted at that location, which might split up subpoints. If you don’t like the result of a move, you can always undo it by pressing Ctrl+Z or clicking the Undo button.
How to collapse and expand the outline in PowerPoint
Expanding a presentation restores the collapsed body text to the outline so that you can once again focus on details. You can collapse and expand an entire presentation, or you can collapse and expand one slide at a time.
To collapse the entire presentation, right-click anywhere in the outline and then choose Collapse →Collapse All or use the keyboard shortcut Alt+Shift+1. To expand the presentation, right-click and choose Expand →Expand All or press Alt+Shift+9.
To collapse a single slide, right-click anywhere in the slide and then choose Collapse → Collapse from the menu that appears. To expand a single slide, right-click the collapsed slide and choose Expand →Expand.
About This Article
This article is from the book:.
- PowerPoint 2019 For Dummies ,
About the book author:
Doug Lowe is a master at demystifying technology. The 50+ technology books he's written include more than 30 For Dummies books, including Networking All-in-One For Dummies. Doug has been managing networks at publishing companies and nonprofit organizations for more than 20 years and is presently IT director for a civil engineering firm.
This article can be found in the category:
- PowerPoint ,
- How to Remove Picture Backgrounds in PowerPoint 2019
- Audio Options in Microsoft PowerPoint 2019
- How to Share Presentations via the PowerPoint Web App
- How to Share a PowerPoint 2019 Presentation in the Cloud
- PowerPoint 2019 Slide Libraries and Ways to Reuse Slides
- View All Articles From Book
- Insert WordArt Article
- Add a hyperlink to a slide Article
- Create a PowerPoint presentation from an outline Article
- Check spelling in your presentation Article
- Create and format a table Article
- Insert a linked Excel chart in PowerPoint Article
- Add slide numbers, page numbers, or the date and time Article
- Set text direction and position in a shape or text box Article
Create a PowerPoint presentation from an outline
If you've already jotted down an outline of your presentation in Word and now need a quick way to add it to your slides, you can import a Word outline into PowerPoint.
Create an outline in Word
Select View > Outline . This automatically generates an outline and opens the Outlining tools:
If your document has headings (any heading levels from H1-H9), you’ll see those headings organized by level.
If your document doesn’t have headings and subheadings yet, the outline will appear as a bulleted list with a separate bullet for each paragraph or body text. To assign or edit headings, heading levels, and set up your document structure:
Select a bulleted item. Or press the Ctrl key to select several lines.
In the Outline Level box, select a heading Level 1 for slide titles, Level 2 for bullet points on that slide.
When finished or to edit your document, select Close Outline View .
If you need help creating an outline, see Create an outline in Word .
Save an outline in Word
To save your document, select Save , name your file, and then select Save once more. Select Close to close your document.
Note: Your Word document must be closed to insert it into a PowerPoint presentation.
Import a Word outline into PowerPoint
Open PowerPoint and select New Slide > Slides from Outline .
In the Insert Outline dialog box, find and select your Word outline and select Insert .
Note: If your Word document contains no Heading 1 or Heading 2 styles, PowerPoint will create a slide for each paragraph in your content.
Guidelines for importing an outline
PowerPoint can import an outline in .docx, .rtf, or .txt format.
If your outline is a Word document Apply a heading format to any text you want to include in a slide. For example, if you apply the Normal style to a block of text, Word won't send that text to PowerPoint.
If your outline is a .txt file Use indentation to indicate heading levels. Any unindented lines of text will become titles of new slides.
For PowerPoint to successfully convert your outline to slides, you must follow these guidelines:
If your outline is a Word document:
Apply a heading format to any text you want to include in a slide. For example, if you apply the Normal style to a block of text, Word won't send that text to PowerPoint
Save the Word document as an .rtf file. In PowerPoint for macOS, you can only import Word documents that are saved in Rich Text Format. Click File > Save As , and in the File Format box, select Rich Text Format (.rft) ).
If your outline is a .txt file: Use indents to indicate heading levels. Remember that any un indented lines of text will become titles of new slides.
Insert outline text into a PowerPoint presentation
In a new PowerPoint presentation file, click the first slide. Or, in an existing presentation file, click the slide that you want the outline to appear after.
On the Home tab, click the arrow next to New Slide , and then click Outline .

Locate the outline file (.rtf or .txt) that you want to insert, and then double-click it or click Insert .
New slides are inserted in the presentation based on the text in the outline file you selected. You are now ready to edit the slides and the presentation as you see fit.
Creating a presentation from an outline isn't support in PowerPoint for the web. It requires a desktop version of PowerPoint.

Need more help?
Want more options.
Explore subscription benefits, browse training courses, learn how to secure your device, and more.
Microsoft 365 subscription benefits
Microsoft 365 training
Microsoft security
Accessibility center
Communities help you ask and answer questions, give feedback, and hear from experts with rich knowledge.
Ask the Microsoft Community
Microsoft Tech Community
Windows Insiders
Microsoft 365 Insiders
Was this information helpful?
Thank you for your feedback.
IMAGES
VIDEO
COMMENTS
Open the presentation that you want to print. Click File > Print. In the Print dialog box, under Settings, select the second box (which by default is set to Full Page Slides) to expand the list of options. Then, under Print Layout, select Outline. You can choose a page orientation (Portrait or Landscape) in the Printer Properties dialog box.
All you have to do is follow the 3 simple steps. Step-1: Click on the "File" tab. In the open PowerPoint presentation, click on the "File" tab from the menu ribbon located at the top of the screen. In the sidebar of the "File" menu, click on the "Print" option. Step-2: Click on the "Print Layout" option.
Summary - How to Print an Outline View in Powerpoint 2010. Click the File tab at the top-left corner of the window. Click Print in the left column. Click the second dropdown menu (it says Full Page Slides by default), then click the Outline option. Confirm that the outline is correct, then click the Print button.
Navigate to the Print Options. On your keyboard, hit CTRL+P to open up the print options for your presentation. 2. Navigate to the Outline View. Within the print options, select the 'Full Page Slides' dropdown (the default setting) and within the menu in the upper right-hand corner, select the Outline View.
How to Access the Outline View in PowerPoint. To begin, open your PowerPoint presentation and navigate to the "View" tab. From there, click "Outline View" in the "Presentation Views" group. Your presentation will now appear as an outline, with each slide represented by a title and bullet points underneath.
Open your PowerPoint presentation. Click on the "View" tab in the Ribbon. Locate the "Presentation Views" group. Click on the "Outline View" option. Once you've entered the outline view, you can scroll through your presentation's textual content, which will be displayed in a structured format. Preparing Your PowerPoint for Printing. Before you ...
Yes, you can print the Outline of a PowerPoint presentation. Many people use outline view to create speaker notes when making a presentation. To print the Outline the Print options will be needed. Use the keyboard shortcut Control+P which takes you to Backstage View and the Print options which are shown below.
Print your presentation. Select the File > Print. For Printer, select the printer you want to print to. For Settings, select the options you want: Slides - from the drop-down, choose to print all slides, selected slides, or the current slide. Or, in the Slides box, type which slide numbers to print, separated by a comma.
By going to View -> Outline View, you can see the outline for your presentation. This view displays the presentation as titles and text within slides to give you an overview of the slide content. Example of PowerPoint Outline. The PowerPoint Outline View can also help to define the structure of your presentation beforehand, or review your ...
Here's how you can use PowerPoint 365 for Windows: First open a presentation which has at least a few slides populated with text. Then access the View tab of the Ribbon and click the Outline View button, as shown highlighted in red within Figure 1. Figure 1: Outline View button within Presentation Views group. You can use the Ctrl + Shift + Tab ...
Print Layout: Choose to print just the slides, just the speaker notes, an outline, or handouts. The number of slides per page is also an option, an effective way to save paper. The Outline prints only the text in the slides, without images. The Notes of a presentation show the slide and the related speaker notes below it.
http://www.Mhelp4u.com - The world's largest free Microsoft video-clip help library with over 4000 video-clips. http://www.mhelp4u.com has thousands of help ...
When we're working on a PowerPoint presentation, it's often helpful to see a streamlined view of our content. That's where printing an outline can save the day. To print an outline in PowerPoint, you simply need to access the "File" tab, go to "Print," and select the "Outline" option from the dropdown menu.
FREE Course! Click: https://www.teachucomp.com/free Learn how to use Outline View in PowerPoint 2019 & 365 at www.teachUcomp.com. A clip from Mastering Power...
To expand your Outline View, simply: Navigate to the View tab; Click on the Outline View; Within the Outline View (click into that actual Outline View on the left), hit the expand keyboard shortcut: Alt+Shift+9. To learn more about working in the Outline view in PowerPoint, read our guide here.
To move between slides, use the arrow keys or click on the desired slide in the left pane. By familiarizing yourself with the Outline View, you'll be one step closer to efficiently printing an outline of your PowerPoint presentation. Additionally, within the Outline View, you have the flexibility to make bulk changes to your presentation.
The Outline pane appears at the left, showing only the text in your presentation. You can quickly create an entire presentation by pasting an outline from Word into the Outline pane. Collapse and Expand Headings. In Outline View, you can collapse or expand headings, subheadings, and text. Right-click any slide title in the Outline pane.
Open the presentation that you want to print. Click File > Print. In the Print dialog box, under Settings, select the second box (which by default is set to Full Page Slides) to expand the list of options. Then, under Print Layout, select Outline. You can choose a page orientation (Portrait or Landscape) in the Printer Properties dialog box.
Click on the 'File' menu at the top-left corner of the screen. Select 'Print' from the options available on the left-hand side of the screen. Under the 'Settings' section, select 'Outline' from the 'Print Layout' options. Adjust the font size and style, as well as other printing settings to your preferences.
Print Layout: Choose to print just the slides, just the speaker notes, an outline, or handouts. The number of slides per page is also an option, an effective way to save paper. The Outline prints only the text in the slides, without images. The Notes of a presentation show the slide and the related speaker notes below it.
Slide Sorter view. You can get to Slide Sorter view from the task bar at the bottom of the slide window, or from the View tab on the ribbon. Slide Sorter view (below) displays all the slides in your presentation in horizontally sequenced, thumbnails. Slide show view is helpful if you need to reorganize your slides—you can just click and drag ...
Press Enter: Place the cursor in a slide's title text and press Enter. This method creates a new slide before the current slide. Whether the title text stays with the current slide, goes with the new slide, or is split between the slides depends on the location of the cursor within the title when you press Enter.
Import a Word outline into PowerPoint. Open PowerPoint and select New Slide > Slides from Outline. In the Insert Outline dialog box, find and select your Word outline and select Insert. Note: If your Word document contains no Heading 1 or Heading 2 styles, PowerPoint will create a slide for each paragraph in your content.