
- Get started with computers
- Learn Microsoft Office
- Apply for a job
- Improve my work skills
- Design nice-looking docs
- Getting Started
- Smartphones & Tablets
- Typing Tutorial
- Online Learning
- Basic Internet Skills
- Online Safety
- Social Media
- Zoom Basics
- Google Docs
- Google Sheets
- Career Planning
- Resume Writing
- Cover Letters
- Job Search and Networking
- Business Communication
- Entrepreneurship 101
- Careers without College
- Job Hunt for Today
- 3D Printing
- Freelancing 101
- Personal Finance
- Sharing Economy
- Decision-Making
- Graphic Design
- Photography
- Image Editing
- Learning WordPress
- Language Learning
- Critical Thinking
- For Educators
- Translations
- Staff Picks
- English expand_more expand_less

PowerPoint Tips - Jump to a Specific Slide
Powerpoint tips -, jump to a specific slide, powerpoint tips jump to a specific slide.

PowerPoint Tips: Jump to a Specific Slide
Lesson 5: jump to a specific slide.
/en/powerpoint-tips/open-a-file-in-slide-show-mode/content/
Jump to a specific slide
When you’re in the middle of a presentation, you don’t have to scroll through one slide at a time to return to an earlier slide. Instead, you can use three different shortcuts to jump to a specific slide while you’re in Slide Show mode.
The video below illustrates how you can use these shortcuts.
- To go to a specific slide number, press a number + Enter . For example, if you wanted to see slide 4, just press 4 , then Enter . (This shortcut is best for shorter presentations when it’s easier to memorize the number of each slide).
- Press Ctrl + S to display the title of every slide in your presentation. Click on your choice and select Go to .
- To display thumbnails of every slide, press the G key, then click the one you want.
It’s important to note that this last shortcut only works in PowerPoint 2013 and newer versions.
Now you don’t have to waste time going back one slide at a time! Stay tuned for our next lesson about spell check and thesaurus shortcuts.
/en/powerpoint-tips/spell-check-and-thesaurus-shortcuts/content/
How to Hide and Unhide a Slide in PowerPoint
PowerPoint presentations often contain more slides than you need to show your audience. Whether you want to remove slides temporarily or skip over certain slides during your presentation, PowerPoint allows you to easily hide and unhide slides.
Why Hide Slides in PowerPoint?
How to hide slides in powerpoint, unhiding hidden slides.
When you want to unhide a slide, the process is just as easy:
The slide will become visible again in the main slide canvas.
Showing Hidden Slides During Presentation
Tips for hiding slides.
Here are some tips when working with hidden slides in PowerPoint:
With this understanding of hiding slides in PowerPoint, you can now build more effective presentations and control what slides your audience sees. Use hidden slides strategically to organize information and draw attention to the most important content dynamically during your presentation.
Add Transitions to PowerPoint Slides
About The Author
Vegaslide staff, related posts, how to delete a slide in powerpoint 2013.

How to Change Layers in PowerPoint 2013
How to make video play automatically in powerpoint, how to add page numbers in powerpoint 2010.
How-To Geek
8 tips to make the best powerpoint presentations.

Your changes have been saved
Email is sent
Email has already been sent
Please verify your email address.
You’ve reached your account maximum for followed topics.
Microsoft Office vs. Google Docs, Sheets, Slides: Which Is Best?
What network does google fi use, free your music from the cloud with volumio pi, quick links, table of contents, start with a goal, less is more, consider your typeface, make bullet points count, limit the use of transitions, skip text where possible, think in color, take a look from the top down, bonus: start with templates.
Slideshows are an intuitive way to share complex ideas with an audience, although they're dull and frustrating when poorly executed. Here are some tips to make your Microsoft PowerPoint presentations sing while avoiding common pitfalls.

It all starts with identifying what we're trying to achieve with the presentation. Is it informative, a showcase of data in an easy-to-understand medium? Or is it more of a pitch, something meant to persuade and convince an audience and lead them to a particular outcome?
It's here where the majority of these presentations go wrong with the inability to identify the talking points that best support our goal. Always start with a goal in mind: to entertain, to inform, or to share data in a way that's easy to understand. Use facts, figures, and images to support your conclusion while keeping structure in mind (Where are we now and where are we going?).
I've found that it's helpful to start with the ending. Once I know how to end a presentation, I know how best to get to that point. I start by identifying the takeaway---that one nugget that I want to implant before thanking everyone for their time---and I work in reverse to figure out how best to get there.
Your mileage, of course, may vary. But it's always going to be a good idea to put in the time in the beginning stages so that you aren't reworking large portions of the presentation later. And that starts with a defined goal.

A slideshow isn't supposed to include everything. It's an introduction to a topic, one that we can elaborate on with speech. Anything unnecessary is a distraction. It makes the presentation less visually appealing and less interesting, and it makes you look bad as a presenter.
This goes for text as well as images. There's nothing worse, in fact, than a series of slides where the presenter just reads them as they appear. Your audience is capable of reading, and chances are they'll be done with the slide, and browsing Reddit, long before you finish. Avoid putting the literal text on the screen, and your audience will thank you.
Related: How to Burn Your PowerPoint to DVD

Right off the bat, we're just going to come out and say that Papyrus and Comic Sans should be banned from all PowerPoint presentations, permanently. Beyond that, it's worth considering the typeface you're using and what it's saying about you, the presenter, and the presentation itself.
Consider choosing readability over aesthetics, and avoid fancy fonts that could prove to be more of a distraction than anything else. A good presentation needs two fonts: a serif and sans-serif. Use one for the headlines and one for body text, lists, and the like. Keep it simple. Veranda, Helvetica, Arial, and even Times New Roman are safe choices. Stick with the classics and it's hard to botch this one too badly.

There reaches a point where bullet points become less of a visual aid and more of a visual examination.
Bullet points should support the speaker, not overwhelm his audience. The best slides have little or no text at all, in fact. As a presenter, it's our job to talk through complex issues, but that doesn't mean that we need to highlight every talking point.
Instead, think about how you can break up large lists into three or four bullet points. Carefully consider whether you need to use more bullet points, or if you can combine multiple topics into a single point instead. And if you can't, remember that there's no one limiting the number of slides you can have in a presentation. It's always possible to break a list of 12 points down into three pages of four points each.

Animation, when used correctly, is a good idea. It breaks up slow-moving parts of a presentation and adds action to elements that require it. But it should be used judiciously.
Adding a transition that wipes left to right between every slide or that animates each bullet point in a list, for example, starts to grow taxing on those forced to endure the presentation. Viewers get bored quickly, and animations that are meant to highlight specific elements quickly become taxing.
That's not to say that you can't use animations and transitions, just that you need to pick your spots. Aim for no more than a handful of these transitions for each presentation. And use them in spots where they'll add to the demonstration, not detract from it.

Sometimes images tell a better story than text can. And as a presenter, your goal is to describe points in detail without making users do a lot of reading. In these cases, a well-designed visual, like a chart, might better convey the information you're trying to share.
The right image adds visual appeal and serves to break up longer, text-heavy sections of the presentation---but only if you're using the right images. A single high-quality image can make all the difference between a success and a dud when you're driving a specific point home.
When considering text, don't think solely in terms of bullet points and paragraphs. Tables, for example, are often unnecessary. Ask yourself whether you could present the same data in a bar or line chart instead.

Color is interesting. It evokes certain feelings and adds visual appeal to your presentation as a whole. Studies show that color also improves interest, comprehension, and retention. It should be a careful consideration, not an afterthought.
You don't have to be a graphic designer to use color well in a presentation. What I do is look for palettes I like, and then find ways to use them in the presentation. There are a number of tools for this, like Adobe Color , Coolors , and ColorHunt , just to name a few. After finding a palette you enjoy, consider how it works with the presentation you're about to give. Pastels, for example, evoke feelings of freedom and light, so they probably aren't the best choice when you're presenting quarterly earnings that missed the mark.
It's also worth mentioning that you don't need to use every color in the palette. Often, you can get by with just two or three, though you should really think through how they all work together and how readable they'll be when layered. A simple rule of thumb here is that contrast is your friend. Dark colors work well on light backgrounds, and light colors work best on dark backgrounds.

Spend some time in the Slide Sorter before you finish your presentation. By clicking the four squares at the bottom left of the presentation, you can take a look at multiple slides at once and consider how each works together. Alternatively, you can click "View" on the ribbon and select "Slide Sorter."
Are you presenting too much text at once? Move an image in. Could a series of slides benefit from a chart or summary before you move on to another point?
It's here that we have the opportunity to view the presentation from beyond the single-slide viewpoint and think in terms of how each slide fits, or if it fits at all. From this view, you can rearrange slides, add additional ones, or delete them entirely if you find that they don't advance the presentation.
The difference between a good presentation and a bad one is really all about preparation and execution. Those that respect the process and plan carefully---not only the presentation as a whole, but each slide within it---are the ones who will succeed.
This brings me to my last (half) point: When in doubt, just buy a template and use it. You can find these all over the web, though Creative Market and GraphicRiver are probably the two most popular marketplaces for this kind of thing. Not all of us are blessed with the skills needed to design and deliver an effective presentation. And while a pre-made PowerPoint template isn't going to make you a better presenter, it will ease the anxiety of creating a visually appealing slide deck.
- Microsoft Office
Stack Exchange Network
Stack Exchange network consists of 183 Q&A communities including Stack Overflow , the largest, most trusted online community for developers to learn, share their knowledge, and build their careers.
Q&A for work
Connect and share knowledge within a single location that is structured and easy to search.
Skip animations on current slide in PowerPoint
This is most likely a fairly simple question but I could not find any answers when I looked around (might be just me who is not really good at googling).
I have a fairly long powerpoint presentation where I use different sections, hyperlinks between them and animations on each slide (roughly 60 in total). Depending on the person I'm talking to I hide some slides while showing others. Sometimes when I skip to the next slide the person listening asks me to go back a few slides. The process of going back a few slides is not really difficult as you only press the left arrow key (or page up or whatever), but it doesn't look professional when you have to press it 6 times to go backwards (or forward) through the animations that many of the slides have.
Suppose that I am 2 animations in into a 7 animation slide and I want to directly skip ahead to the next slide; is there a way to, with one keyboard command, skip the remaining 5 animations on the current slide and go to the next one? I want to be able to continue through PPT slides without going through every single animation, on the fly (if this is possible).
Any answers to this is much appreciated!
- microsoft-office
- microsoft-powerpoint
- 1 is there at least any option to jump to next section with the keyboard? – skan Commented Sep 30, 2015 at 16:34
- I would love that too. I imagine you could create a 'next slide' button on every page with a hyperlink to 'Next Slide' and then use a PPT built-in shortcut to access that button, but then it only works on your computer... IF that's possible :) – Tanaka Saito Commented May 2, 2017 at 11:47
- So annoying there'a no option for this. PgUp & PgDn buttons of keyboard would seem perfect candidate keys for such slide-jumps. – FlorianH Commented Jul 3, 2021 at 5:34
4 Answers 4
During a presentation, you can type the a slide number and press Enter to go directly to the specific slide. This may be the easiest way to skip the remaining animations on the current slide.
Here are useful Keyboard shortcuts for use while delivering a presentation in PowerPoint 2013 .
- 1 I guess I will have to remember where I have the important information :) OR, I could just add slide numbers in the bottom corner. Great tip, thank you! – Tanaka Saito Commented Nov 28, 2013 at 11:12
- There is no shortcut no jump to the next page without playing the animations – skan Commented Sep 26, 2015 at 11:15
- 1 @skan We know that. What it the point of your comment? – CharlieRB Commented Sep 28, 2015 at 11:10
Often you have a standard box on every sheet, (logo, date, page#, etc, or you ca create one). You can now right-mouse click this item and choose 'Action settings' then place a tick 'Hyperlink to' next slide (or any other choice)

You can also build this in a master template: e.g. 3 buttons of your own design that go to: previous, next, or a preselected index page of your choice.
If you have a great number of slides this may not work so well. But if they are titled and easy to recognise you may be able to use the context menu for quicker access then skip back and forward.

- This is a good suggestion, but works better for a smaller presentation. I will keep this in mind though, thank you! – Tanaka Saito Commented Nov 28, 2013 at 11:13
I know this is a old post, but I reply anyways: In the newer versions of Powerpoint you can either
Click and drag the desired (link-)slide in the left menu (the canvas menu), into the slide where you want the link to be. A picture of that slide will then be pasted into the slide and work as a link.
You can right-click on any object => The option "Link", then on the right hand side you have bookmark, and then simply choose the specific slide.
But something I didn't find out was how to jump to a slide showing the "end result" after all animations have been played. The possible links I mentioned above always "reset" animations for all slides.
Regards Hallvard
You must log in to answer this question.
Not the answer you're looking for browse other questions tagged microsoft-office microsoft-powerpoint ..
- The Overflow Blog
- Where does Postgres fit in a world of GenAI and vector databases?
- Mobile Observability: monitoring performance through cracked screens, old...
- Featured on Meta
- Announcing a change to the data-dump process
- Bringing clarity to status tag usage on meta sites
Hot Network Questions
- Parody of Fables About Authenticity
- Which hash algorithms support binary input of arbitrary bit length?
- Are there any polls on the opinion about Hamas in the broader Arab or Muslim world?
- Why are complex coordinates outlawed in physics?
- Determining Error Rate of Phase Shift Keying via Monte Carlo Simulation
- Rings demanding identity in the categorical context
- Whence “uniform distribution”?
- How do we reconcile the story of the woman caught in adultery in John 8 and the man stoned for picking up sticks on Sabbath in Numbers 15?
- What prevents a browser from saving and tracking passwords entered to a site?
- What are some refutations to the etymological fallacy?
- Do the amplitude and frequency of gravitational waves emitted by binary stars change as the stars get closer together?
- Which version of Netscape, on which OS, appears in the movie “Cut” (2000)?
- Displaying a text in the center of the page
- What is the highest apogee of a satellite in Earth orbit?
- Is 3 Ohm resistance value of a PCB fuse reasonable?
- Does Vexing Bauble counter taxed 0 mana spells?
- How to remove obligation to run as administrator in Windows?
- What unique phenomena would be observed in a system around a hypervelocity star?
- Took a pic of old school friend in the 80s who is now quite famous and written a huge selling memoir. Pic has ben used in book without permission
- High voltage, low current connectors
- Image Intelligence concerning alien structures on the moon
- TikZ -- Best strategy to choose points for the Hobby algorithm
- Is this screw inside a 2-prong receptacle a possible ground?
- How is message waiting conveyed to home POTS phone
TechRepublic
Account information.

Share with Your Friends
How to remove slide numbers from specific slides in Microsoft PowerPoint
Your email has been sent

Occasionally, you see a Microsoft PowerPoint presentation with numbered slides. It’s the same as numbering pages in a Microsoft Word document. Similar to Word, there might be slides that you don’t want to number, such as the title slide. PowerPoint’s slide-numbering feature is easy to implement, but it is seriously limited.
In this tutorial, I’ll show you how to add slide numbers to a presentation. Then, I’ll show you how to remove numbers from specific slides and a trick that lets you restart slide numbering at the second slide, but that’s the only time it works.
SEE: Windows, Linux, and Mac commands everyone needs to know (free PDF) (TechRepublic)
I’m using Microsoft 365 on a Windows 10 64-bit system, but you can use older versions of PowerPoint. PowerPoint for the web supports slide numbers. If you’re working with a slide show other than the default, add slide numbering to the master show slides. The process is the same.
How to add slide numbers in PowerPoint
Adding slide numbers to a presentation is simple. Similar to Word, you’ll add a field that displays the current slide number. Because it’s a field, it updates when you move, delete and add slides. Let’s start by adding slide numbers to all the slides in a simple presentation:
- After adding a slide, click the Insert tab.
- Click Header & Footer in the Text group to add the numbers to the footer.
- In the resulting dialog, click the Slide tab if necessary.
- Check the Slide Number option ( Figure A ).
- Click Apply to All. Notice that there’s also an Apply button. Click Apply to insert the page number only on the selected slide(s).

As you can see in Figure B , the slide number is in the bottom-right corner.
Enabling slide numbering for one or all slides is easy. Now, let’s turn it off for a specific page.
How to disable slide numbering in PowerPoint
Once you’ve enabled numbering for all slides, you might want to disable it for a page or two. For instance, this presentation has a title page — most do. As a rule, title slides don’t display a number, so let’s turn numbering off for the title slide as follows:
- Click the Insert tab and then click Header & Footer in the Text group.
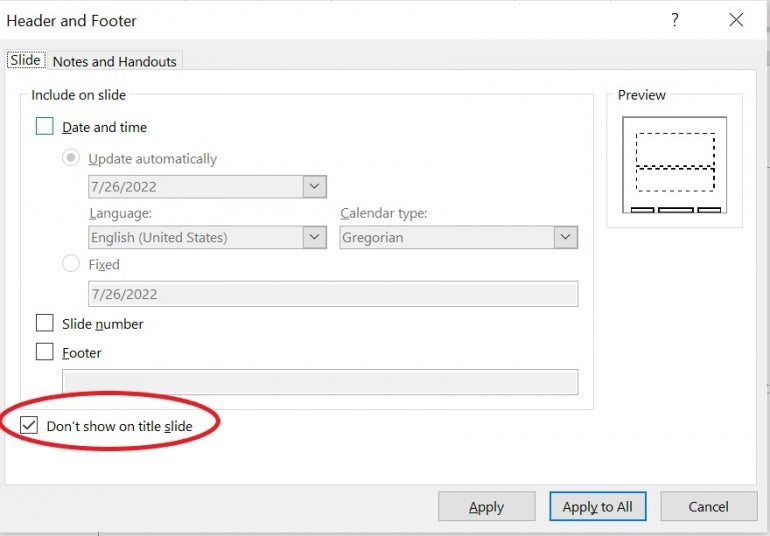
- In the resulting dialog, check the Don’t Show On Title Slide option ( Figure C ).
- If the title page is currently selected, click Apply. If you select another slide, click Apply All.
That was easy, but what if you want to disable numbering for a slide other than the title slide? Again, the solution is simple:
- Select the slide in question. In this case, we’ll use slide 2.
- Click Insert and then click Header & Footer in the Text group.
- In the resulting dialog, uncheck the Slide Number option.
- Click Apply to disable numbering for only the selected slide, the second slide.
This simple presentation has four slides. The first two have no slide numbers, and slides 3 and 4 do. You might want to consider restarting the page numbering at slide 3. Instead of displaying 3, you might want it to display 1. To the best of my knowledge, you can’t restart slide numbering. However, I do have a quick trick that will work only when you’ve turned numbering off for the first slide.
You can reset the starting slide number, and PowerPoint will apply it to the entire presentation. If you start with 4 slides and disable numbering for the first slide, you can reset that starting number to 0. Consequently, slide 1 is 0, slide 2 is 1 and so on. To reset the starting number to 0, do the following:
- Click the Design tab.
- In the Customize group, click Slide Size.
- From the dropdown, choose Custom Slide Size.
- In the resulting dialog, change the Number Slides From setting from 1 to 0 ( Figure D ).

At this point, slide 3 displays 2 and slide 4 displays 3. The only way to fix this is to enable numbering for slide 2 as follows:
- Select slide 2 — the real slide 2.
- Click the Insert tab.
- Choose Header & Footer in the Text group.
- In the resulting dialog, check Slide Number.
Figure E shows the slides and numbering. The title slide displays no number. The second slide displays 1. Slide 3 displays 2 and slide 4 displays 3. The only time this works is when the first slide doesn’t display a number and you reset the starting number to 0.

You can reset the starting slide number to a larger number. You’ll do so when combining different presentations. For instance, you might run the first show with slides 1 through 10 and then run a second, from slides 11 to 25.
There are third-party products available that allow you to implement more complex slide numbering schemes in PowerPoint.
Subscribe to the Developer Insider Newsletter
From the hottest programming languages to commentary on the Linux OS, get the developer and open source news and tips you need to know. Delivered Tuesdays and Thursdays
- Windows 11 cheat sheet: Everything you need to know
- Windows PowerToys: A cheat sheet
- Google Workspace vs. Microsoft 365: A side-by-side analysis w/checklist
- Best software for businesses and end users

Create a TechRepublic Account
Get the web's best business technology news, tutorials, reviews, trends, and analysis—in your inbox. Let's start with the basics.
* - indicates required fields
Sign in to TechRepublic
Lost your password? Request a new password
Reset Password
Please enter your email adress. You will receive an email message with instructions on how to reset your password.
Check your email for a password reset link. If you didn't receive an email don't forgot to check your spam folder, otherwise contact support .
Welcome. Tell us a little bit about you.
This will help us provide you with customized content.
Want to receive more TechRepublic news?
You're all set.
Thanks for signing up! Keep an eye out for a confirmation email from our team. To ensure any newsletters you subscribed to hit your inbox, make sure to add [email protected] to your contacts list.
How to Stop Powerpoint From Skipping Slides
- Small Business
- Business Communications & Etiquette
- Presentations
- ')" data-event="social share" data-info="Pinterest" aria-label="Share on Pinterest">
- ')" data-event="social share" data-info="Reddit" aria-label="Share on Reddit">
- ')" data-event="social share" data-info="Flipboard" aria-label="Share on Flipboard">
How to Embed ZIP Files in PowerPoint
How to keep music playing when a macbook is closed, how to clean an imac keyboard.
- How to Turn Off Acceleration on a Mac Mouse
- How to Unlock a Frozen Keyboard
Slides might skip in PowerPoint for two reasons: You may have an issue with the hardware that's advancing the slides or the slides are hidden in the PowerPoint software. PowerPoint gives the option to hide slides so you can use one file to give multiple presentations and simply hide the slides you don't need. Or, the keyboard or mouse you use to advance the slides in your presentation might have a hardware or software issue that causes them to click twice instead of once so you end up skipping every other slide.
Hidden Slides
Launch the PowerPoint file with the skipping slides.
Click on the "View" tab and choose "Slide Sorter." Look at the thumbnails of the slides in your presentation. If any of the slides' numbers have a box around them and a slash through them, then the slides are hidden and will be skipped during a presentation.
Right-click a slide that's hidden and click "Hide Slide" to toggle the feature off. Repeat for all the hidden slides in the slide show and then save the file.
Malfunctioning Hardware
Launch the PowerPoint presentation and press "F5" to send it to slideshow mode.
Press the left mouse button to advance the first slide. Note if there is any skipping. Press the space bar on your keyboard to advance the next slide. Look for skipping. Press the right arrow key and look for skipping. Press the down arrow to check for skipping.
Blow canned air through the troughs in your keyboard to dislodge any debris that might be affecting the way the buttons work. Keep the can upright, don't invert it. Retest the keys. If you continue to have issues, run the presentation on a different computer or use a different keyboard on the same computer.
Test your mouse in other programs in Windows to see if it double-clicks. The microswitch mounts in a mouse can become damaged and register double-clicks instead of single-clicks. Test the PowerPoint on a different system or test the mouse on a different computer. If you've isolated the mouse as the problem, contact your manufacturer for technical support.
- Microsoft Office: Hide or Show a Slide
- Microsoft Support: Troubleshoot Mouse Double-Clicking when You Single-Click
- Microsoft Office: The Power of Hiding Slides
James T Wood is a teacher, blogger and author. Since 2009 he has published two books and numerous articles, both online and in print. His work experience has spanned the computer world, from sales and support to training and repair. He is also an accomplished public speaker and PowerPoint presenter.
Related Articles
How to troubleshoot a computer that scrolls by itself, usb keyboard causing the system to reboot, what causes keyboard & mouse delays, why is my mac mouse going all over the place, should you turn off your cordless laser mouse when you shut down or hibernate the computer, how to make a powerpoint go back to page one, why does my computer keep chiming, dell trackpad issues, how to uninstall a mouse driver on a computer, most popular.
- 1 How to Troubleshoot a Computer That Scrolls by Itself
- 2 USB Keyboard Causing the System to Reboot
- 3 What Causes Keyboard & Mouse Delays?
- 4 Why Is My Mac Mouse Going All Over the Place?
- PRO Courses Guides New Tech Help Pro Expert Videos About wikiHow Pro Upgrade Sign In
- EDIT Edit this Article
- EXPLORE Tech Help Pro About Us Random Article Quizzes Request a New Article Community Dashboard This Or That Game Happiness Hub Popular Categories Arts and Entertainment Artwork Books Movies Computers and Electronics Computers Phone Skills Technology Hacks Health Men's Health Mental Health Women's Health Relationships Dating Love Relationship Issues Hobbies and Crafts Crafts Drawing Games Education & Communication Communication Skills Personal Development Studying Personal Care and Style Fashion Hair Care Personal Hygiene Youth Personal Care School Stuff Dating All Categories Arts and Entertainment Finance and Business Home and Garden Relationship Quizzes Cars & Other Vehicles Food and Entertaining Personal Care and Style Sports and Fitness Computers and Electronics Health Pets and Animals Travel Education & Communication Hobbies and Crafts Philosophy and Religion Work World Family Life Holidays and Traditions Relationships Youth
- Browse Articles
- Learn Something New
- Quizzes Hot
- Happiness Hub
- This Or That Game
- Train Your Brain
- Explore More
- Support wikiHow
- About wikiHow
- Log in / Sign up
- Computers and Electronics
- Presentation Software
- PowerPoint Presentations
Simple Steps to Make a PowerPoint Presentation
Last Updated: July 23, 2024 Fact Checked
Creating a New PowerPoint
Creating the title slide, adding a new slide, adding content to slides, adding transitions, testing and saving your presentation.
This article was co-authored by wikiHow staff writer, Darlene Antonelli, MA . Darlene Antonelli is a Technology Writer and Editor for wikiHow. Darlene has experience teaching college courses, writing technology-related articles, and working hands-on in the technology field. She earned an MA in Writing from Rowan University in 2012 and wrote her thesis on online communities and the personalities curated in such communities. This article has been fact-checked, ensuring the accuracy of any cited facts and confirming the authority of its sources. This article has been viewed 4,342,031 times. Learn more...
Do you want to have your data in a slide show? If you have Microsoft 365, you can use PowerPoint! PowerPoint is a program that's part of the Microsoft Office suite (which you have to pay for) and is available for both Windows and Mac computers. This wikiHow teaches you how to create your own Microsoft PowerPoint presentation on a computer.
How to Make a PowerPoint Presentation
- Open the PowerPoint app, select a template and theme, then like “Create.”
- Click the text box to add your title and subtitle to create your title slide.
- Click the “Insert” tab, then “New Slide” to add another slide.
- Choose the type of slide you want to add, then add text and pictures.
- Rearrange slides by dragging them up or down in the preview box.
Things You Should Know
- Templates make it easy to create vibrant presentations no matter your skill level.
- When adding photos, you can adjust their sizes by clicking and dragging in or out from their corners.
- You can add animated transitions between slides or to individual elements like bullet points and blocks of text.

- If you don't have a Microsoft Office 365 subscription, you can use the website instead of the desktop app. Go to https://powerpoint.office.com/ to use the website version.
- You can also use the mobile app to make presentations, though it's easier to do this on a computer, which has a larger screen, a mouse, and a keyboard.

- If you don't want to use a template, just click the Blank option in the upper-left side of the page and skip to the next part.

- Skip this step if your selected template has no themes available.

- If you're creating a PowerPoint presentation for which an elaborate title slide has been requested, ignore this step.

- You can change the font and size of text used from the Home tab that's in the orange ribbon at the top of the window.

- You can also just leave this box blank if you like.

- You can also click and drag in or out one of a text box's corners to shrink or enlarge the text box.

- On a Mac, you'll click the Home tab instead. [1] X Research source

- Clicking the white slide-shaped box above this option will result in a new text slide being inserted.

- Title Slide
- Title and Content
- Section Header
- Two Content
- Content with Caption
- Picture with Caption

- Naturally, the title slide should be the first slide in your presentation, meaning that it should be the top slide in the left-hand column.

- Skip this step and the next two steps if your selected slide uses a template that doesn't have text boxes in it.

- Text boxes in PowerPoint will automatically format the bulk of your text for you (e.g., adding bullet points) based on the context of the content itself.
- You can add notes that the Presentation will not include (but you'll still be able to see them on your screen) by clicking Notes at the bottom of the slide.

- You can change the font of the selected text by clicking the current font's name and then clicking your preferred font.
- If you want to change the size of the text, click the numbered drop-down box and then click a larger or smaller number based on whether you want to enlarge or shrink the text.
- You can also change the color, bolding, italicization, underlining, and so on from here.

- Photos in particular can be enlarged or shrunk by clicking and dragging out or in one of their corners.

- Remember to keep slides uncluttered and relatively free of distractions. It's best to keep the amount of text per slide to around 33 words or less. [2] X Research source

- Slide content will animate in the order in which you assign transitions. For example, if you animate a photo on the slide and then animate the title, the photo will appear before the title.
- Make your slideshow progress automatically by setting the speed of every transition to align with your speech as well as setting each slide to Advance . [3] X Trustworthy Source Microsoft Support Technical support and product information from Microsoft. Go to source

- If you need to exit the presentation, press Esc .

- Windows - Click File , click Save , double-click This PC , select a save location, enter a name for your presentation, and click Save .
- Mac - Click File , click Save As... , enter the presentation's name in the "Save As" field, select a save location by clicking the "Where" box and clicking a folder, and click Save .
Community Q&A
- If you save your PowerPoint presentation in .pps format instead of the default .ppt format, double-clicking your PowerPoint presentation file will prompt the presentation to open directly into the slideshow view. Thanks Helpful 6 Not Helpful 0
- If you don't have Microsoft Office, you can still use Apple's Keynote program or Google Slides to create a PowerPoint presentation. Thanks Helpful 0 Not Helpful 0
- Your PowerPoint presentation (or some features in it) may not open in significantly older versions of PowerPoint. Thanks Helpful 1 Not Helpful 2
- Great PowerPoint presentations avoid placing too much text on one slide. Thanks Helpful 0 Not Helpful 0
You Might Also Like

- ↑ https://onedrive.live.com/view.aspx?resid=DBDCE00C929AA5D8!252&ithint=file%2cpptx&app=PowerPoint&authkey=!AH4O9NxcbehqzIg
- ↑ https://www.virtualsalt.com/powerpoint.htm
- ↑ https://support.microsoft.com/en-us/office/set-the-timing-and-speed-of-a-transition-c3c3c66f-4cca-4821-b8b9-7de0f3f6ead1#:~:text=To%20make%20the%20slide%20advance,effect%20on%20the%20slide%20finishes .
About This Article

- Send fan mail to authors
Reader Success Stories
Artis Holland
Sep 22, 2016
Is this article up to date?

Oct 18, 2016
Jul 23, 2016
Margery Niyi
Sep 25, 2017
Jul 21, 2016

Featured Articles

Trending Articles

Watch Articles

- Terms of Use
- Privacy Policy
- Do Not Sell or Share My Info
- Not Selling Info
wikiHow Tech Help:
Tech troubles got you down? We've got the tips you need

Use keyboard shortcuts to deliver PowerPoint presentations
Many users find that using an external keyboard with keyboard shortcuts for PowerPoint helps them work more efficiently. For users with mobility or vision disabilities, keyboard shortcuts can be easier than using the touchscreen and are an essential alternative to using a mouse.
For a separate list of shortcuts to use while creating your presentation, go to Use keyboard shortcuts to create PowerPoint presentations .
The shortcuts in this topic refer to the US keyboard layout. Keys for other layouts might not correspond exactly to the keys on a US keyboard.
A plus sign (+) in a shortcut means that you need to press multiple keys at the same time.
A comma sign (,) in a shortcut means that you need to press multiple keys in order.
This article describes the keyboard shortcuts and some other common shortcut keys that apply while you're delivering your presentation with PowerPoint for Windows.
To quickly find a shortcut in this article, you can use Search. Press Ctrl+F, and then type your search words.
If an action that you use often does not have a shortcut key, you can record a macro. For step-by-step instructions to record a macro, refer to the section “Record a macro” in Automate tasks with the Macro Recorder to create one.
During the presentation, to open a list of shortcuts, press F1. Use the arrow keys to move between the tabs in the Slide Show Help dialog box.
Get the PowerPoint 2016 keyboard shortcuts in a Word document at this link: PowerPoint 2016 for Windows keyboard shortcuts .
In this topic
Frequently used shortcuts, control the slide show, control media in the slide show, pointer and annotations in the slide show, rehearse the presentation, maneuver in presenter view.
This table lists the most frequently used shortcuts in PowerPoint for Windows.
| To do this | Press |
|---|---|
| Start a presentation from the beginning. | F5 |
| Start a presentation from the current slide. | Shift+F5 |
| Start the presentation in . | Alt+F5 |
| Perform the next animation or advance to the next slide. | N Enter Page down Right arrow key Down arrow key Spacebar |
| Perform the previous animation or return to the previous slide. | P Page up Left arrow key Up arrow key Backspace |
| Hide the pointer and navigation buttons. | Ctrl+H |
| Display a blank black slide, or return to the presentation from a blank black slide. | B Period (.) |
| Display a blank white slide, or return to the presentation from a blank white slide. | W Comma (,) |
| End the presentation. | Esc |
Top of Page
You can use the following keyboard shortcuts while you’re delivering your presentation in Slide Show (full-screen) mode, with or without Presenter View .
| To do this | Press |
|---|---|
| Go to a specific slide. | Type the slide number, then press Enter |
| Go to the next slide, if the next slide is hidden. | H (not available in ) |
| View the dialog box. | Ctrl+S |
| Return to the first slide. | Home Press and hold the Right and Left mouse buttons for two seconds |
| Go to the last slide. | End |
| View the computer taskbar. | Ctrl+T |
| Display the context menu. | Shift+F10 or the Windows Menu key |
| Display the shortcuts menu. | F1 |
| Go to the next hotspot on the current slide. (Hotspots include hyperlinks, animation triggers, audio objects, and video objects.) | Tab key |
| Go to the previous hyperlink on the current slide. | Shift+Tab |
| Open the selected hyperlink. | Enter while a hyperlink is selected |
Control media in the slide show
These keyboard shortcuts work with video files imported from your computer or other device. They don't work with online video files.
| To do this | Press |
|---|---|
| Change the camera source for cameo (PowerPoint for Microsoft 365 only) | Alt+X |
| Play or pause media. | Alt+P Ctrl+Spacebar |
| Stop media playback. | Alt+Q |
| Go to the next bookmark. | Alt+End |
| Go to the previous bookmark. | Alt+Home |
| Increase the sound volume. | Alt+Up |
| Decrease the sound volume. | Alt+Down |
| Mute the sound. | Alt+U |
| Move forward three seconds. | Alt+Shift+Page down |
| Move backward three seconds. | Alt+Shift+Page up |
| Move forward 0.25 seconds, then pause. | Alt+Shift+Right arrow key |
| Move backward 0.25 seconds, then pause. | Alt+Shift+Left arrow key |
| Show or hide the audio and subtitles menu. (For videos that have multiple audio tracks and/or subtitle tracks in supported formats.) | Alt+J |
Use the following keyboard shortcuts to control the pointer and to use it to create annotations during your presentation.
| To do this | Press |
|---|---|
| Start the laser pointer. | Ctrl+L |
| Change the pointer to a pen. | Ctrl+P |
| Change the pointer to an arrow. | Ctrl+A |
| Change the pen pointer to an eraser. | Ctrl+E |
| Hide the arrow pointer. | Ctrl+H |
| Show or hide ink markup. | Ctrl+M |
| Erase on-screen annotations. | E |
You can use these keyboard shortcuts when you are rehearsing your presentation.
| To do this | Press |
|---|---|
| Set new timings while rehearsing. | T |
| Use original timings while rehearsing. | O |
| Use mouse click to advance while rehearsing. | M |
| Re-record slide narration and timing. | R |
You can use the following keyboard shortcuts while you’re delivering your presentation using Presenter View in newer versions of PowerPoint. Presenter View lets you look at your presentation with your speaker notes on one screen (your laptop, for example), while the audience views the notes-free presentation on a different screen.
When you are connected to a second display, Presenter View is shown automatically when you start the slide show. To start a presentation in Presenter View even if you have only a single display, press Alt+F5.
Tip: If Presenter View does not start automatically with two displays, go the Slide Show tab, select the Use Presenter View checkbox, and select the preferred monitor.
| To do this | Press |
|---|---|
| Cycle between regions. (Buttons above the slide, buttons on the upper-right corner, and the pane) | F6 |
| Cycle through tools within a region. | Tab key |
| Scroll down one line in the pane. | Ctrl+Down arrow key |
| Scroll up one line in the pane. | Ctrl+Up arrow key |
| Scroll down one screenful in the pane. | Ctrl+Page down |
| Scroll up one screenful in the pane. | Ctrl+Page up |
| Read the next line in the pane. | Alt+A |
| Read the previous line in the pane. | Alt+Z |
| Read the elapsed time. (The timer starts running as soon as you start .) | Alt+W |
| Read the next step (for example, the next slide, next animation, or end of slide show). | Alt+Q |
| Close . | Esc |
PowerPoint help & learning
Screen reader support for PowerPoint
Use keyboard shortcuts to create PowerPoint presentations
Basic tasks to create a presentation in PowerPoint with a screen reader
Use a screen reader to explore and navigate PowerPoint
This article describes the keyboard shortcuts and some other common shortcut keys that apply while you're delivering your presentation with PowerPoint for macOS.
The settings in some versions of the Mac operating system (OS) and some utility applications might conflict with keyboard shortcuts in Microsoft 365 for Mac. For information about changing the key assignment for a keyboard shortcut, refer to Mac Help for your version of macOS or your utility application.
If you don't find a keyboard shortcut here that meets your needs, you can create a custom keyboard shortcut. For instructions, go to Create a custom keyboard shortcut for Office for Mac .
Many of the shortcuts that use the Ctrl key on a Windows keyboard also work with the Control key in PowerPoint for macOS. However, not all do.
To quickly find a shortcut in this article, you can use the Search. Press Command+F, and then type your search words.
During the presentation, to open a list of shortcuts, press forward slash (/).
Pointer and annotations in the slide show
Navigate the presenter view on macos 10.15 (catalina) and later.
This table lists the most frequently used shortcuts in PowerPoint for macOS.
| To do this | Press |
|---|---|
| Start a presentation from the beginning. | ⌘+Shift+Return |
| Start a presentation from the current slide. | ⌘+Return |
| Start the presentation in . | Option+Return |
| Perform the next animation or advance to the next slide. | N Page down Right arrow key Down arrow key Spacebar |
| Perform the previous animation or return to the previous slide. | P Page up Left arrow key Up arrow key Delete |
| Hide the pointer. | ⌘+I |
| Display a blank black slide, or return to the presentation from a blank black slide. | B Shift+B Period (.) |
| Display a blank white slide, or return to the presentation from a blank white slide. | W Shift+W Comma (,) |
| End the presentation. | Esc Hyphen (-) ⌘+Period (.) |
You can use the following keyboard shortcuts while you’re delivering your presentation in Slide Show (full-screen) mode, with or without the Presenter View .
| To do this | Press |
|---|---|
| Go to a specific slide. | Type the slide number, then press Return |
| Go to the next slide, if the next slide is hidden. | H |
| Return to the first slide. | Function+Left arrow key |
| Go to the last slide. | Function+Right arrow key |
| Display the shortcut menu. | Control+Mouse click |
| Go to the next hotspot on the current slide. (Hotspots include hyperlinks, animation triggers, audio objects, and video objects.) | Tab key |
| Go to the previous hyperlink on the current slide. | Shift+Tab |
| Open the selected hyperlink. | Return while a hyperlink is selected |
Use the following keyboard shortcuts to control media during a presentation.
| To do this | Press |
|---|---|
| Change the camera source for cameo (PowerPoint for Microsoft 365 for Mac only) | Option+X |
| To do this | Press |
|---|---|
| Start the laser pointer. | ⌘+L |
| Change the pointer to a pen. | ⌘+P |
| Change the pointer to an arrow. | ⌘+A |
| Hide the pointer. | ⌘+I |
| Hide the pointer on mouse move. | Control+H |
| Show the pointer on mouse move. | ⌘+U |
| Erase on-screen annotations. | Shift+E |
You can use the following keyboard shortcuts while you’re delivering your presentation using the Presenter View on macOS 10.15 (Catalina) and later, and when the keyboard control navigation is turned on. For instructions, refer to Turn on the keyboard control navigation .
Use the shortcuts in the table below to move in the Presenter View in PowerPoint for macOS.
| To do this | Press |
|---|---|
| Start the presentation in the . | Option+Return |
| Move the focus to the next control. | Tab key |
| Move the focus to the previous control. | Shift+Tab |
| Activate the control in focus. | Spacebar |
| In the , move the focus to the next control (pressing the Tab key inserts a tab character). | Control+Tab |
Skip ahead in your presentation
You can use your keyboard to skip ahead several slides without the audience seeing the slides as you transition to the new slide.
Press the Tab key until you reach the Slide Navigator control (filmstrip).
Press and hold down the Option key and press the Left or Right arrow key repeatedly until you find the slide you want to skip to.
Release the Option key to move to the slide you want to skip to.
Turn on the keyboard control navigation
To use your keyboard to move between and activate controls on your Mac, turn on the keyboard control navigation.
If you're not using VoiceOver, on your computer, select System Preferences > Keyboard > Shortcuts , and select the Use keyboard navigation to move focus between controls checkbox.
If you're using VoiceOver, the control navigation should be on by default. To check the setting, do the following:
On your computer, press Control+Option+M to access the Apple menu bar item. To open the Apple menu, press Control+Option+Spacebar.
Press Control+Option+Down arrow key until you hear "System preferences ellipses," and then press Control+Option+Spacebar.
The System Preferences window opens. The focus is in the Search text box.
Type Keyboard , and then press Return. The Keyboard dialog box opens.
Press Control+Option+Right arrow key until you hear "Shortcuts tab," and then press Control+Option+Spacebar.
Press Control+Option+Right arrow key until you hear: "Use keyboard navigation to move focus between controls." VoiceOver also announces if the option is selected or unselected. To toggle the option on or off, press Control+Option+Spacebar.
To close the Keyboard dialog box, press Command+W.
This article describes the keyboard shortcuts that apply while you're delivering your presentation with PowerPoint for the web.
If you use Narrator with the Windows 10 Fall Creators Update, you have to turn off scan mode in order to edit documents, spreadsheets, or presentations with Microsoft 365 for the web. For more information, refer to Turn off virtual or browse mode in screen readers in Windows 10 Fall Creators Update .
When you use PowerPoint for the web, we recommend that you use Microsoft Edge as your web browser. Because PowerPoint for the web runs in your web browser, the keyboard shortcuts are different from those in the desktop program. For example, you’ll use Ctrl+F6 instead of F6 for jumping in and out of the commands. Also, common shortcuts like F1 (Help) and Ctrl+O (Open) apply to the web browser – not PowerPoint for the web.
This table lists the keyboard shortcuts you can use to control the slide show.
| To do this | Windows | Mac |
|---|---|---|
| Start a presentation from the beginning. | Ctrl+F5 | ⌘+Shift+Return |
| Start a presentation from the current slide. | Shift+Ctrl+F5 | ⌘+Shift+F5 |
| Perform the next animation or advance to the next slide. | N Enter Page down Right arrow key Down arrow key Spacebar | N Return Page down Right arrow key Down arrow key Spacebar |
| Perform the previous animation or return to the previous slide. | P Page up Left arrow key Up arrow key Backspace | P Page up Left arrow key Up arrow key Delete |
| End the presentation. | Esc | Esc |
Technical support for customers with disabilities
Microsoft wants to provide the best possible experience for all our customers. If you have a disability or questions related to accessibility, please contact the Microsoft Disability Answer Desk for technical assistance. The Disability Answer Desk support team is trained in using many popular assistive technologies and can offer assistance in English, Spanish, French, and American Sign Language. Please go to the Microsoft Disability Answer Desk site to find out the contact details for your region.
If you are a government, commercial, or enterprise user, please contact the enterprise Disability Answer Desk .

Need more help?
Want more options.
Explore subscription benefits, browse training courses, learn how to secure your device, and more.

Microsoft 365 subscription benefits

Microsoft 365 training

Microsoft security

Accessibility center
Communities help you ask and answer questions, give feedback, and hear from experts with rich knowledge.

Ask the Microsoft Community

Microsoft Tech Community

Windows Insiders
Microsoft 365 Insiders
Find solutions to common problems or get help from a support agent.

Online support
Was this information helpful?
Thank you for your feedback.
How to Apply Translate Feature in PowerPoint
In today’s interconnected world, the ability to communicate effectively across languages is more important than ever. Whether you’re presenting at an international conference, collaborating with global teams, or creating multilingual content for your audience, PowerPoint’s translation feature is a powerful tool that can bridge language gaps effortlessly.
Imagine you’re presenting a groundbreaking idea to a large audience and want to ensure everyone understands your message without language barriers. Or maybe you’re preparing a presentation to share with partners worldwide. In both cases, translating your slides can make your content more accessible.
This article will walk you through the step-by-step process of applying the translation feature in PowerPoint, helping you to break down language barriers and enhance the impact of your presentations. Let’s see how to apply this secret feature.
Step 1: Open Your Slide
Start by opening the PowerPoint presentation and navigating to the specific slide that contains the text you want to translate. Ensure that the text you wish to translate is visible and selected.

Step 2: Head Over to the Review Tab
Go to the “Review” tab on the ribbon at the top of your PowerPoint window. This tab contains various tools related to reviewing and editing your presentation.

Step 3: Select Translate
In the “Review” tab, find and click on the “Translate” button located in the Language section. This will open the translation options.

Step 4: Click on the Text Box You Want to Translate
Click on the text box or text area that you wish to translate. This action will highlight the text and make it ready for translation.

Step 5: Look Over to the Right Side of Your Screen
After selecting the text, look to the right side of your screen where the translation pane will appear. This pane will display translation options and a text box for your selected content.

Step 6: The Translator Window Will Appear
In the translation pane, you will see various language options. Choose the language you want to translate your text into by selecting from the dropdown menu.

Step 7: Click on Insert to Apply the Translation
After selecting your preferred language, click on “Insert.” This will automatically replace the original text with the translated text in the selected language.

Final Thoughts
PowerPoint’s translation feature is like having a personal translator for your slides. It helps you reach a global audience by turning your text into different languages with just a few clicks. Whether you’re presenting to an international crowd or sharing with friends around the world, this tool makes sure everyone understands your message.
So why not give it a shot? It’s an easy way to make your presentations more inclusive and keep everyone in the loop—no language barriers, no problem!
At SlideBazaar, we help you create engaging and memorable presentations. Choose from our collection of professional templates or opt for our custom design services for a personalized touch. Your presentations deserve to be elevated to new heights, and we’re here to help you achieve just that!
BROWSE BY CATEGORY
- PowerPoint Templates
- Keynote Presentations
- Infographic
- Free slides
QUICK LINKS
- Frequently Asked Questions
- Terms & Conditions
- Privacy Policy
- DMCA Policy
EMAIL NEWSLETTER
Get updates of our PowerPoint templates and slide designs before anyone else.
A step-by-step guide to captivating PowerPoint presentation design
november 20, 2023
by Corporate PowerPoint Girl
Do you often find yourself stuck with a lackluster PowerPoint presentation, desperately seeking ways to make it more engaging and visually appealing? If your boss has ever told you to "please fix" a presentation and you didn't know where to start, you're not alone. In this article, we'll walk you through a straightforward method to transform your PowerPoint slides into a visually captivating masterpiece.
Let's dive right in!
Clean up your slides
The first step in this journey to presentation excellence is all about decluttering your slides and elevating their impact. Say goodbye to those uninspiring bullet points that often dominate presentations. Instead, focus on what truly matters – the key call-out numbers. By increasing the font size of these numbers, you ensure they take center stage, immediately drawing your audience's attention.
To make those numbers pop, consider breaking the text after the numbers into the next line and adding a touch of color. The contrast created by pairing a dark color with a lighter shade, like dark teal and light teal or burnt orange with peach, can work wonders. This simple adjustment makes your data more engaging , enhancing the overall impact of your presentation.
Add dimension with boxes
Now, let's introduce an element of depth and organization to your slides. By adding boxes, you'll create a visually pleasing structure that guides your audience through the content. In the "Insert" menu, select "Table" and opt for a one-by-one table. Change the table color to a light gray shade, elongate it, and position it neatly to the left of your text.
To improve readability and aesthetics, increase the spacing between text phrases. A small adjustment in the before spacing setting (setting it to 48) significantly enhances the visual appeal of your slides.
Insert circles
To further enhance the visual appeal and engagement of your slides, let's introduce circles. In the Insert menu, navigate to Shapes and choose the circle. Adjust the circle's height and width to 1.2, ensuring it complements your content seamlessly. Match the circle's shape fill color with the corresponding text color for a harmonious look.
Avoid using colored outlines for the circles, as they may distract from the overall aesthetic. This simple addition of circles adds an element of visual interest to your presentation, making it more captivating.
Choose icons
Now, it's time for a touch of creativity. Selecting icons to complement your text can elevate the clarity and appeal of your slides. In the "Insert" menu, you can search for relevant keywords to find the perfect icon from PowerPoint's extensive library .
For instance, if your text discusses investment portfolio yield, search for "growth" and choose an upward arrow growth icon. These icons add an extra layer of visual appeal and clarity to your content, making it more engaging and informative.
Final touches
To wrap up the transformation process, we come to the final touches that give your presentation a polished, professional finish. Align your icons with their corresponding circles and change the shape fill color to white. This simple adjustment creates a crisp, cohesive look that ties everything together seamlessly.
In conclusion, by following these steps, you've embarked on a journey to enhance your PowerPoint presentation . These initial steps are just the beginning of your exploration into the world of design elements and styles that can cater to your specific presentation needs. The key to a stunning PowerPoint presentation lies in the details. By following these steps, you can turn a lackluster set of slides into a visually engaging and dynamic presentation that will captivate your audience. So, the next time your boss says, "Please fix," you'll know exactly where to start. Happy presenting!
Related topics
- Vote: Reader’s Choice
- Meta Quest 4
- Google Pixel 9
- Google Pixel 8a
- Apple Vision Pro 2
- Nintendo Switch 2
- Samsung Galaxy Ring
- Yellowstone Season 6
- Recall an Email in Outlook
- Stranger Things Season 5
How to delete a slide in PowerPoint

If you are using Microsoft PowerPoint , there may be a slide that you need to delete. Maybe you find that a slide is unnecessary or have a slide you used to test different layouts that you can now remove.
Delete a slide in PowerPoint
Delete multiple slides in powerpoint, delete a slide in the powerpoint mobile app.
We’ll show you how to delete a slide in PowerPoint in the web, desktop, and mobile applications.
What You Need
Microsoft PowerPoint
PowerPoint mobile app (optional)
Internet access (optional)
You might want to delete a slide before printing your PowerPoint presentation with notes . Luckily, it’s easy to remove a slide in PowerPoint. Plus, you can delete an individual slide the same way in PowerPoint on the web as well as the desktop application on Windows and Mac.
Step 1: Be sure you’re using Normal, Outline View, or Slide Sorter view. Head to the View tab to choose one of these if necessary.
Step 2: In Normal or Outline View, display the thumbnails on the left by dragging to expand that area.
Step 3: Either right-click the slide you want to remove and choose Delete Slide or select the slide and press your Delete key (or Backspace key on Windows.)
Step 4: Note that you won’t be asked to confirm. If you delete the wrong slide, quickly select Undo in the Quick Access Toolbar to replace the removed slide.
Maybe you have more than one slide that you want to delete in your presentation. This is just as easy as removing a single slide in PowerPoint on the web or in the desktop application.
Step 1: Use Normal, Outline View, or Slide Sorter view.
Step 2: Select the slides using one of the following methods:
- For adjacent slides, select the first slide, hold the Shift key, and select the last slide in the group.
- For nonadjacent slides, select the first slide, hold the Ctrl or Command key, and select each additional slide.
Step 3: Either right-click and choose Delete Slide or press your Delete key.
Again, if you make an error in the slide selection, select Undo in the Quick Access Toolbar to replace the deleted slides.
Using PowerPoint on your mobile device is convenient for creating and editing slideshows on the go. Fortunately, you can delete individual slides in the PowerPoint app on Android or iPhone pretty easily.
Step 1: With the presentation open, be sure you’re in edit mode. Select Edit at the bottom if necessary.
Step 2: In the slide thumbnail row at the bottom or on the left, select the slide you want to remove.
Step 3: Select Delete in the pop-up toolbar.
Step 4: Continue this process if you want to remove additional slides.
If you accidentally delete the wrong slide, select Undo at the top to replace it.
What is the difference between hide slides and delete slides?
When you hide a slide in PowerPoint, this stops it from appearing while you’re presenting the slideshow. The hidden slide stays in your presentation during the editing process. The same is true when you hide a slide in Google Slides .
But when you delete a slide in PowerPoint, this removes the slide completely. You won’t see it while you’re presenting or editing the slideshow.
How do I delete a PowerPoint presentation?
Navigate to the location of the PowerPoint file whether in a folder or in OneDrive. Right-click the file, choose Delete , and confirm if prompted.
How do you delete a slide on Google Slides?
If you're planning to use Google Slides , it can be useful to know how to remove slides in that software. To remove a slide on Google Slides, start by choosing either Show filmstrip or Grid view in the View menu. Then, right-click the slide you want to remove and choose Delete or select the slide and then select the Delete key.
Editors’ Recommendations
- How to convert a PowerPoint to Google Slides
- How to use Microsoft PowerPoint
- How to delete a page in Word (including a blank page)
- Best Microsoft Office deals: Get Word, PowerPoint, and Excel for free
- Microsoft Copilot: how to use this powerful AI assistant
- How-To Guides

Microsoft Teams is a terrific workplace platform for keeping the camaraderie strong. Featuring collaborative messaging, video conferencing, and file-sharing tools, it’s your one-stop-shop for in-office, hybrid and at-home workers alike. But anyone with a long history of using Teams will tell you how clogged up your message stockpile can get. Fortunately, deleting and hiding these exchanges is relatively easy to do, and we’ve put together this guide to help.
Google Chrome is a user-friendly web browser that is packed with useful features and intuitive controls. It’s also the default browser for pretty much any Chrome-branded product you purchase. Even if you prefer Safari or Firefox, we bet Chrome has one or two things you would dig. But what if you've added Google Chrome to your Windows or macOS machine, and you’ve decided you don’t like the dang thing?
PowerPoint makes it easy to give a great presentation thanks to intuitive software that lets anyone craft an eye-catching deck. What's even better, however, is the option to use Presenter View. This lets you leave notes for yourself that can be viewed on your computer screen while everyone else is only seeing your presentation.
IMAGES
VIDEO
COMMENTS
In this video, you'll learn how to jump to a specific slide in PowerPoint. Blog: https://www.techielass.comTwitter: https://www.twitter.com/TechieLassEquipme...
Press the Left arrow key. Mouse: Right-click a slide, and then click Previous on the shortcut menu. Note: If you have a custom animation effect on your slide, clicking the slide starts the animation effect, rather than moving to the next slide. Use Go to a specific slide below to move to a specific slide and avoid triggering the animation effect.
To go to a specific slide number, press a number + Enter. For example, if you wanted to see slide 4, just press 4, then Enter. (This shortcut is best for shorter presentations when it's easier to memorize the number of each slide). Press Ctrl + S to display the title of every slide in your presentation. Click on your choice and select Go to .
You can make your custom slide show be shown as the default. On the "Slide Show" tab, click on "Set Up Slide Show"; under "Show Slides", click on "Custom Show" and select the custom show that you want. Now, if you click one of the "Start Slide Show" buttons or press F5, PowerPoint will display your selected show. Share.
2. Right-click with your mouse anywhere within your active presentation. A menu appears on your screen. 3. Click "Go to Slide" from the pop-up menu and then click on the name of the slide you ...
1. Open up a PowerPoint presentation. Since you want to hide a slide, it is assumed that you already have a PowerPoint presentation created. Find the file on your computer and open it. 2. Select the correct slide. On the left side of your screen, you should see a list of all the slides in your presentation.
Right-click the current slide and select See All Slides. The screen switches to a thumbnail list of all the slides in the presentation. Select the hidden slide you want to show. The selected slide is shown full-screen and the slide show resumes. If you are using presenter view, your audience won't see the steps you take to select the slide.
Sometimes while presenting our PowerPoint Presentation, we need to move from one Slide to the Next, move to a Previous Slide, or even move to a specific Slid...
Open your PowerPoint presentation and navigate to Normal view. Select the slide you want to hide in the left side Thumbnails pane. Right click the slide and choose Hide Slide from the menu. The slide number will now show a strikethrough line, indicating it is hidden. You can hide multiple slides at once by Ctrl+Click selecting them first before ...
Discover how to jump around between your slides in PowerPoint using your keyboard shortcuts (and navigate your slide shows).🚀 UNLOCK the critical PowerPoint...
Create a Section. To create a section, select the View tab and choose "Slide Sorter" at the top. Then, right-click the first slide you want in the section and choose "Add Section" from the shortcut menu. When the section appears, replace "Untitled Section" with the name you want, and press Enter or Return.
In the context menu, choose "Hide Slide." The slide will now be hidden while in Presenter View. You can tell that a slide is hidden if the thumbnail is a lighter color than the other slides. If you want to unhide the slide, simply right-click the slide and click "Hide Slide" again. The slide will now appear during the presentation again.
One of the possible reasons why your PowerPoint presentation skips is because some slides are hidden. To resolve your concern, follow the steps below: Open your PowerPoint file with the skipping slides. Click on the View tab and select Slide Sorter. Look at the thumbnails of the slides in your presentation. If any of the slide numbers have a ...
Make Bullet Points Count. Limit the Use of Transitions. Skip Text Where Possible. Think in Color. Take a Look From the Top Down. Bonus: Start With Templates. Slideshows are an intuitive way to share complex ideas with an audience, although they're dull and frustrating when poorly executed.
Add a section. Right-click between slides and select Add Section. An Untitled Section is added in the thumbnail pane, and the Rename Section dialog box opens. Type a name in the Section name box. Select Rename. To collapse a section, click the triangle next to the section name. The numeral by the section name shows the number of slides in that ...
13. During a presentation, you can type the a slide number and press Enter to go directly to the specific slide. This may be the easiest way to skip the remaining animations on the current slide. Here are useful Keyboard shortcuts for use while delivering a presentation in PowerPoint 2013. Share.
To do that, simply go up to the Home tab and click on New Slide. This inserts a new slide in your presentation right after the one you were on. You can alternatively hit Ctrl+M on your keyboard to insert a new blank slide in PowerPoint. To learn more about this shortcut, see my guide on using Ctrl+M in PowerPoint.
Select the slide in question. In this case, we'll use slide 2. Click Insert and then click Header & Footer in the Text group. In the resulting dialog, uncheck the Slide Number option. Click ...
2. Press the left mouse button to advance the first slide. Note if there is any skipping. Press the space bar on your keyboard to advance the next slide. Look for skipping. Press the right arrow ...
Open the PowerPoint app, select a template and theme, then like "Create.". Click the text box to add your title and subtitle to create your title slide. Click the "Insert" tab, then "New Slide" to add another slide. Choose the type of slide you want to add, then add text and pictures. Rearrange slides by dragging them up or down in ...
Start a presentation from the current slide. Shift+F5. Start the presentation in Presenter View. Alt+F5. Perform the next animation or advance to the next slide. N. Enter. Page down. Right arrow key. Down arrow key. Spacebar. Perform the previous animation or return to the previous slide. P. Page up. Left arrow key. Up arrow key. Backspace
Step 1: Open Your Slide. Start by opening the PowerPoint presentation and navigating to the specific slide that contains the text you want to translate. Ensure that the text you wish to translate is visible and selected. Step 2: Head Over to the Review Tab. Go to the "Review" tab on the ribbon at the top of your PowerPoint window.
Decide on Your Close. The first step is to decide what type of close and call to action you'll use for your presentation. For the purposes of this tutorial, I'll use a persuasive close with numbers that back up the ideas presented in the presentation. Slide #13 from the Yukee template fits perfectly for this occasion.
In the "Insert" menu, select "Table" and opt for a one-by-one table. Change the table color to a light gray shade, elongate it, and position it neatly to the left of your text. To improve readability and aesthetics, increase the spacing between text phrases. A small adjustment in the before spacing setting (setting it to 48) significantly ...
For adjacent slides, select the first slide, hold the Shift key, and select the last slide in the group. For nonadjacent slides, select the first slide, hold the Ctrl or Command key, and select ...